
INTRODUCTION
Overview
Internet of Things ecosystems consists of many components and require different expertise to provide a good and valuable solution. One of the main components is the middleware which glues together the hardware and the application. It should have many tools that allows developers to manage and deploy devices and data efficiently. However, if one has to develop it from scratch, it will be a long winding and time consuming.
FAVORIOT PLATFORM is a middleware platform specifically designed for any Internet of Things (IoT) and Machine to Machine (M2M) solutions. The platform is developed to support the integration of data from various sensors, actuators and other sources of data. Collecting and storing data from IOT devices become much easier. Moreover, the platform also helps developers to build vertical applications. Develops does not need to worry about hosting and storing the data generated by their IoT devices.
FAVORIOT PLATFORM enables the devices to aggregates data using its REST API and other protocol available. The external application can also pull the data from Favoriot Platform using REST API.
Architecture of FAVORIOT PLATFORM
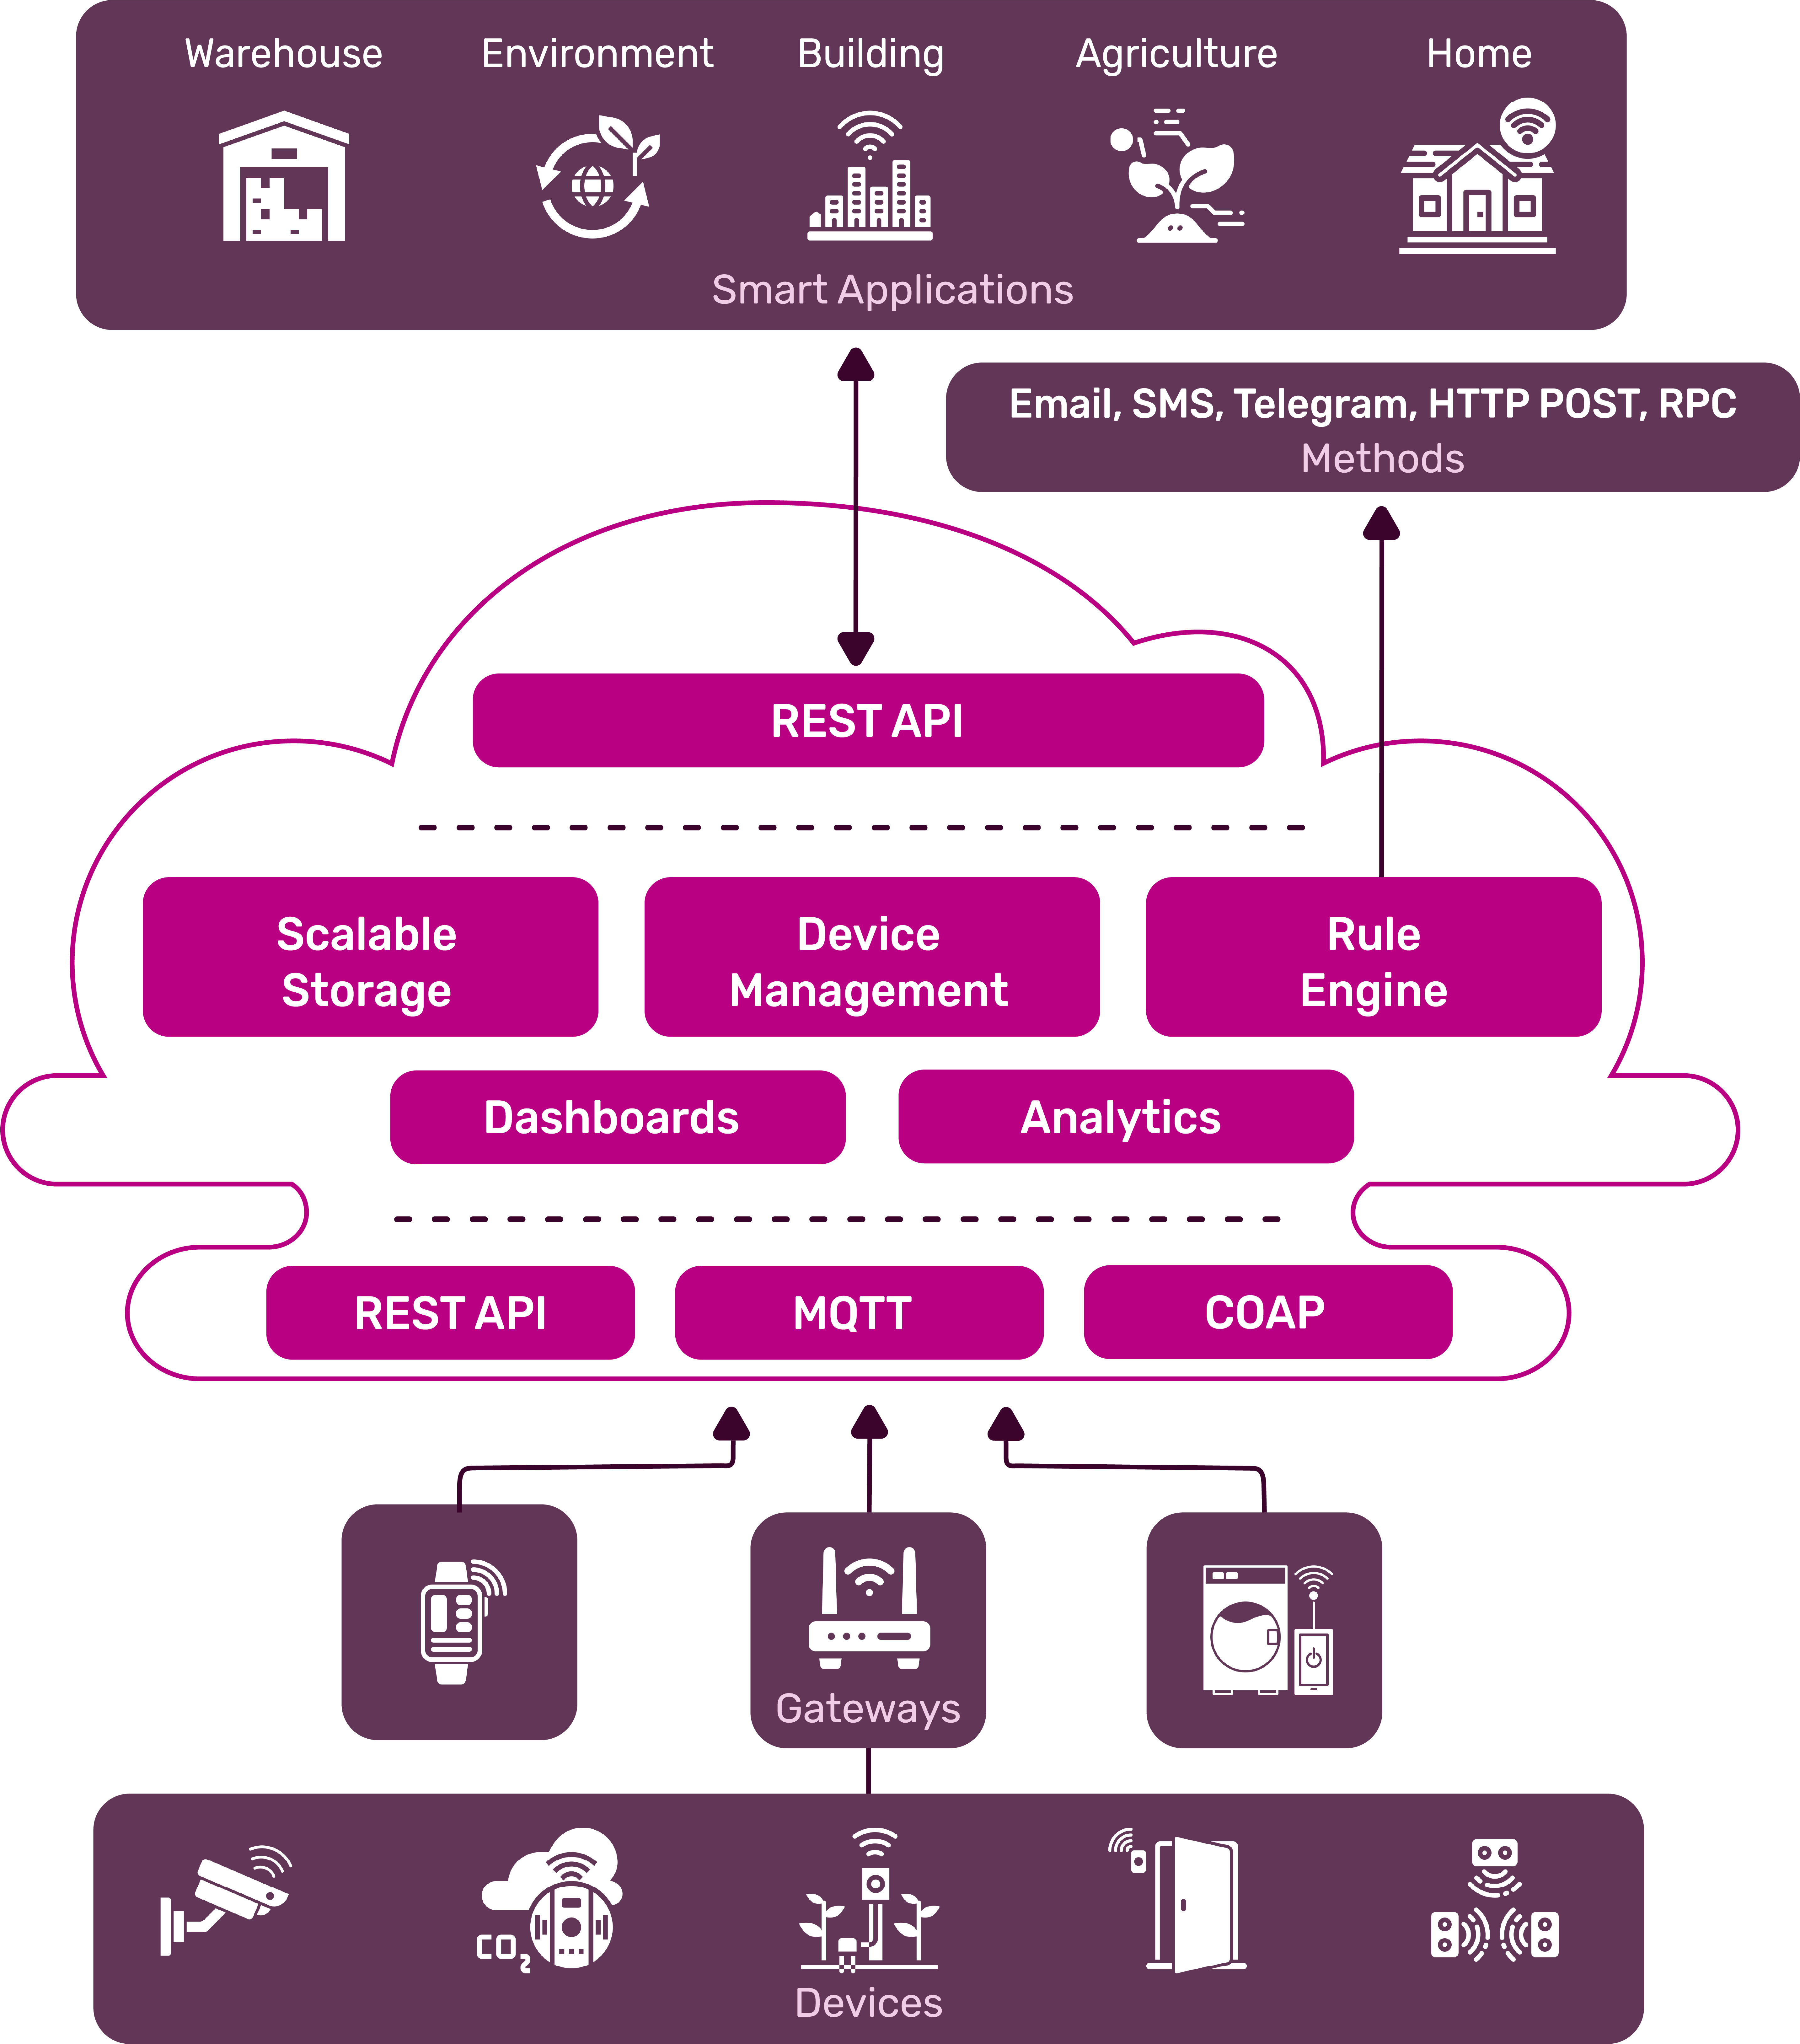
Figure 1: Components in FAVORIOT PLATFORM
As shown in Figure 1 above, the FAVORIOT Platform consists of several components:
- Device Connectivity - Supports different protocols such RESTAPI, Websocket, MQTT, and COAP.
- Device Management - To ensures the connected "things" are working properly. We create the abstraction of the physical devices in IOT realms within the IOT middleware
- Scalable Storage - Scalable storage of device data brings the requirements for hybrid cloud-based databases to a new level in terms of data volume, variety, velocity and veracity
- Rule Engine - Combining business logic with notification engine enable execution of "smart" actions based on specific sensor data.
- Dashboard - Enables users to see patterns and observe trends from visualization dashboards where data is vividly portrayed through various type of widgets such charts
- Analytic - Enables users to analyze data collected and gain more insight to do better decision in business operations.
- Application Programming Interface (API) - APIs that act as interfaces for third party systems.
- Security - All interaction with the IOT Middleware are secured via HTTP/TLS protocol.
How Does it Work?
Connect Your IOT Device
- Connect any type of device (Arduino,Raspberry Pi,ESP32 etc)
- And start your Internet of Things project with FAVORIOT PLATFORM
Collecting Data
- Use our Transport protocol such HTTP(S), WebSocket, MQTT and COAP to push JSON data generated by your device
- Secure: API Keys and HTTPS Connection
- We store your data in our Scalable BigData Storage
Manage Devices and Data
- Interact with your devices and data from FAVORIOT middleware
- Define your business logic through our RULE-BASED Engine
- Define Notification Action upon defining business logic
Build your Application
- Retrieve your data within FAVORIOT Platform using RESTAPI.
- Build your own Application using data stored in FAVORIOT (Visualization, Dashboarding, etc.)
- Focus on your apps and let us carry the systems, security and communications
- Reduce development time
- Let us take care of IT infrastructure cost, problems and scalability for your IOT Project
Favoriot Platform Hierarchy
In the FAVORIOT ecosystem, the Device is the central entity. It represents a physical IoT device in the IoT middleware, enabling seamless integration between the physical world and digital systems. The data produced by these devices can be aggregated, analyzed, and acted upon efficiently.
The FAVORIOT platform is built around a hierarchical structure, which allows easy and efficient handling of IoT deployments at different levels.
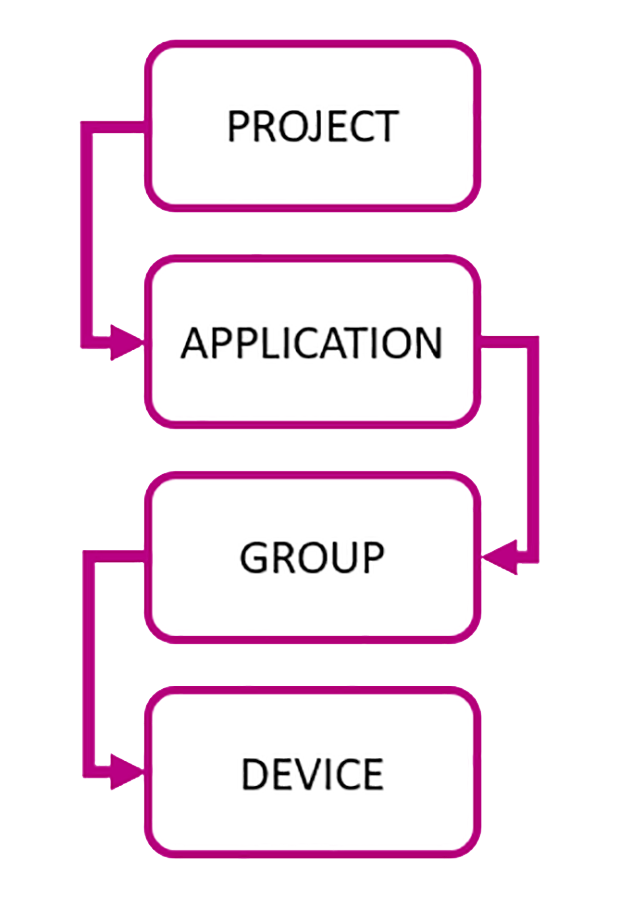
Figure 2: FAVORIOT PLATFORM Hierarchy
Hierarchy Overview
- Entities such as Project, Application, and Group are used to organize and link Devices.
- Data is associated with streams of information produced by these devices.
- Rules can be defined to trigger automated actions based on incoming device data.
Setup Hierarchy Video Tutorial
Project Hierarchy
A project acts as a container for your IoT applications, device groups, and devices.
The video covers:
- Navigating to the Projects section in the dashboard.
- Clicking Create Project.
- Filling in basic details such as Project Name and Description.
- Saving the project so it's ready to link with devices and applications.
How to Create a Project in Favoriot Platform
Application Hierarchy
An Application represents a specific functionality or feature within a project. It defines how data will be handled, processed, and displayed.
The video covers:
- Navigating to the Applications section in the dashboard.
- Clicking Create Application.
- Providing basic details such as Application Name and Description.
- Linking the application to a project.
- Saving the application.
How to Create an Application in Favoriot Platform
Group Hierarchy
A Group is a logical collection of devices, making it easier to manage and organize devices under specific categories.
The video covers:
- Navigating to the Groups section in the dashboard.
- Clicking Create Group.
- Entering details such as Group Name and Description.
- Assigning devices to the group.
- Saving the group for better organization and management.
How to Create a Group in Favoriot Platform
Device Hierarchy
A Device represents an individual IoT device within the Favoriot Platform.
Devices are the primary data sources, capable of sending or receiving data via APIs.
Each device has a unique identifier and is linked to a specific group.
The video covers:
- Navigating to the Devices section in the dashboard.
- Clicking Create Device.
- Entering details such as Device Name, Description, etc.
- Assigning the device to a Group.
- Saving the device.
How to Create a Device in Favoriot Platform
Example: Smart City IoT Deployment
1. Project – Smart City Management
Represents the overall initiative to monitor and manage urban infrastructure across the city.
2. Application – City Operations Dashboard
A central web application for city administrators to view real-time data, receive alerts, and control connected devices.
3. Groups – Organized by district or infrastructure type
- Downtown Area – Environmental sensors, traffic lights, public Wi-Fi access points.
- Water Management – Smart water meters, flood detection sensors.
- Public Safety – CCTV cameras, emergency alert systems.
4. Devices (Example: Downtown Area Group)
| Device Name | Type | Purpose |
|---|---|---|
| DT-AirQuality-01 | Air Quality Sensor | Measures PM2.5, PM10, CO₂ levels. |
| DT-TrafficLight-05 | Traffic Light Controller | Adjusts traffic flow dynamically. |
| DT-NoiseSensor-02 | Sound Level Sensor | Monitors noise pollution levels. |
REST API
The Favoriot platform offers a REST API that lets you manage and interact with IoT devices and their data. Using this API, developers can send data from devices, create projects, manage applications, organize devices into groups, and retrieve past data. The Favoriot REST API works through HTTP requests and returns data in JSON format, making it simple to integrate IoT data into your own applications or control devices directly. This section explains the different API endpoints available in the Favoriot platform and how to use them.
Project
API presented in this section deals with project endpoint.
Get all projects
FAVORIOT Middleware expects for the API key to be included in all API requests to the server in a header that looks like the following:
apikey: <YOUR API KEY HERE>;
Make sure to replace
<YOUR API KEY HERE>with your API key.
# With shell, you can just pass the correct header with each request
curl -X GET --header
'Accept: application/json' --header
'apikey: <YOUR API KEY HERE>'
'https://apiv2.favoriot.com/v2/'
var request = require("request");

var options = { method: 'GET',
  url: 'https://apiv2.favoriot.com/v2/projects',
  headers:
   { 'cache-control': 'no-cache',
     'content-type': 'application/json',
     'apikey': 'YOUR API KEY HERE' } };

request(options, function (error, response, body) {
  if (error) throw new Error(error);

  console.log(body);
});
OkHttpClient client = new OkHttpClient();

Request request = new Request.Builder()
  .url("https://apiv2.favoriot.com/v2/projects")
  .get()
  .addHeader("apikey", "YOUR API KEY HERE")
  .addHeader("content-type", "application/json")
  .addHeader("cache-control", "no-cache")
  .build();

Response response = client.newCall(request).execute();
import requests

url = "https://apiv2.favoriot.com/v2/projects"

headers = {
    'apikey': "YOUR API KEY HERE",
    'content-type': "application/json",
    'cache-control': "no-cache"
    }

response = requests.request("GET", url, headers=headers)

print(response.text)
The above command returns JSON structured like this:
{
  "numFound": 1,
  "results": [
    {
      "user_id": "favoriot",
      "project_name": "projectDefault",
      "active": true,
      "description": "No desc",
      "project_created_at": "2019-09-23T03:58:22.009Z",
      "project_developer_id": "projectDefault@favoriot",
      "project_id": "1b247924-1f9c-48d6-ae52-52c73c35768e",
      "project_updated_at": "2019-09-23T03:58:22.009Z"
    }
  ]
}
This endpoint retrieves all Project.
HTTP REQUEST
GET /projects
QUERY PARAMETERS
| Name | Description | Type | Data Type |
|---|---|---|---|
| project_name | project name | query | string |
| project_developer_id | project Developer ID | query | string |
| active | status of the project | query | boolean |
| created_at | filter the list of results by field created_at (timestamp) | query | string |
| created_from_to | Allow to specify a range of project creation | query | string |
| max | define the number of results to be returned | query | number |
| order | sorting the results by creation date (asc or desc) | query | string { ASC , DESC } |
| offset | list project at given offset | query | number |
RESPONSES
| Status | Meaning | Description |
|---|---|---|
| 200 | OK | Success |
| 400 | Bad Request | Operation Failed |
| 503 | Service Unavailable | Error: Something wrong with the database or the query |
Get specific project
curl -X GET --header
'Accept: application/json' --header
'apikey: <YOUR API KEY HERE>'
'https://apiv2.favoriot.com/v2/projects/{project_developer_id}'
var request = require("request");

var options = { method: 'GET',
  url: 'https://apiv2.favoriot.com/v2/projects/{project_developer_id}',
  headers:
   { 'cache-control': 'no-cache',
     'content-type': 'application/json',
     'apikey': 'YOUR API KEY HERE' } };

request(options, function (error, response, body) {
  if (error) throw new Error(error);

  console.log(body);
});
OkHttpClient client = new OkHttpClient();

Request request = new Request.Builder()
  .url("https://apiv2.favoriot.com/v2/projects/{project_developer_id}")
  .get()
  .addHeader("apikey", "YOUR API KEY HERE")
  .addHeader("content-type", "application/json")
  .addHeader("cache-control", "no-cache")
  .build();

Response response = client.newCall(request).execute();
import requests

url = "https://apiv2.favoriot.com/v2/projects/{project_developer_id}"

headers = {
    'apikey': "YOUR API KEY HERE",
    'content-type': "application/json",
    'cache-control': "no-cache"
    }

response = requests.request("GET", url, headers=headers)

print(response.text)
The above command returns JSON structured like this:
{
  "user_id": "favoriot",
  "project_name": "Project-1",
  "active": true,
  "description": "Captures stream of IOT data",
  "project_created_at": "2019-09-24T01:41:50.613Z",
  "project_developer_id": "Project-1@favoriot",
  "project_id": "a0b7c716-cad6-43fb-b013-58d8f0cb57b9",
  "project_updated_at": "2019-09-24T01:41:50.613Z"
}
This endpoint retrieves a specific project.
HTTP Request
GET /projects/{project_developer_id}
URL Parameters
| Name | Description | Type | Data Type | Required |
|---|---|---|---|---|
| project_developer_id | ID of the project | path | string | Yes |
Responses
| Status | Meaning | Description |
|---|---|---|
| 200 | OK | Success |
| 400 | Bad Request | Operation Failed |
| 503 | Service Unavailable | Error: Something wrong with the database or the query |
Creating a project
This endpoint creates a Project.
HTTP Request
POST /projects
curl -X POST --header
'Content-Type: application/json'
--header 'Accept: application/json'
--header 'apikey: YOUR API KEY HERE'
-d '{
  "project_name": "PROJECT NAME",
  "active": true,
  "description": "DESCRIPTION",
  "user_id": "USER ID"
}' 'https://apiv2.favoriot.com/v2/projects'
var request = require("request");

var options = { method: 'POST',
  url: 'https://apiv2.favoriot.com/v2/projects',
  headers:
   { 'cache-control': 'no-cache',
     'content-type': 'application/json',
     'apikey': 'YOUR API KEY HERE' } };

request(options, function (error, response, body) {
  if (error) throw new Error(error);

  console.log(body);
});
OkHttpClient client = new OkHttpClient();

Request request = new Request.Builder()
  .url("https://apiv2.favoriot.com/v2/projects")
  .post(null)
  .addHeader("apikey", "YOUR API KEY HERE")
  .addHeader("content-type", "application/json")
  .addHeader("cache-control", "no-cache")
  .build();

Response response = client.newCall(request).execute();
import requests

url = "https://apiv2.favoriot.com/v2/projects"

headers = {
    'apikey': "YOUR API KEY HERE",
    'content-type': "application/json",
    'cache-control': "no-cache",
    }

response = requests.request("POST", url, headers=headers)

print(response.text)
Body parameter
{
  "project_name": "string",
  "active": true,
  "description": "string",
  "user_id": "string"
}
The above command returns JSON structured like this:
{
  "statusCode": 201,
  "message": "Project Created"
}
Description of body parameter
| Name | Description |
|---|---|
| project_name | Name of the project. This should be unique. Example: Parkingproject |
| active | true or false. Indicate whether project is active or not. default true. Example: true |
| description | Brief description of project. Example: Parking project for my house |
| user_id | Your username for FAVORIOT platform. Example: @FAVORIOT |
URL Parameters
| Name | Description | Type | Data Type | Required |
|---|---|---|---|---|
| project_developer_id | ID of the project | path | string | Yes |
RESPONSES
| Status | Meaning | Description |
|---|---|---|
| 201 | Created | Success |
| 400 | Bad Request | Operation Failed |
| 422 | [Unprocessable Entity] | validationError : Empty string or invalid character |
| 503 | Service Unavailable | Error: Something wrong with the database or the query |
Deleting a project
This endpoint deletes a project.
HTTP Request
DELETE /projects/{project_developer_id}
# You can also use wget
curl -X DELETE --header
'Accept: application/json'
--header 'apikey: YOUR API KEY HERE'
'https://apiv2.favoriot.com/v2/projects/{project_developer_id}'
var request = require("request");

var options = { method: 'DELETE',
  url: 'https://apiv2.favoriot.com/v2/projects/{project_developer_id}',
  headers:
   { 'cache-control': 'no-cache',
     'content-type': 'application/json',
     'apikey': 'YOUR API KEY HERE' } };

request(options, function (error, response, body) {
  if (error) throw new Error(error);

  console.log(body);
});
OkHttpClient client = new OkHttpClient();

Request request = new Request.Builder()
  .url("https://apiv2.favoriot.com/v2/projects/{project_developer_id}")
  .delete(null)
  .addHeader("apikey", "YOUR API KEY HERE")
  .addHeader("content-type", "application/json")
  .addHeader("cache-control", "no-cache")
  .build();

Response response = client.newCall(request).execute();
import requests

url = "https://apiv2.favoriot.com/v2/projects/{PROJECT DEVELOPER ID}"

headers = {
    'apikey': "YOUR API KEY HERE",
    'content-type': "application/json",
    'cache-control': "no-cache"
    }

response = requests.request("DELETE", url, headers=headers)

print(response.text)
The above command returns JSON structured like this:
{
  "code": 201,
  "message": "Project Deleted"
}
Parameters
| Name | Description | Type | Data Type | Required |
|---|---|---|---|---|
| project_developer_id | ID of the project | path | string | Yes |
RESPONSES
| Status | Meaning | Description |
|---|---|---|
| 201 | Deleted | Success |
| 400 | Bad Request | Operation Failed |
| 422 | Unprocessable Entity | Delete Failed: The project is currently being referred by one or more applications entity |
| 503 | Service Unavailable | Error: Something wrong with the database or the query |
Updating a project
Alter and update a project -- Only fields 'active','description', and 'project_updated_at' allowed to be changed.
HTTP REQUEST
PUT /projects/{project_developer_id}
# You can also use wget
curl -X PUT --header 'Content-Type: application/json'
--header 'Accept: application/json'
--header 'apikey: YOUR API KEY HERE'
-d '{
  "description": "No Desc",
  "active": true
}'
'https://apiv2.favoriot.com/v2/projects/{project_developer_id}'
var request = require("request");

var options = { method: 'PUT',
  url: 'https://apiv2.favoriot.com/v2/projects/{project_developer_id}',
  headers:
   { 'cache-control': 'no-cache',
     'content-type': 'application/json',
     'apikey': 'YOUR API KEY HERE' } };

request(options, function (error, response, body) {
  if (error) throw new Error(error);

  console.log(body);
});
OkHttpClient client = new OkHttpClient();

Request request = new Request.Builder()
  .url("https://apiv2.favoriot.com/v2/projects/{project_developer_id}")
  .put(null)
  .addHeader("apikey", "YOUR API KEY HERE")
  .addHeader("content-type", "application/json")
  .addHeader("cache-control", "no-cache")
  .build();

Response response = client.newCall(request).execute();
import requests

url = "https://apiv2.favoriot.com/v2/projects/{PROJECT DEVELOPER ID}"

headers = {
    'apikey': "YOUR API KEY HERE",
    'content-type': "application/json",
    'cache-control': "no-cache"
    }

response = requests.request("PUT", url, headers=headers)

print(response.text)
Body parameter
{
  "description": "No Desc",
  "active": true
}
The above command returns JSON structured like this:
{
  "code": 201,
  "message": "Project Updated"
}
PARAMETERS
| Name | Description | Type | Data Type | Required |
|---|---|---|---|---|
| project_developer_id | ID of the project | path | string | Yes |
| Body | Body of the data | Object | Object | Yes |
RESPONSES
| Status | Meaning | Description |
|---|---|---|
| 201 | Updated | Success |
| 400 | Bad Request | Operation Failed |
| 404 | Not Found | Updated failed : Couldn't find rows as specified by parameters in the body |
| 503 | Service Unavailable | Error: Something wrong with the database or the query |
Get application related to a project
Return a list of all applications from a project
HTTP REQUEST
GET /projects/{project_developer_id}/apps
# You can also use wget
curl -X GET --header 'Accept: application/json'
 --header 'apikey: YOUR API KEY HERE'
 'https://apiv2.favoriot.com/v2/projects/{project_developer_id}/apps'
var request = require("request");

var options = { method: 'GET',
  url: 'https://apiv2.favoriot.com/v2/projects/{project_developer_id}/apps',
  headers:
   { 'cache-control': 'no-cache',
     'content-type': 'application/json',
     'apikey': 'YOUR API KEY HERE' } };

request(options, function (error, response, body) {
  if (error) throw new Error(error);

  console.log(body);
});
OkHttpClient client = new OkHttpClient();

Request request = new Request.Builder()
  .url("https://apiv2.favoriot.com/v2/projects/{project_developer_id}/apps")
  .get(null)
  .addHeader("apikey", "YOUR API KEY HERE")
  .addHeader("content-type", "application/json")
  .addHeader("cache-control", "no-cache")
  .build();

Response response = client.newCall(request).execute();
import requests

url = "https://apiv2.favoriot.com/v2/projects/{project_developer_id}/apps"

headers = {
    'apikey': "YOUR API KEY HERE",
    'content-type': "application/json",
    'cache-control': "no-cache"
    }

response = requests.request("GET", url, headers=headers)

print(response.text)
The above command returns JSON structured like this:
{
  "statusCode": 200,
  "numResults": 1,
  "results": [
    {
      "user_id": "favoriot",
      "application_name": "Application1",
      "active": true,
      "application_created_at": "2019-09-23T08:15:10.062Z",
      "application_developer_id": "Application1@favoriot",
      "application_id": "7b65056d-89c5-4ff0-bcab-93e709f7224f",
      "application_updated_at": "2019-09-23T08:15:10.062Z",
      "description": "No desc",
      "project_developer_id": "Project1@favoriot"
    }
  ]
}
PARAMETERS
| Name | Description | Type | Data Type | Required |
|---|---|---|---|---|
| project_developer_id | ID of the project | path | string | Yes |
RESPONSES
| Status | Meaning | Description |
|---|---|---|
| 200 | OK | Success |
| 400 | Bad Request | Request not valid |
| 503 | Service Unavailable | Error: Something wrong with the database or the query |
Get an specific application related to project
Show an application from a specific project
HTTP REQUEST
GET /projects/{project_developer_id}/apps/{application_developer_id}
Code samples
# You can also use wget
curl -X GET --header 'Accept: application/json'
--header 'apikey: YOUR API KEY HERE'
 'https://apiv2.favoriot.com/v2/projects/{project_developer_id}/apps/{application_developer_id}'
var request = require("request");

var options = { method: 'GET',
  url: 'https://apiv2.favoriot.com/v2/projects/{project_developer_id}/apps/{application_developer_id}',
  headers:
   { 'cache-control': 'no-cache',
     'content-type': 'application/json',
     'apikey': 'YOUR API KEY HERE' } };

request(options, function (error, response, body) {
  if (error) throw new Error(error);

  console.log(body);
});
OkHttpClient client = new OkHttpClient();

Request request = new Request.Builder()
  .url("https://apiv2.favoriot.com/v2/projects/{project_developer_id}/apps/{application_developer_id}")
  .get(null)
  .addHeader("apikey", "YOUR API KEY HERE")
  .addHeader("content-type", "application/json")
  .addHeader("cache-control", "no-cache")
  .build();

Response response = client.newCall(request).execute();
import requests

url = "https://apiv2.favoriot.com/v2/projects/{project_developer_id}/apps/{application_developer_id}"

headers = {
    'apikey': "YOUR API KEY HERE",
    'content-type': "application/json",
    'cache-control': "no-cache"
    }

response = requests.request("GET", url, headers=headers)

print(response.text)
The above command returns JSON structured like this:
{
  "statusCode": 200,
  "numFound": 1,
  "results": [
    {
      "user_id": "favoriot",
      "application_name": "Application1",
      "active": true,
      "application_created_at": "2019-09-23T08:15:10.062Z",
      "application_developer_id": "Application1@favoriot",
      "application_id": "7b65056d-89c5-4ff0-bcab-93e709f7224f",
      "application_updated_at": "2019-09-23T08:15:10.062Z",
      "description": "No desc",
      "project_developer_id": "Project1@favoriot"
    }
  ]
}
PARAMETERS
| Parameter | In | Type | Required | Description |
|---|---|---|---|---|
| project_developer_id | path | string | true | Project developer ID |
| application_developer_id | path | string | true | application ID |
RESPONSES
| Status | Meaning | Description |
|---|---|---|
| 200 | OK | Success |
| 400 | Bad Request | Request not valid |
| 503 | Service Unavailable | Error: Something wrong with the database or the query |
Applications
Endpoints related to application
Creating application
Create an application by passing necessary information in the HTTP body
HTTP REQUEST
POST /apps
# You can also use wget
curl -X POST --header 'Content-Type: application/json'
--header 'Accept: application/json'
 --header 'apikey: YOUR API KEY HERE'
 -d '{
  "application_name": "string",
  "active": true,
  "project_developer_id": "string",
  "description": "string",
  "user_id": "string"
}'
'https://apiv2.favoriot.com/v2/apps'
OkHttpClient client = new OkHttpClient();

Request request = new Request.Builder()
  .url("https://apiv2.favoriot.com/v2/apps")
  .post(null)
  .addHeader("apikey", "YOUR API KEY HERE")
  .addHeader("content-type", "application/json")
  .addHeader("cache-control", "no-cache")
  .build();

Response response = client.newCall(request).execute();
var request = require("request");

var options = { method: 'POST',
  url: 'https://apiv2.favoriot.com/v2/apps',
  headers:
   { 'cache-control': 'no-cache',
     'content-type': 'application/json',
     'apikey': 'YOUR API KEY HERE' } };

request(options, function (error, response, body) {
  if (error) throw new Error(error);

  console.log(body);
});
import requests

url = "https://apiv2.favoriot.com/v2/apps"

headers = {
    'apikey': "YOUR API KEY HERE",
    'content-type': "application/json",
    'cache-control': "no-cache",
    }

response = requests.request("POST", url, headers=headers)

print(response.text)
Body parameter
{
 "application_name": "string",
  "active": true,
  "project_developer_id": "string",
  "description": "string",
  "user_id": "string"
}
Example responses
{
  "statusCode": 201,
  "message": "Application Created"
}
Description of body parameter
| Name | Description |
|---|---|
| application_name | Name of the project. This should be unique. Example: parkingApplication |
| active | true or false. Indicate whether application is active or not. default true. Example: true |
| project_developer_id | ID of the project to which the application will be associated. Example: projectDefault@FAVORIOT |
| description | Brief description of Application. Example: Parking application for my house |
| user_id | Your username for FAVORIOT platform. Example: @FAVORIOT |
QUERY PARAMETERS
| Parameter | In | Type | Required | Description |
|---|---|---|---|---|
| body | body | object | true | No description |
RESPONSES
| Status | Meaning | Description |
|---|---|---|
| 201 | Created | Created |
| 400 | Bad Request | Request not valid |
| 422 | Unprocessable Entity | validationError : project_developer_id can not be empty. It is used as reference |
| 404 | Not Found | Either <user_id> or <project_developer_id> that's referred in this application is not exists |
| 409 | Conflict | <application_name> has been used by this user |
| 503 | Service Unavailable | Error: Something wrong with the database or the query |
Get all applications
Return a list containing all applications
HTTP REQUEST
GET /apps
# You can also use wget
curl -X GET --header 'Accept: application/json'
--header 'apikey: YOUR API KEY HERE'
'https://apiv2.favoriot.com/v2/apps'
OkHttpClient client = new OkHttpClient();

Request request = new Request.Builder()
  .url("https://apiv2.favoriot.com/v2/apps")
  .get(null)
  .addHeader("apikey", "YOUR API KEY HERE")
  .addHeader("content-type", "application/json")
  .addHeader("cache-control", "no-cache")
  .build();

Response response = client.newCall(request).execute();
var request = require("request");

var options = { method: 'GET',
  url: 'https://apiv2.favoriot.com/v2/apps',
  headers:
   { 'cache-control': 'no-cache',
     'content-type': 'application/json',
     'apikey': 'YOUR API KEY HERE' } };

request(options, function (error, response, body) {
  if (error) throw new Error(error);

  console.log(body);
});
import requests

url = "https://apiv2.favoriot.com/v2/apps"

headers = {
    'apikey': "YOUR API KEY HERE",
    'content-type': "application/json",
    'cache-control': "no-cache",
    }

response = requests.request("GET", url, headers=headers)

print(response.text)
Example responses
{
  "statusCode": 200,
  "numFound": 1,
  "results": [
    {
      "user_id": "favoriot",
      "application_name": "Application1",
      "active": true,
      "application_created_at": "2019-09-26T08:30:36.091Z",
      "application_developer_id": "Application1@favoriot",
      "application_id": "7c6ebfd1-c70b-4ab3-a789-444a47d29c83",
      "application_updated_at": "2019-09-26T08:30:36.091Z",
      "description": "No desc",
      "project_developer_id": "Project1@favoriot"
    },
  ]
}
QUERY PARAMETERS
| Parameter | In | Type | Required | Description |
|---|---|---|---|---|
| application_name | query | string | false | application name |
| application_developer_id | query | string | false | application developer ID |
| created_at | query | number | false | filter the list of results by field created_at (timestamp) |
| created_from_to | query | string | false | Allow to specify a range of creation (created_at_from, e.g. value 13370093222) |
| max | query | integer | false | define the number of results to be returned |
| sort | query | string | false | sorting the results by the given field |
| order | query | string | false | sorting the results by creation date (asc or desc) |
| offset | query | number | false | list applications at given offset |
RESPONSES
| Status | Meaning | Description |
|---|---|---|
| 200 | OK | Success |
| 400 | Bad Request | Request not valid |
| 503 | Service Unavailable | Error: Something wrong with the database or the query |
Get a particular application
Show an application as specified by app_id
HTTP REQUEST
GET /apps/{application_developer_id}
Code samples
# You can also use wget
curl -X GET --header 'Accept: application/json'
--header 'apikey: YOUR API KEY HERE'
'https://apiv2.favoriot.com/v2/apps/{application_developer_id}'
OkHttpClient client = new OkHttpClient();

Request request = new Request.Builder()
  .url("https://apiv2.favoriot.com/v2/apps/{application_developer_id}")
  .post(null)
  .addHeader("apikey", "YOUR API KEY HERE")
  .addHeader("content-type", "application/json")
  .addHeader("cache-control", "no-cache")
  .build();

Response response = client.newCall(request).execute();
var request = require("request");

var options = { method: 'POST',
  url: 'https://apiv2.favoriot.com/v2/apps/{application_developer_id}',
  headers:
   { 'cache-control': 'no-cache',
     'content-type': 'application/json',
     'apikey': 'YOUR API KEY HERE' } };

request(options, function (error, response, body) {
  if (error) throw new Error(error);

  console.log(body);
});
import requests

url = "https://apiv2.favoriot.com/v2/apps/{application_developer_id}"

headers = {
    'apikey': "YOUR API KEY HERE",
    'content-type': "application/json",
    'cache-control': "no-cache",
    }

response = requests.request("POST", url, headers=headers)

print(response.text)
Example responses
{
  "statusCode": 200,
  "numFound": 1,
  "results": [
    {
      "user_id": "favoriot",
      "application_name": "Application1",
      "active": true,
      "application_created_at": "2019-09-23T08:15:10.062Z",
      "application_developer_id": "Application1@favoriot",
      "application_id": "7b65056d-89c5-4ff0-bcab-93e709f7224f",
      "application_updated_at": "2019-09-23T08:15:10.062Z",
      "description": "No desc",
      "project_developer_id": "Project1@favoriot"
    }
  ]
}
PARAMETERS
| Parameter | In | Type | Required | Description |
|---|---|---|---|---|
| application_developer_id | path | string | true | application developer ID |
RESPONSE
| Status | Meaning | Description |
|---|---|---|
| 200 | OK | Success |
| 400 | Bad Request | Request not valid |
| 503 | Service Unavailable | Error: Something wrong with the database or the query |
Updating an application
Alter and update an application
HTTP REQUEST
PUT /apps/{application_developer_id}
# You can also use wget
curl -X PUT --header 'Content-Type: application/json' --header 'Accept: application/json' --header 'apikey: YOUR API KEY HERE' -d '{
  "application_name": "string",
  "active": true,
  "description": "string"
}' 'https://apiv2.favoriot.com/v2/apps/{application_developer_id}'
OkHttpClient client = new OkHttpClient();

Request request = new Request.Builder()
  .url("https://apiv2.favoriot.com/v2/apps/{application_developer_id}")
  .put(null)
  .addHeader("apikey", "YOUR API KEY HERE")
  .addHeader("content-type", "application/json")
  .addHeader("cache-control", "no-cache")
  .build();

Response response = client.newCall(request).execute();
var request = require("request");

var options = { method: 'PUT',
  url: 'https://apiv2.favoriot.com/v2/{application_developer_id}',
  headers:
   { 'cache-control': 'no-cache',
     'content-type': 'application/json',
     'apikey': 'YOUR API KEY HERE' } };

request(options, function (error, response, body) {
  if (error) throw new Error(error);

  console.log(body);
});
import requests

url = "https://apiv2.favoriot.com/v2/apps/{application_developer_id}"

headers = {
    'apikey': "YOUR API KEY HERE",
    'content-type': "application/json",
    'cache-control': "no-cache",
    }

response = requests.request("PUT", url, headers=headers)

print(response.text)
Body parameter
{
  "application_name": "string",
  "active": true,
  "description": "string"
}
Example responses
{
  "statusCode": 201,
  "message": "Application Updated"
}
QUERY PARAMETERS
| Parameter | In | Type | Required | Description |
|---|---|---|---|---|
| application_developer_id | path | string | true | application developer ID |
| body | body | object | true | No description |
RESPONSES
| Status | Meaning | Description |
|---|---|---|
| 201 | Updated | Success |
| 400 | Bad Request | Operation Failed |
| 404 | Not Found | Updated failed : Couldn't find Rows as specified by parameters in the body |
| 503 | Service Unavailable | Error: Something wrong with the database or the query |
Deleting an application
Delete an application
HTTP REQUEST
DELETE /apps/{application_developer_id}
Code samples
# You can also use wget
curl -X DELETE --header 'Accept: application/json'
--header 'apikey: YOUR API KEY HERE'
'https://apiv2.favoriot.com/v2/apps/{application_developer_id}'
OkHttpClient client = new OkHttpClient();

Request request = new Request.Builder()
  .url("https://apiv2.favoriot.com/v2/apps/{application_developer_id}")
  .delete(null)
  .addHeader("apikey", "YOUR API KEY HERE")
  .addHeader("content-type", "application/json")
  .addHeader("cache-control", "no-cache")
  .build();

Response response = client.newCall(request).execute();
var request = require("request");

var options = { method: 'DELETE',
  url: 'https://apiv2.favoriot.com/v2/apps/{application_developer_id}',
  headers:
   { 'cache-control': 'no-cache',
     'content-type': 'application/json',
     'apikey': 'YOUR API KEY HERE' } };

request(options, function (error, response, body) {
  if (error) throw new Error(error);

  console.log(body);
});
import requests

url = "https://apiv2.favoriot.com/v2/apps/{application_developer_id}"

headers = {
    'apikey': "YOUR API KEY HERE",
    'content-type': "application/json",
    'cache-control': "no-cache",
    }

response = requests.request("DELETE", url, headers=headers)

print(response.text)
Example responses
{
  "statusCode": 201,
  "message": "Application Deleted"
}
QUERY PARAMETERS
| Parameter | In | Type | Required | Description |
|---|---|---|---|---|
| application_developer_id | path | string | true | application developer ID |
RESPONSES
| Status | Meaning | Description |
|---|---|---|
| 201 | Deleted | Success |
| 400 | Bad Request | Operation Failed |
| 422 | Unprocessable Entity | Delete Failed: This application is currently being referred by one or more groups |
| 503 | Service Unavailable | Error: Something wrong with the database or the query |
Get all groups of an application
Return a list of all groups from an application
HTTP REQUEST
GET /applications/{application_developer_id}/groups
Code samples
# You can also use wget
curl -X GET --header 'Accept: application/json'
--header 'apikey: YOUR API KEY HERE'
'https://apiv2.favoriot.com/v2/applications/{application_developer_id}/groups'
OkHttpClient client = new OkHttpClient();

Request request = new Request.Builder()
  .url("https://apiv2.favoriot.com/v2/applications/{application_developer_id}/groups")
  .delete(null)
  .addHeader("apikey", "YOUR API KEY HERE")
  .addHeader("content-type", "application/json")
  .addHeader("cache-control", "no-cache")
  .build();

Response response = client.newCall(request).execute();
var request = require("request");

var options = { method: 'DELETE',
  url: 'https://apiv2.favoriot.com/v2/applications/{application_developer_id}/groups',
  headers:
   { 'cache-control': 'no-cache',
     'content-type': 'application/json',
     'apikey': 'YOUR API KEY HERE' } };

request(options, function (error, response, body) {
  if (error) throw new Error(error);

  console.log(body);
});
import requests

url = "https://apiv2.favoriot.com/v2/applications/{application_developer_id}/groups"

headers = {
    'apikey': "YOUR API KEY HERE",
    'content-type': "application/json",
    'cache-control': "no-cache",
    }

response = requests.request("DELETE", url, headers=headers)

print(response.text)
Example responses
{
  "numResults": 1,
  "results": [
    {
      "group_id": "b771141b-aa8b-44f3-a18a-3b29bb7579a2",
      "application_developer_id": "applicationDefault@zeldi",
      "group_developer_id": "groupDefault@zeldi",
      "description": "no description",
      "group_name": "groupDefault",
      "active": true,
      "user_id": "FAVORIOT"
    }
  ]
}
QUERY PARAMETERS
| Parameter | In | Type | Required | Description |
|---|---|---|---|---|
| application_developer_id | path | string | true | Application developer ID |
RESPONSES
| Status | Meaning | Description |
|---|---|---|
| 200 | OK | Success |
| 400 | Bad Request | Request not valid |
| 503 | Service Unavailable | Error: Something wrong with the database or the query |
Groups
Groups endpoints
Creating a group
Create a group of devices by passing necessary information in the HTTP body
HTTP request
POST /groups
# You can also use wget
curl -X POST --header 'Content-Type: application/json'
--header 'Accept: application/json'
 --header 'apikey: YOUR API KEY HERE'
 -d '{
  "group_name": "groupDefault",
  "active": true,
  "application_developer_id": "APPLICATION NAME",
  "description": "none"
}' 'https://apiv2.favoriot.com/v2/groups'
OkHttpClient client = new OkHttpClient();

Request request = new Request.Builder()
  .url("https://apiv2.favoriot.com/v2/groups")
  .post(null)
  .addHeader("apikey", "YOUR API KEY HERE")
  .addHeader("content-type", "application/json")
  .addHeader("cache-control", "no-cache")
  .build();

Response response = client.newCall(request).execute();
var request = require("request");

var options = { method: 'POST',
  url: 'https://apiv2.favoriot.com/v2/groups',
  headers:
   { 'cache-control': 'no-cache',
     'content-type': 'application/json',
     'apikey': 'YOUR API KEY HERE' } };

request(options, function (error, response, body) {
  if (error) throw new Error(error);

  console.log(body);
});
import requests

url = "https://apiv2.favoriot.com/v2/groups"

headers = {
    'apikey': "YOUR API KEY HERE",
    'content-type': "application/json",
    'cache-control': "no-cache",
    }

response = requests.request("POST", url, headers=headers)

print(response.text)
Body parameter
{
  "group_name": "groupDefault",
  "active": true,
  "application_developer_id": "applicationDefault@FAVORIOT",
  "description": "none"
}
Description of body parameter
| Name | Description |
|---|---|
| group_name | Name of the group. This should be unique. Example: parkingGroup |
| active | true or false. Indicate whether application is active or not. default true. Example: true |
| application_developer_id | ID of the group to which the application will be associated. Example: groupDefault@FAVORIOT |
| description | Brief description of Application. Example: Parking application for my house |
| user_id | Your username for FAVORIOT platform. Example: @FAVORIOT |
RESPONSES
| Status | Meaning | Description |
|---|---|---|
| 201 | Created | Created |
| 400 | Bad Request | Request not valid |
| 404 | Not Found | Either specified <user_id> or <application_developer_id> that's referred in this Group Hierarchy is not exists |
| 409 | Conflict | <group_name> has been used by this user |
| 503 | Service Unavailable | Error: Something wrong with the database or the query |
Example responses
{
  "statusCode": 201,
  "message": "Group Created"
}
QUERY PARAMETERS
| Parameter | In | Type | Required | Description |
|---|---|---|---|---|
| body | body | object | true | No description |
Get all groups
Return a list containing all groups
HTTP request
GET /groups
Code samples
# You can also use wget
curl -X GET --header 'Accept: application/json'
 --header 'apikey: YOUR API KEY HERE'
 'https://apiv2.favoriot.com/v2/groups'
OkHttpClient client = new OkHttpClient();

Request request = new Request.Builder()
  .url("https://apiv2.favoriot.com/v2/groups")
  .get(null)
  .addHeader("apikey", "YOUR API KEY HERE")
  .addHeader("content-type", "application/json")
  .addHeader("cache-control", "no-cache")
  .build();

Response response = client.newCall(request).execute();
var request = require("request");

var options = { method: 'GET',
  url: 'https://apiv2.favoriot.com/v2/groups',
  headers:
   { 'cache-control': 'no-cache',
     'content-type': 'application/json',
     'apikey': 'YOUR API KEY HERE' } };

request(options, function (error, response, body) {
  if (error) throw new Error(error);

  console.log(body);
});
import requests

url = "https://apiv2.favoriot.com/v2/groups"

headers = {
    'apikey': "YOUR API KEY HERE",
    'content-type': "application/json",
    'cache-control': "no-cache",
    }

response = requests.request("GET", url, headers=headers)

print(response.text)
Example responses
{
  "statusCode": 200,
  "numFound": 1,
  "results": [
    {
      "user_id": "favoriot",
      "group_name": "group1",
      "active": true,
      "application_developer_id": "Application1@favoriot",
      "description": "Group description",
      "group_created_at": "2019-09-27T00:31:54.863Z",
      "group_developer_id": "group1@favoriot",
      "group_id": "e3cf0853-6fe3-4867-9c1b-a7eae31a754b",
      "group_updated_at": "2019-09-27T00:31:54.863Z"
    },
  ]
}
QUERY PARAMETERS
| Parameter | In | Type | Required | Description |
|---|---|---|---|---|
| group_name | query | string | false | Group name |
| group_developer_id | query | string | false | Group ID |
| created_at | query | number | false | filter the list of results by field created_at (timestamp) |
| created_from_to | query | string | false | Allow to specify a range of group creation (e.g. [ 2016-09-03T01:39:39.473Z TO NOW] ) |
| max | query | integer | false | define the number of results to be returned |
| order | query | string | false | sorting the results (asc or desc) |
| offset | query | number | false | list of groups at given offset |
RESPONSES
| Status | Meaning | Description |
|---|---|---|
| 200 | OK | Success |
| 400 | Bad Request | Request not valid |
| 503 | Service Unavailable | Error: Something wrong with the database or the query |
Get a specific group
show a group as specified by group_developer_id
HTTP request
GET /groups/{group_developer_id}
# You can also use wget
curl -X GET --header 'Accept: application/json'
--header 'apikey: YOUR API KEY HERE'
'https://apiv2.favoriot.com/v2/groups/{group_developer_id}'
OkHttpClient client = new OkHttpClient();

Request request = new Request.Builder()
  .url("https://apiv2.favoriot.com/v2/groups/{group_developer_id}")
  .get(null)
  .addHeader("apikey", "YOUR API KEY HERE")
  .addHeader("content-type", "application/json")
  .addHeader("cache-control", "no-cache")
  .build();

Response response = client.newCall(request).execute();
var request = require("request");

var options = { method: 'GET',
  url: 'https://apiv2.favoriot.com/v2/groups/{group_developer_id}',
  headers:
   { 'cache-control': 'no-cache',
     'content-type': 'application/json',
     'apikey': 'YOUR API KEY HERE' } };

request(options, function (error, response, body) {
  if (error) throw new Error(error);

  console.log(body);
});
import requests

url = "https://apiv2.favoriot.com/v2/groups/{group_developer_id}"

headers = {
    'apikey': "YOUR API KEY HERE",
    'content-type': "application/json",
    'cache-control': "no-cache",
    }

response = requests.request("GET", url, headers=headers)

print(response.text)
Example responses
{
 "statusCode": 200,
  "numFound": 1,
  "results": [
    {
      "user_id": "favoriot",
      "group_name": "Group1",
      "active": true,
      "application_developer_id": "Application1@favoriot",
      "description": "Group description",
      "group_created_at": "2019-09-27T00:24:10.153Z",
      "group_developer_id": "Group1@favoriot",
      "group_id": "98af0cff-e0a0-4696-bd58-45daf0febac1",
      "group_updated_at": "2019-09-27T00:24:10.153Z"
    }
  ]
}
QUERY PARAMETERS
| Parameter | In | Type | Required | Description |
|---|---|---|---|---|
| group_developer_id | path | string | true | group developer ID |
RESPONSES
| Status | Meaning | Description |
|---|---|---|
| 200 | OK | Success |
| 400 | Bad Request | Request not valid |
| 503 | Service Unavailable | Error: Something wrong with the database or the query |
Updating a group
This API endpoint is used to update information about the group.
HTTP request
PUT /groups/{group_developer_id}
# You can also use wget
curl -X PUT --header 'Content-Type: application/json'
--header 'Accept: application/json' --header 'apikey: YOUR API KEY HERE'
 -d '{
  "description": "No Desc",
  "active": true
}'
'https://apiv2.favoriot.com/v2/groups/group_developer_id'
OkHttpClient client = new OkHttpClient();

Request request = new Request.Builder()
  .url("https://apiv2.favoriot.com/v2/groups/{group_developer_id}")
  .put(null)
  .addHeader("apikey", "YOUR API KEY HERE")
  .addHeader("content-type", "application/json")
  .addHeader("cache-control", "no-cache")
  .build();

Response response = client.newCall(request).execute();
var request = require("request");

var options = { method: 'PUT',
  url: 'https://apiv2.favoriot.com/v2/{group_developer_id}',
  headers:
   { 'cache-control': 'no-cache',
     'content-type': 'application/json',
     'apikey': 'YOUR API KEY HERE' } };

request(options, function (error, response, body) {
  if (error) throw new Error(error);

  console.log(body);
});
import requests

url = "https://apiv2.favoriot.com/v2/{group_developer_id}"

headers = {
    'apikey': "YOUR API KEY HERE",
    'content-type': "application/json",
    'cache-control': "no-cache",
    }

response = requests.request("PUT", url, headers=headers)

print(response.text)
Body parameter
{
  "description": "No Desc",
  "active": true
}
Example responses
{
  "statusCode": 201,
  "message": "Group Updated"
}
QUERY PARAMETERS
| Parameter | In | Type | Required | Description |
|---|---|---|---|---|
| group_developer_id | path | string | true | Group developer ID |
| body | body | object | true | No description |
RESPONSES
| Status | Meaning | Description |
|---|---|---|
| 201 | Update | Success |
| 400 | Bad Request | Operation Failed |
| 404 | Not Found | Updated failed : Couldn't find Rows as specified by parameters in the body |
| 503 | Service Unavailable | Error: Something wrong with the database or the query |
Deleting a group
Delete a particular group. -- NB: Once a particular group is removed, all entities under that group will also be removed.
HTTP request
DELETE /groups/{group_developer_id}
# You can also use wget
curl -X DELETE --header 'Accept: application/json'
 --header 'apikey: YOUR API KEY HERE'
 'https://apiv2.favoriot.com/v2/groups/{group_developer_id}'
OkHttpClient client = new OkHttpClient();

Request request = new Request.Builder()
  .url("https://apiv2.favoriot.com/v2/groups/{group_developer_id}")
  .delete(null)
  .addHeader("apikey", "YOUR API KEY HERE")
  .addHeader("content-type", "application/json")
  .addHeader("cache-control", "no-cache")
  .build();

Response response = client.newCall(request).execute();
var request = require("request");

var options = { method: 'DELETE',
  url: 'https://apiv2.favoriot.com/v2/groups/{group_developer_id}',
  headers:
   { 'cache-control': 'no-cache',
     'content-type': 'application/json',
     'apikey': 'YOUR API KEY HERE' } };

request(options, function (error, response, body) {
  if (error) throw new Error(error);

  console.log(body);
});
import requests

url = "https://apiv2.favoriot.com/v2/groups/{group_developer_id}"

headers = {
    'apikey': "YOUR API KEY HERE",
    'content-type': "application/json",
    'cache-control': "no-cache",
    }

response = requests.request("DELETE", url, headers=headers)

print(response.text)
Example responses
{
  "statusCode": 201,
  "message": "Group Deleted"
}
QUERY PARAMETERS
| Parameter | In | Type | Required | Description |
|---|---|---|---|---|
| group_developer_id | path | string | true | Group ID |
RESPONSES
| Status | Meaning | Description |
|---|---|---|
| 201 | Deleted | Success |
| 400 | Bad Request | Operation Failed |
| 503 | Service Unavailable | Error: Something wrong with the database or the query |
| 422 | Unprocessable Entity | Delete Failed: The group is currently being referred by one or more devices |
Get a group from particular application
show a group from a specific application
HTTP request
GET /applications/{application_developer_id}/groups/{group_developer_id}
# You can also use wget
curl -X GET --header 'Accept: application/json'
 --header 'apikey: YOUR API KEY HERE'
 'https://apiv2.favoriot.com/v2/applications/{APPLICATION ID}/groups/{group_developer_id}'
OkHttpClient client = new OkHttpClient();

Request request = new Request.Builder()
  .url("https://apiv2.favoriot.com/v2/applications/{application_developer_id}/groups/{group_developer_id}")
  .get(null)
  .addHeader("apikey", "YOUR API KEY HERE")
  .addHeader("content-type", "application/json")
  .addHeader("cache-control", "no-cache")
  .build();

Response response = client.newCall(request).execute();
var request = require("request");

var options = { method: 'GET',
  url: 'https://apiv2.favoriot.com/v2/applications/{application_developer_id}/groups/{group_developer_id}',
  headers:
   { 'cache-control': 'no-cache',
     'content-type': 'application/json',
     'apikey': 'YOUR API KEY HERE' } };

request(options, function (error, response, body) {
  if (error) throw new Error(error);

  console.log(body);
});
import requests

url = "https://apiv2.favoriot.com/v2/applications/{application_developer_id}/groups/{group_developer_id}"

headers = {
    'apikey': "YOUR API KEY HERE",
    'content-type': "application/json",
    'cache-control': "no-cache",
    }

response = requests.request("GET", url, headers=headers)

print(response.text)
Example responses
{
 "statusCode": 200,
  "numFound": 1,
  "results": [
    {
      "user_id": "favoriot",
      "group_name": "Group1",
      "active": true,
      "application_developer_id": "Application1@favoriot",
      "description": "Group description",
      "group_created_at": "2019-09-24T00:49:41.231Z",
      "group_developer_id": "Group1@favoriot",
      "group_id": "ca4d511d-8bc3-4201-ac0c-692c1f2a2490",
      "group_updated_at": "2019-09-24T00:49:41.231Z"
    }
  ]
}
QUERY PARAMETERS
| Parameter | In | Type | Required | Description |
|---|---|---|---|---|
| application_developer_id | path | string | true | application developer ID |
| group_developer_id | path | string | true | Group developer ID |
RESPONSES
| Status | Meaning | Description |
|---|---|---|
| 200 | OK | Success |
| 400 | Bad Request | Request not valid |
| 503 | Service Unavailable | Error: Something wrong with the database or the query |
Get all device of a group
Return a list of all devices from a specific group.
HTTP request
GET /groups/{group_developer_id}/devices
# You can also use wget
curl -X GET --header 'Accept: application/json'
--header 'apikey: YOUR API KEY HERE'
'https://apiv2.favoriot.com/v2/groups/{group_developer_id}/devices'
OkHttpClient client = new OkHttpClient();

Request request = new Request.Builder()
  .url("https://apiv2.favoriot.com/v2/groups/{group_developer_id}/devices")
  .get(null)
  .addHeader("apikey", "YOUR API KEY HERE")
  .addHeader("content-type", "application/json")
  .addHeader("cache-control", "no-cache")
  .build();

Response response = client.newCall(request).execute();
var request = require("request");

var options = { method: 'GET',
  url: 'https://apiv2.favoriot.com/v2/groups/{group_developer_id}/devices',
  headers:
   { 'cache-control': 'no-cache',
     'content-type': 'application/json',
     'apikey': 'YOUR API KEY HERE' } };

request(options, function (error, response, body) {
  if (error) throw new Error(error);

  console.log(body);
});
import requests

url = "https://apiv2.favoriot.com/v2/groups/{group_developer_id}/devices"

headers = {
    'apikey': "YOUR API KEY HERE",
    'content-type': "application/json",
    'cache-control': "no-cache",
    }

response = requests.request("GET", url, headers=headers)

print(response.text)
Example responses
{
  // "numResults": 1,
  // "results": [
  //   {
  //     "device_id": "b771141b-aa8b-44f3-a18a-3b29bb7579a2",
  //     "group_developer_id": "groupDefault@FAVORIOT",
  //     "device_developer_id": "deviceDefault@FAVORIOT",
  //     "description": "no description",
  //     "device_name": "deviceDefault",
  //     "active": true,
  //     "user_id": "FAVORIOT"
  //   }
  // ]
}
QUERY PARAMETERS
| Parameter | In | Type | Required | Description |
|---|---|---|---|---|
| group_developer_id | path | string | true | Group developer ID |
RESPONSES
| Status | Meaning | Description |
|---|---|---|
| 200 | OK | Success |
| 400 | Bad Request | Request not valid |
| 503 | Service Unavailable | Error: Something wrong with the database or the query |
Get a device for specific group
Show a specific device from a specific group.
HTTP request
GET /groups/{group_developer_id}/devices/{device_developer_id}
# You can also use wget
curl -X GET --header 'Accept: application/json'
 --header 'apikey: YOUR API KEY HERE'
 'https://apiv2.favoriot.com/v2/groups/{group_developer_id}/devices/{device_developer_id}'
OkHttpClient client = new OkHttpClient();

Request request = new Request.Builder()
  .url("https://apiv2.favoriot.com/v2/groups/{group_developer_id}/devices/{device_developer_id}")
  .get(null)
  .addHeader("apikey", "YOUR API KEY HERE")
  .addHeader("content-type", "application/json")
  .addHeader("cache-control", "no-cache")
  .build();

Response response = client.newCall(request).execute();
var request = require("request");

var options = { method: 'GET',
  url: 'https://apiv2.favoriot.com/v2/groups/{group_developer_id}/devices/{device_developer_id}',
  headers:
   { 'cache-control': 'no-cache',
     'content-type': 'application/json',
     'apikey': 'YOUR API KEY HERE' } };

request(options, function (error, response, body) {
  if (error) throw new Error(error);

  console.log(body);
});
import requests

url = "https://apiv2.favoriot.com/v2/groups/{group_developer_id}/devices/{device_developer_id}"

headers = {
    'apikey': "YOUR API KEY HERE",
    'content-type': "application/json",
    'cache-control': "no-cache",
    }

response = requests.request("GET", url, headers=headers)

print(response.text)
Example responses
{
  "statusCode": 200,
  "numFound": 1,
  "results": [
    {
      "user_id": "muqrizIOT",
      "device_name": "deviceMusicMaster",
      "active": true,
      "description": "Device for music nerds and sound geeks to check.",
      "device_created_at": "2019-09-27T01:07:38.114Z",
      "device_developer_id": "deviceMusicMaster@muqrizIOT",
      "device_id": "0f6e8a70-e208-4544-8b14-a8e16a976f0b",
      "device_type": "others",
      "device_updated_at": "2019-09-27T01:07:38.114Z",
      "group_developer_id": "GroupAudio@muqrizIOT",
      "sensor_type": "others",
      "timezone": "Kuala Lumpur, Singapore"
    }
  ]
}
QUERY PARAMETERS
| Parameter | In | Type | Required | Description |
|---|---|---|---|---|
| group_developer_id | path | string | true | Group developer ID |
| device_developer_id | path | string | true | device developer ID |
RESPONSES
| Status | Meaning | Description |
|---|---|---|
| 200 | OK | Success |
| 400 | Bad Request | Request not valid |
| 503 | Service Unavailable | Error: Something wrong with the database or the query |
Devices
Device APIs enable developers to quickly connect devices and communicate data over encrypted connections using industry-standard TLS protocol. A device is a representation of specific device or logical entity. It can be a physical device or sensor (such as a temperature sensor at home).
The following REST APIs are used to manage IOT devices within FAVORIOT middleware platform.
Create a device
Code samples
# You can also use wget
curl -X POST --header 'Content-Type: application/json'
 --header 'Accept: application/json'
  --header 'apikey: YOUR API KEY'
  -d '{
  "device_name": "string",
  "active": true,
  "group_developer_id": "groupDefault@FAVORIOT",
  "description": "string",
  "device_type": "arduino",
  "sensor_type": "temperature",
  "timezone": "Asia/Kuala_Lumpur",
  "latitude": 0,
  "longitude": 0
}'
'https://apiv2.favoriot.com/v2/devices'
OkHttpClient client = new OkHttpClient();

Request request = new Request.Builder()
  .url("https://apiv2.favoriot.com/v2/devices")
  .post(null)
  .addHeader("apikey", "YOUR API KEY HERE")
  .addHeader("content-type", "application/json")
  .addHeader("cache-control", "no-cache")
  .build();

Response response = client.newCall(request).execute();
var request = require("request");

var options = { method: 'POST',
  url: 'https://apiv2.favoriot.com/v2/devices',
  headers:
   { 'cache-control': 'no-cache',
     'content-type': 'application/json',
     'apikey': 'YOUR API KEY HERE' } };

request(options, function (error, response, body) {
  if (error) throw new Error(error);

  console.log(body);
});
import requests

url = "https://apiv2.favoriot.com/v2/devices"

headers = {
    'apikey': "YOUR API KEY HERE",
    'content-type': "application/json",
    'cache-control': "no-cache",
    }

response = requests.request("POST", url, headers=headers)

print(response.text)
Body parameter
{
  "device_name": "string",
  "active": true,
  "group_developer_id": "groupDefault@FAVORIOT",
  "description": "string",
  "device_type": "arduino",
  "sensor_type": "temperature",
  "timezone": "Asia/Kuala_Lumpur",
  "latitude": 0,
  "longitude": 0
}
Example responses
{
  "statusCode": 201,
  "message": "Device Created"
}
Create a device by passing necessary information in the HTTP body
URL: https://apiv2.favoriot.com/v2/devices
Method: POST
QUERY PARAMETERS
| In | Type | Required | Description |
|---|---|---|---|
| HTTP body | JSON object | true | All attributes related to device are declared as JSON object |
The following are attributes that can be stored within the HTTP body when creating a device.
| Attribute | Description |
|---|---|
| device_name | String Device name Example:device-1 if device_name is not defined, default name will be set. |
| active | Boolean true or false Enables or disables the device. Default is true. |
| group_developer_id | String Group identifier. A device should be structured under certain group, default is groupDefault@username Example: group-01@FAVORIOT |
| description | String Device description. |
| device_type | String Can be one of the device types available Example: Arduino |
| sensor_type | String Can be any types of sensor attached to the device Example: Temperature |
| timezone | String Defines device time zone. Default value is “Asia/Kuala_Lumpur”. Value must be one defined by FAVORIOT: https://api2.favoriot.com/v2/time_zones/ |
| latitude | Number - Defines the Latitude coordinate. Example:43.170 |
| longitude | Number - Defines the longitude coordinate. Example:-3.101 |
RESPONSES
| Status | Description |
|---|---|
| 201 | Created |
| 409 | Device name has been used by the current user |
| 422 | Unable to process the contained instructions |
Get all device
Code samples
# You can also use wget
curl -X GET --header 'Accept: application/json'
--header 'apikey: YOUR API KEY HERE'
'https://apiv2.favoriot.com/v2/devices'
OkHttpClient client = new OkHttpClient();

Request request = new Request.Builder()
  .url("https://apiv2.favoriot.com/v2/devices")
  .get(null)
  .addHeader("apikey", "YOUR API KEY HERE")
  .addHeader("content-type", "application/json")
  .addHeader("cache-control", "no-cache")
  .build();

Response response = client.newCall(request).execute();
var request = require("request");

var options = { method: 'GET',
  url: 'https://apiv2.favoriot.com/v2/devices',
  headers:
   { 'cache-control': 'no-cache',
     'content-type': 'application/json',
     'apikey': 'YOUR API KEY HERE' } };

request(options, function (error, response, body) {
  if (error) throw new Error(error);

  console.log(body);
});
import requests

url = "https://apiv2.favoriot.com/v2/devices"

headers = {
    'apikey': "YOUR API KEY HERE",
    'content-type': "application/json",
    'cache-control': "no-cache",
    }

response = requests.request("GET", url, headers=headers)

print(response.text)
Example responses
{
  "statusCode": 200,
  "numFound": 1,
  "results": [
    {
      "user_id": "favoriot",
      "device_name": "Device1",
      "active": true,
      "description": "Device description",
      "device_created_at": "2019-09-27T01:18:09.893Z",
      "device_developer_id": "Device1@favoriot",
      "device_id": "c6d831d7-7246-41ae-802c-acbf453f33f6",
      "device_type": "others",
      "device_updated_at": "2019-09-27T01:18:09.893Z",
      "group_developer_id": "Group1@favoriot",
      "sensor_type": "others",
      "timezone": "Asia/Kuala_Lumpur"
    },
  ]
}
Return a list containing all devices, max 10000.
URL: https://apiv2.favoriot.com/v2/devices
Method: GET
Response: JSON
QUERY PARAMETERS
To narrow the query, the following parameters can be appended as query parameters in the URL.
| Parameter | Description |
|---|---|
| device_name | Type:String Required:optional Device name |
| device_developer_id | Type:String Required:optional Device developer ID |
| created_at | Type:Timestamp Required:optional filter the list of results by field created_at (timestamp) |
| created_from_to | Type:String Required:optional Allow to specify a range of device creation (e.g. [ 2016-09-03T01:39:39.473Z TO NOW] ) |
| max | Type:Integer Required:optional define the number of results to be returned |
| order | Type:String Required:optional sorting the results by creation date either ascending or descending ( asc or desc) |
| offset | Type:Integer Required:optional list devices at given offset |
Example of API usage:
To return 10 devices, the following API is used:
https://apiv2.favoriot.com/v2/devices?max=10
RESPONSES CODE
| Status | Description |
|---|---|
| 200 | Success refer to example responses for the result format |
| 422 | Unable to process the contained instructions |
Get a specific device
Code samples
# You can also use wget
curl -X GET --header 'Accept: application/json'
--header 'apikey: YOUR API KEY HERE'
'https://apiv2.favoriot.com/v2/devices/{device_developer_id}'
OkHttpClient client = new OkHttpClient();

Request request = new Request.Builder()
  .url("https://apiv2.favoriot.com/v2/devices/{device_developer_id}")
  .get(null)
  .addHeader("apikey", "YOUR API KEY HERE")
  .addHeader("content-type", "application/json")
  .addHeader("cache-control", "no-cache")
  .build();

Response response = client.newCall(request).execute();
var request = require("request");

var options = { method: 'GET',
  url: 'https://apiv2.favoriot.com/v2/devices/{device_developer_id}',
  headers:
   { 'cache-control': 'no-cache',
     'content-type': 'application/json',
     'apikey': 'YOUR API KEY HERE' } };

request(options, function (error, response, body) {
  if (error) throw new Error(error);

  console.log(body);
});
import requests

url = "https://apiv2.favoriot.com/v2/devices/{device_developer_id}"

headers = {
    'apikey': "YOUR API KEY HERE",
    'content-type': "application/json",
    'cache-control': "no-cache",
    }

response = requests.request("GET", url, headers=headers)

print(response.text)
Example responses
{
 "statusCode": 200,
  "numFound": 1,
  "results": [
    {
      "user_id": "favoriot",
      "device_name": "Device1",
      "active": true,
      "description": "No desc",
      "device_created_at": "2019-09-27T01:18:09.893Z",
      "device_developer_id": "Device1@favoriot",
      "device_id": "c6d831d7-7246-41ae-802c-acbf453f33f6",
      "device_type": "others",
      "device_updated_at": "2019-09-27T01:18:09.893Z",
      "group_developer_id": "Group1@favoriot",
      "sensor_type": "others",
      "timezone": "Asia/Kuala_Lumpur"
    }
  ]
}
- Show a single object of device as specified by device_developer_id.
- The parameter is specified as path in the URL
URL: https://apiv2.favoriot.com/v2/devices/{device_developer_id}
Method: GET
Response: JSON
As can be seen from the URL above, with this API, the query parameter (device_developer_id) part of the URL.
Note you may need to convert any symbols (e.g. @) from the device developer id into equivalent its HTML URL Encoding reference(s). E.g. '@' === '%40' | 'mydeviceid@user' === 'mydeviceid%40user'
Or you may need to wrap your device developer id in HTML URL Encoding reference(s). E.g. '"' === %40 | '"'device@userid'"' === %40device@userid%40
QUERY PARAMETERS
| Parameter | In | Type | Required | Description |
|---|---|---|---|---|
| device_developer_id | path | String | true | Device developer ID |
RESPONSES
| Status | Description |
|---|---|
| 200 | Success refer to example responses for the result format |
| 422 | Unable to process the contained instructions |
Update a device
# You can also use wget
curl -X PUT --header 'Content-Type: application/json'
--header 'Accept: application/json' --header 'apikey: YOUR API KEY HERE'
 -d '{
  "description": "No Desc",
  "active": true,
  "device_type": "arduino",
  "sensor_type": "temperature",
  "timezone": "Asia/Kuala_Lumpur",
  "latitude": 0,
  "longitude": 0
}'
'https://apiv2.favoriot.com/v2/devices/{device_developer_id}'
OkHttpClient client = new OkHttpClient();

Request request = new Request.Builder()
  .url("https://apiv2.favoriot.com/v2/devices/{device_developer_id}")
  .put(null)
  .addHeader("apikey", "YOUR API KEY HERE")
  .addHeader("content-type", "application/json")
  .addHeader("cache-control", "no-cache")
  .build();

Response response = client.newCall(request).execute();
var request = require("request");

var options = { method: 'PUT',
  url: 'https://apiv2.favoriot.com/v2/devices/{device_developer_id}',
  headers:
   { 'cache-control': 'no-cache',
     'content-type': 'application/json',
     'apikey': 'YOUR API KEY HERE' } };

request(options, function (error, response, body) {
  if (error) throw new Error(error);

  console.log(body);
});
import requests

url = "https://apiv2.favoriot.com/v2/devices/{device_developer_id}"

headers = {
    'apikey': "YOUR API KEY HERE",
    'content-type': "application/json",
    'cache-control': "no-cache",
    }

response = requests.request("PUT", url, headers=headers)

print(response.text)
Body parameter
{
  "description": "No Desc",
  "active": true,
  "device_type": "arduino",
  "sensor_type": "temperature",
  "timezone": "Asia/Kuala_Lumpur",
  "latitude": 0,
  "longitude": 0
}
Example responses
{
  "statusCode": 201,
  "message": "Device is successfully updated"
}
- Alter and update information of a device
- The parameter referring to Device ID is specified as path in the URL
- The attributes meant for changing device attribute is stored in HTTP Body
URL: https://apiv2.favoriot.com/v2/devices/{device_developer_id}
Method: PUT
Response: JSON
QUERY PARAMETERS
| Parameter | In | Type | Required | Description |
|---|---|---|---|---|
| device_developer_id | path | string | true | device developer ID |
| HTTP Body | body | JSON | true | The attributes meant for updating device is stored in HTTP Body |
Attributed for Updating A Device
The following are attributes that can be mentioned within the HTTP body in order to change the information about a device.
| Attribute | Type | Description |
|---|---|---|
| description | String |
Device description. |
| active | Boolean |
true or false Enables or disables the device. Default is true. |
| device_type | String |
Can be one of the device types available Example: Arduino |
| sensor_type | String |
Can be any types of sensor attached to the device Example: Temperature |
| timezone | String |
Defines device time zone. Default value is “Asia/Kuala_Lumpur”. Value must be one defined by FAVORIOT: https://apiv2.favoriot.com/v2/time_zones/ |
| latitude | Number | Defines the Latitude coordinate. Example:43.170 |
| longitude | Number | Defines the longitude coordinate. Example:-3.101 |
RESPONSES
| Status | Description |
|---|---|
| 201 | Updated |
| 422 | Failed to update the device |
Delete a device
# You can also use wget
curl -X DELETE --header 'Accept: application/json'
--header 'apikey: YOUR API KEY HERE'
'https://apiv2.favoriot.com/v2/devices/{device_developer_id}'
OkHttpClient client = new OkHttpClient();

Request request = new Request.Builder()
  .url("https://apiv2.favoriot.com/v2/devices/{device_developer_id}")
  .delete(null)
  .addHeader("apikey", "YOUR API KEY HERE")
  .addHeader("content-type", "application/json")
  .addHeader("cache-control", "no-cache")
  .build();

Response response = client.newCall(request).execute();
var request = require("request");

var options = { method: 'DELETE',
  url: 'https://apiv2.favoriot.com/v2/devices/{device_developer_id}',
  headers:
   { 'cache-control': 'no-cache',
     'content-type': 'application/json',
     'apikey': 'YOUR API KEY HERE' } };

request(options, function (error, response, body) {
  if (error) throw new Error(error);

  console.log(body);
});
import requests

url = "https://apiv2.favoriot.com/v2/devices/{device_developer_id}"

headers = {
    'apikey': "YOUR API KEY HERE",
    'content-type': "application/json",
    'cache-control': "no-cache",
    }

response = requests.request("DELETE", url, headers=headers)

print(response.text)
Example responses
{
  "code": 201,
  "message": "Device Deleted"
}
- Delete a particular device as specified by device_developer_id.
- The parameter is specified as path in the URL
- A device is can not be removed if one or more data streams referring to it.
URL: https://apiv2.favoriot.com/v2/devices/{device_developer_id}
Method: DELETE
As can be seen from the URL above, with this API, the query parameter (device_developer_id) part of the URL.
QUERY PARAMETERS
| Parameter | In | Description | ||
|---|---|---|---|---|
| device_developer_id | path | Type:String - Required:true Device developer ID |
RESPONSES
| Status | Description |
|---|---|
| 201 | Deleted |
| 422 | Unable to deleted the device |
Get all data stream of a device
Code samples
# You can also use wget
curl -X GET --header 'Accept: application/json'
--header 'apikey: YOUR API KEY HERE'
'https://apiv2.favoriot.com/v2/devices/{device_developer_id}/streams'
OkHttpClient client = new OkHttpClient();

Request request = new Request.Builder()
  .url("https://apiv2.favoriot.com/v2/devices/{device_developer_id}/streams")
  .get(null)
  .addHeader("apikey", "YOUR API KEY HERE")
  .addHeader("content-type", "application/json")
  .addHeader("cache-control", "no-cache")
  .build();

Response response = client.newCall(request).execute();
var request = require("request");

var options = { method: 'GET',
  url: 'https://apiv2.favoriot.com/v2/devices/{device_developer_id}/streams',
  headers:
   { 'cache-control': 'no-cache',
     'content-type': 'application/json',
     'apikey': 'YOUR API KEY HERE' } };

request(options, function (error, response, body) {
  if (error) throw new Error(error);

  console.log(body);
});
import requests

url = "https://apiv2.favoriot.com/v2/devices/{device_developer_id}/streams"

headers = {
    'apikey': "YOUR API KEY HERE",
    'content-type': "application/json",
    'cache-control': "no-cache",
    }

response = requests.request("GET", url, headers=headers)

print(response.text)
Example responses
{
   "statusCode": 200,
  "numFound": 1,
  "results": [
    {
      "user_id": "favoriot",
      "year": 2019,
      "timestamp": 1569289513493,
      "data": {
        "grip": "99",
        "pressure": "15",
        "strength": "32",
        "tear": "83"
      },
      "device_developer_id": "Device1@favoriot",
      "stream_created_at": "2019-09-24T01:45:13.493Z",
      "stream_developer_id": "19ce1d03-fcf8-4668-8e5b-21c22ffbfa9c@muqrizIOT",
      "stream_id": "19ce1d03-fcf8-4668-8e5b-21c22ffbfa9c"
    },
  ]
}
- Return a list of data treams that belong to a particular device.
- Maximum 10000 data streams will be returned in JSON format.
- The parameter is specified as path in the URL
URL:
https://apiv2.favoriot.com/v2/devices/{device_developer_id}/streams
Method: GET
Response: JSON
As can be seen from the URL above, with this API, the query parameter (device_developer_id) part of the URL.
| Parameter | In | Description | ||
|---|---|---|---|---|
| device_developer_id | path | Type:String - Required:true Device developer ID |
RESPONSES
| Status | Description |
|---|---|
| 200 | Success. |
| 422 | Unable to process the contained instructions |
Data
HTTP Endpoints related to data streams management
Send data from a device
Code samples
# You can also use wget
curl -X POST --header 'Content-Type: application/json'
 --header 'Accept: application/json'
 --header 'apikey: YOUR API KEY HERE'
 -d '{
  "device_developer_id": "deviceDefault@FAVORIOT",
  "data": { "temperature": "31","humidity": "70"}
  }'
'https://apiv2.favoriot.com/v2/streams'
var request = require("request");

var options = { method: 'POST',
  url: 'https://apiv2.favoriot.com/v2/streams',
  headers:
   { 'cache-control': 'no-cache',
     'content-type': 'application/json',
     'apikey': 'YOUR API KEY HERE' } };

request(options, function (error, response, body) {
  if (error) throw new Error(error);

  console.log(body);
});
OkHttpClient client = new OkHttpClient();

Request request = new Request.Builder()
  .url("https://apiv2.favoriot.com/v2/streams")
  .post(null)
  .addHeader("apikey", "YOUR API KEY HERE")
  .addHeader("content-type", "application/json")
  .addHeader("cache-control", "no-cache")
  .build();

Response response = client.newCall(request).execute();
import requests

url = "https://apiv2.favoriot.com/v2/streams"

headers = {
    'apikey': "YOUR API KEY HERE",
    'content-type': "application/json",
    'cache-control': "no-cache",
    'postman-token': "b404ce24-2b0b-b9c8-8895-6324a6900c47"
    }

response = requests.request("POST", url, headers=headers)

print(response.text)
Example of Body parameter
{
  "device_developer_id": "deviceDefault@FAVORIOT",
  "data": { "temperature": "31",
            "humidity": "70"
          }
}
Example responses
{
  "statusCode": 20150,
  "message": "A stream created"
}
{
  "statusCode": 4002,
  "message": "Invalid JSON"
}
{
  "statusCode": 4002,
  "message": "There entities are not enabled"
}
{
  "statusCode": 40450,
  "message": "Stream Creation Failed: either specified <user_id> or <device_developer_id> that's referred in the data stream is not exists"
}
- Create/Post data stream by passing necessary information in the HTTP body
- The parameter is specified in body of the URL
- The following are required in the HTTP body
- device_developer_id
- data stream
URL: https://apiv2.favoriot.com/v2/streams
Method: POST
QUERY PARAMETERS
| Parameter | In | Type | Required | Description |
|---|---|---|---|---|
| body | body | JSON | true | data stream from a device |
RESPONSES
| Status | Description |
|---|---|
| 201 | Data Stream Created |
| 400 | Invalid JSON or Data format |
| 401 | Un-authorized user or API-key |
| 422 | Request not valid |
Get all data of a device
# You can also use wget
curl -X GET --header 'Accept: application/json'
--header 'apikey: YOUR API KEY HERE'
'https://apiv2.favoriot.com/v2/streams'
var request = require("request");

var options = { method: 'GET',
  url: 'https://apiv2.favoriot.com/v2/streams',
  headers:
   { 'cache-control': 'no-cache',
     'content-type': 'application/json',
     'apikey': 'YOUR API KEY HERE' } };

request(options, function (error, response, body) {
  if (error) throw new Error(error);

  console.log(body);
});
OkHttpClient client = new OkHttpClient();

Request request = new Request.Builder()
  .url("https://apiv2.favoriot.com/v2/streams")
  .get()
  .addHeader("apikey", "YOUR API KEY HERE")
  .addHeader("content-type", "application/json")
  .addHeader("cache-control", "no-cache")
  .build();

Response response = client.newCall(request).execute();
import requests

url = "https://apiv2.favoriot.com/v2/streams"

headers = {
    'apikey': "YOUR API KEY HERE",
    'content-type': "application/json",
    'cache-control': "no-cache"
    }

response = requests.request("GET", url, headers=headers)

print(response.text)
Example responses
{
 "statusCode": 200,
  "numFound": 38,
  "results": [
    {
      "user_id": "favoriot",
      "year": 2019,
      "timestamp": 1569548452393,
      "data": {
        "temperature": 20,
        "humidity": 10,
      }
    }
  ]
}
{
  "statusCode": 400,
  "message": "Request not valid"
}
- List data streams for maximum 10000 streams
- Optionally, specific parameters can be set to narrow the search
URL: https://apiv2.favoriot.com/v2/streams
Method: GET
QUERY PARAMETERS
| Parameter | In | Type | Required | Description |
|---|---|---|---|---|
| device_developer_id | query | string | false | Device developer ID |
| created_at | query | string | false | filter the list of results by field created_at (timestamp) |
| created_from_to | query | string | false | Allow to specify a range of streams creation (e.g. [ 2016-09-03T01:39:39.473Z TO NOW] ) |
| max | query | integer | false | define the number of results to be returned |
| order | query | string | false | sorting the results by creation date either ascending or descending (asc or desc) |
| offset | query | number | false | list the streams at given offset |
Example of API usage with specific parameters:
To return 10 streams, the following API is used:
https://apiv2.favoriot.com/v2/streams?max=10&order=asc
RESPONSES
| Status | Description |
|---|---|
| 200 | Success |
| 401 | Un-authorized user or API-key |
| 422 | Request not valid |
Get specific data stream
# You can also use wget
curl -X GET --header 'Accept: application/json'
--header 'apikey: YOUR API KEY HERE'
'https://apiv2.favoriot.com/v2/streams/{stream_developer_id}'
var request = require("request");

var options = { method: 'GET',
  url: 'https://apiv2.favoriot.com/v2/streams/{stream_developer_id}',
  headers:
   { 'cache-control': 'no-cache',
     'content-type': 'application/json',
     'apikey': 'YOUR API KEY HERE' } };

request(options, function (error, response, body) {
  if (error) throw new Error(error);

  console.log(body);
});
OkHttpClient client = new OkHttpClient();

Request request = new Request.Builder()
  .url("https://apiv2.favoriot.com/v2/streams/{stream_developer_id}")
  .get()
  .addHeader("apikey", "YOUR API KEY HERE")
  .addHeader("content-type", "application/json")
  .addHeader("cache-control", "no-cache")
  .build();

Response response = client.newCall(request).execute();
import requests

url = "https://apiv2.favoriot.com/v2/streams/{stream_developer_id}"

headers = {
    'apikey': "YOUR API KEY HERE",
    'content-type': "application/json",
    'cache-control': "no-cache"
    }

response = requests.request("GET", url, headers=headers)

print(response.text)
Example responses
{
 "statusCode": 200,
  "numFound": 1,
  "results": [
    {
      "user_id": "favoriot",
      "year": 2019,
      "timestamp": 1569548452393,
      "data": {
        "temperature": 100,
        "acceleration": 50,
      },
      "device_developer_id": "Device1@favoriot",
      "stream_created_at": "2019-09-27T01:40:52.393Z",
      "stream_developer_id": "1a11e047-9ec4-4003-b7ec-81cad869689a@favoriot",
      "stream_id": "1a11e047-9ec4-4003-b7ec-81cad869689a"
    }
  ]
}
{
  "statusCode": 400,
  "message": "Error!!"
}
- Every stream is automatically set with a stream ID (stream_developer_id)
- One can request a specific stream using the following REST API
URL: https://apiv2.favoriot.com/v2/streams/{stream_developer_id}
Method: GET
Response: JSON Object
QUERY PARAMETERS
| Parameter | In | Type | Required | Description |
|---|---|---|---|---|
| stream_developer_id | path | string | true | Stream developer ID |
RESPONSES
| Status | Description |
|---|---|
| 200 | Success |
| 401 | Un-authorized user or API-key |
| 422 | Request not valid |
Delete data sent by a device
# You can also use wget
curl -X DELETE --header 'Accept: application/json'
--header 'apikey: YOUR API KEY HERE'
'https://apiv2.favoriot.com/v2/streams/{stream_developer_id}'
var request = require("request");

var options = { method: 'DELETE',
  url: 'https://apiv2.favoriot.com/v2/streams/{stream_developer_id}',
  headers:
   { 'postman-token': '683948a5-70d7-0080-15f3-b2929bac016c',
     'cache-control': 'no-cache',
     'content-type': 'application/json',
     'apikey': 'YOUR API KEY HERE' } };

request(options, function (error, response, body) {
  if (error) throw new Error(error);

  console.log(body);
});
OkHttpClient client = new OkHttpClient();

Request request = new Request.Builder()
  .url("https://apiv2.favoriot.com/v2/streams/{stream_developer_id}")
  .delete(null)
  .addHeader("apikey", "YOUR API KEY HERE")
  .addHeader("content-type", "application/json")
  .addHeader("cache-control", "no-cache")
  .build();

Response response = client.newCall(request).execute();
import requests

url = "https://apiv2.favoriot.com/v2/streams/{stream_developer_id}"

headers = {
    'apikey': "YOUR API KEY HERE",
    'content-type': "application/json",
    'cache-control': "no-cache"
    }

response = requests.request("DELETE", url, headers=headers)

print(response.text)
Example responses
{
  "statusCode": 20050,
  "message": "Stream deleted"
}
{
  "statusCode": 400,
  "message": Operation failed
  }
{
  "statusCode": 40452,
  "message": "Delete Failed: The stream is not exists"
  }
- Every stream is automatically set with a stream ID (stream_developer_id)
- One can DELETE a particular stream using the following REST API
URL: https://apiv2.favoriot.com/v2/streams/{stream_developer_id}
Method: DELETE
QUERY PARAMETERS
| Parameter | In | Type | Required | Description |
|---|---|---|---|---|
| stream_developer_id | path | string | true | stream developer ID |
RESPONSES
| Status | Description |
|---|---|
| 200 | Success |
| 401 | Un-authorized user or API-key |
| 422 | Request not valid |
| 404 | Not Found |
Delete all streams for specific device
# You can also use wget
curl -X DELETE --header 'Accept: application/json'
--header 'apikey: YOUR API KEY HERE'
'https://apiv2.favoriot.com/v2/devices/{device_developer_id}/streams'
var request = require("request");

var options = { method: 'DELETE',
  url: 'https://apiv2.favoriot.com/v2/devices/{device_developer_id}/streams',
  headers:
   { 'postman-token': '683948a5-70d7-0080-15f3-b2929bac016c',
     'cache-control': 'no-cache',
     'content-type': 'application/json',
     'apikey': 'YOUR API KEY HERE' } };

request(options, function (error, response, body) {
  if (error) throw new Error(error);

  console.log(body);
});
OkHttpClient client = new OkHttpClient();

Request request = new Request.Builder()
  .url("https://apiv2.favoriot.com/v2/devices/{device_developer_id}/streams")
  .delete(null)
  .addHeader("apikey", "YOUR API KEY HERE")
  .addHeader("content-type", "application/json")
  .addHeader("cache-control", "no-cache")
  .build();

Response response = client.newCall(request).execute();
import requests

url = "https://apiv2.favoriot.com/v2/devices/{device_developer_id}/streams"

headers = {
    'apikey': "YOUR API KEY HERE",
    'content-type': "application/json",
    'cache-control': "no-cache"
    }

response = requests.request("DELETE", url, headers=headers)

print(response.text)
Example responses
{
  "statusCode": 20050,
  "message": "Stream deleted"
}
{
  "statusCode": 400,
  "message": Operation failed
  }
{
  "statusCode": 40452,
  "message": "Delete Failed: The stream is not exists"
  }
- Every stream is automatically set with a stream ID (stream_developer_id)
- One can DELETE all stream for a particular device using the following REST API
URL: https://apiv2.favoriot.com/v2/devices/{device_developer_id}/streams
Method: DELETE
QUERY PARAMETERS
| Parameter | In | Type | Required | Description |
|---|---|---|---|---|
| device_developer_id | path | string | true | device developer ID |
RESPONSES
| Status | Description |
|---|---|
| 200 | Success |
| 401 | Un-authorized user or API-key |
| 422 | Request not valid |
| 404 | Not Found |
Delete all streams
# You can also use wget
curl -X DELETE --header 'Accept: application/json'
--header 'apikey: YOUR API KEY HERE'
'https://apiv2.favoriot.com/v2/streams'
var request = require("request");

var options = { method: 'DELETE',
  url: 'https://apiv2.favoriot.com/v2/streams',
  headers:
   { 'postman-token': '683948a5-70d7-0080-15f3-b2929bac016c',
     'cache-control': 'no-cache',
     'content-type': 'application/json',
     'apikey': 'YOUR API KEY HERE' } };

request(options, function (error, response, body) {
  if (error) throw new Error(error);

  console.log(body);
});
OkHttpClient client = new OkHttpClient();

Request request = new Request.Builder()
  .url("https://apiv2.favoriot.com/v2/streams")
  .delete(null)
  .addHeader("apikey", "YOUR API KEY HERE")
  .addHeader("content-type", "application/json")
  .addHeader("cache-control", "no-cache")
  .build();

Response response = client.newCall(request).execute();
import requests

url = "https://apiv2.favoriot.com/v2/streams"

headers = {
    'apikey': "YOUR API KEY HERE",
    'content-type': "application/json",
    'cache-control': "no-cache"
    }

response = requests.request("DELETE", url, headers=headers)

print(response.text)
Example responses
{
  "statusCode": 20050,
  "message": "Stream deleted"
}
{
  "statusCode": 400,
  "message": Operation failed
  }
{
  "statusCode": 40452,
  "message": "Delete Failed: The stream is not exists"
  }
- Every stream is automatically set with a stream ID (stream_developer_id)
- One can DELETE all stream for a particular device using the following REST API
URL: https://apiv2.favoriot.com/v2/streams
Method: DELETE
RESPONSES
| Status | Description |
|---|---|
| 200 | Success |
| 401 | Un-authorized user or API-key |
| 422 | Request not valid |
| 404 | Not Found |
Errors
The FAVORIOT API uses the following error codes. The error code are separated according to functionality of the APIs.
User Authentication
| Type of Status | HTTP Code | status Code |
|---|---|---|
| Database Error | 503 | - |
| Not Unique Field | 409 | 409xx |
| Unable to find user | 404 | 404xx |
| Wrong password (Un-authenticated) | 401 | 401xx |
| Token Related (Un-authenticated) | 401 | 401xx |
| Validation error | 422 | 422xx |
| Invalid token on changing passwd | 422 | 422xx |
| Token un-authorized (forbidden) | 403 | 403xx |
Validation Error
- email : should be of the form example@email.com
- username or user_id should be 6 to 20 characters in Alphanumeric or special characters.
Project Creation
| Type of Status | HTTP Code | status Code |
|---|---|---|
| Unable to create project | 422 | |
| ERROR: Database Error | 503 | 5031x |
| ERROR: Unable to find user | 404 | 4041x |
| ERROR: Not Unique Field | 409 | 4091x |
| ERROR: Validation error | 422 | 4221x |
| ERROR: Unable to update | 400 | 4001x |
| ERROR:(Field speciefied not found) | 404 | 4041x |
- project_id, project_developer_id and project_name are not allowed to be changed
Application
| Type of Status | HTTP Code | status Code |
|---|---|---|
| ERROR: Database Error | 503 | 5032x |
| ERROR: Unable to update | 400 | 4002x |
| ERROR:(Specified field not found) | 404 | 4042x |
| ERROR: Validation error | 422 | 4223x |
Group
| Type of Status | HTTP Code | status Code |
|---|---|---|
| ERROR: Database Error | 503 | 5033x |
| ERROR: Unable to find user | 404 | 4043x |
| ERROR: Not Unique Field | 409 | 4093x |
| ERROR: Validation error | 422 | 4223x |
Device
| Type of Status | HTTP Code | status Code |
|---|---|---|
| ERROR: Database Error | 503 | 5034x |
| ERROR: Unable to find user | 404 | 4044x |
| ERROR: Not Unique Field | 409 | 4094x |
| ERROR: Validation error | 422 | 4224x |
Data Stream
| Type of Status | HTTP Code | status Code |
|---|---|---|
| ERROR: Database Error | 503 | 5035x |
| ERROR: Unable to find user | 404 | 4045x |
| ERROR: Not Unique Field | 409 | 4095x |
| ERROR: Validation error | 422 | 4225x |
SECURITY
API keys
API keys are essential for managing and securing access to the platform's resources and functionalities. API keys act as authentication credentials that allow applications, devices, or users to interact with the Favoriot API. There are generally two types of API keys: read/write API keys and read-only API keys. Here's a breakdown of each:
Read/Write API key
- A Read/Write API key grants full access to the API, allowing users to perform both read and write operations. This means that applications or devices using this key can retrieve data from the Favoriot Platform and also send data or make changes to the resources.
Read-Only API Key
- A Read-Only API key allows access only to read data from the API. With this key, users or applications can retrieve information but cannot make any modifications to the resources on the Favoriot platform.
How to find API keys
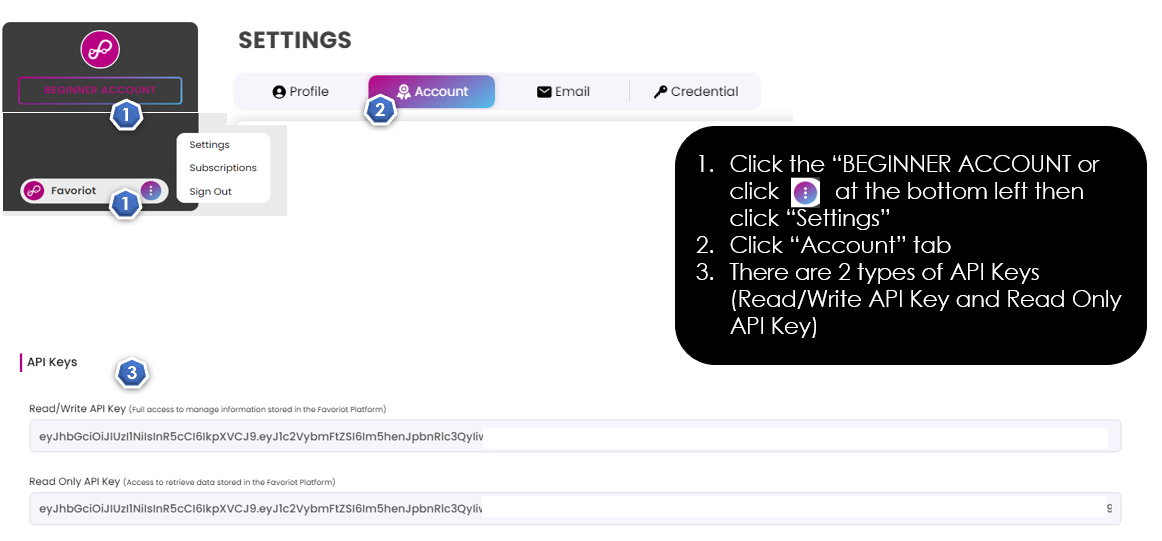
Access Token
An access token is a secure, unique identifier used to authenticate and authorize requests to the Favoriot platform. It enables IoT devices and gateways to interact with the platform without repeatedly transmitting sensitive credentials such as usernames and passwords. This improves both security and efficiency when communicating with platform services.
Access tokens are also integral to data streaming and MQTT communication. They function as MQTT credentials (username and password) and manage topic authorization, ensuring that only authorized devices or users can publish or subscribe to specific topics. This mechanism safeguards the integrity and security of data exchanges across the platform.
Each device or gateway is issued its own access token, ensuring fine-grained control and secure interactions on a per-device basis.
Access Token Usage by Module
Device Module
- Upload data streams to the platform.
RPC Module
- Receive and process Remote Procedure Call (RPC) commands.
Gateway Module
- Upload data streams on behalf of connected devices.
Firmware OTA Module
- Download firmware binary files.
- Report update progress and status from a device or gateway.
Device Access Token
How to find device access token
Navigate to "Devices" page and click on the view button (eye icon) to check the device's Access Token and popup will appear.
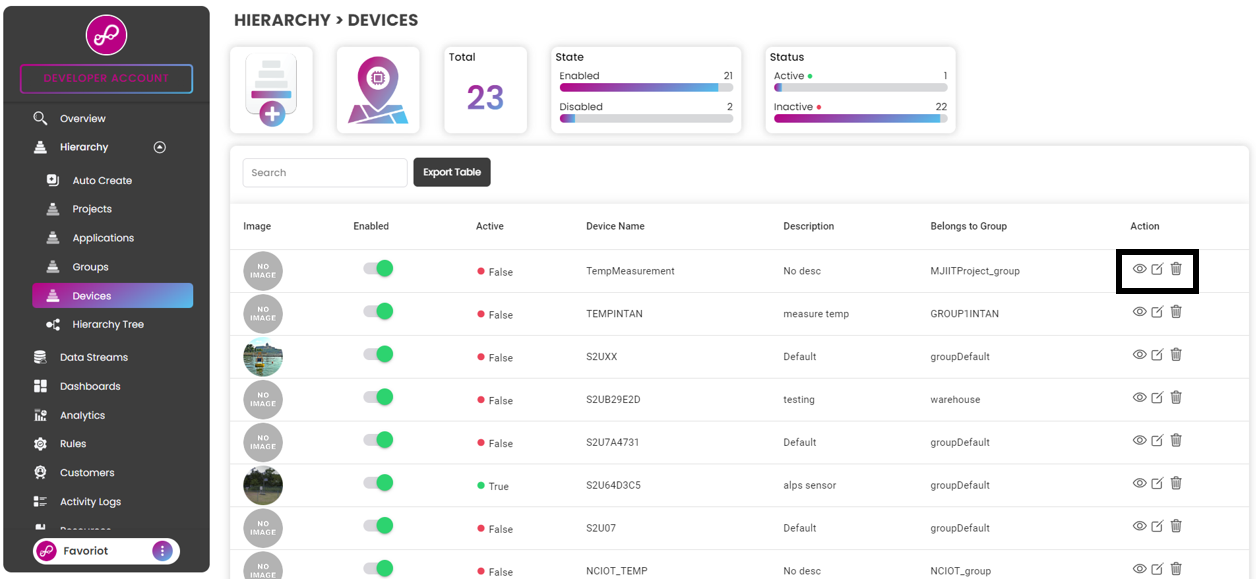
Take a look at the 'Access Token' label, now you can copy the access token by click copy button at the end.
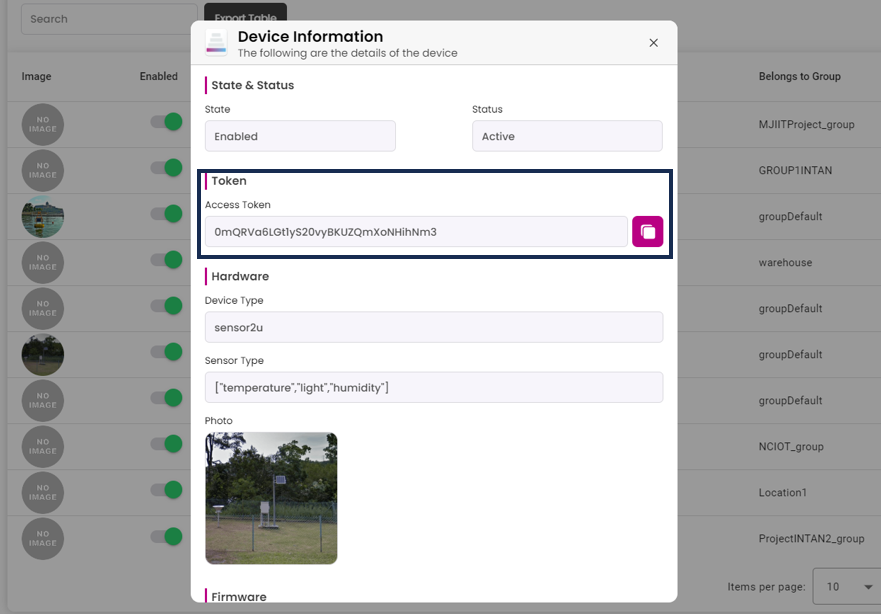
Regenerate access token
Click on the edit icon in the "Devices" page.

Then click on the refresh icon to generate a new Access Token.
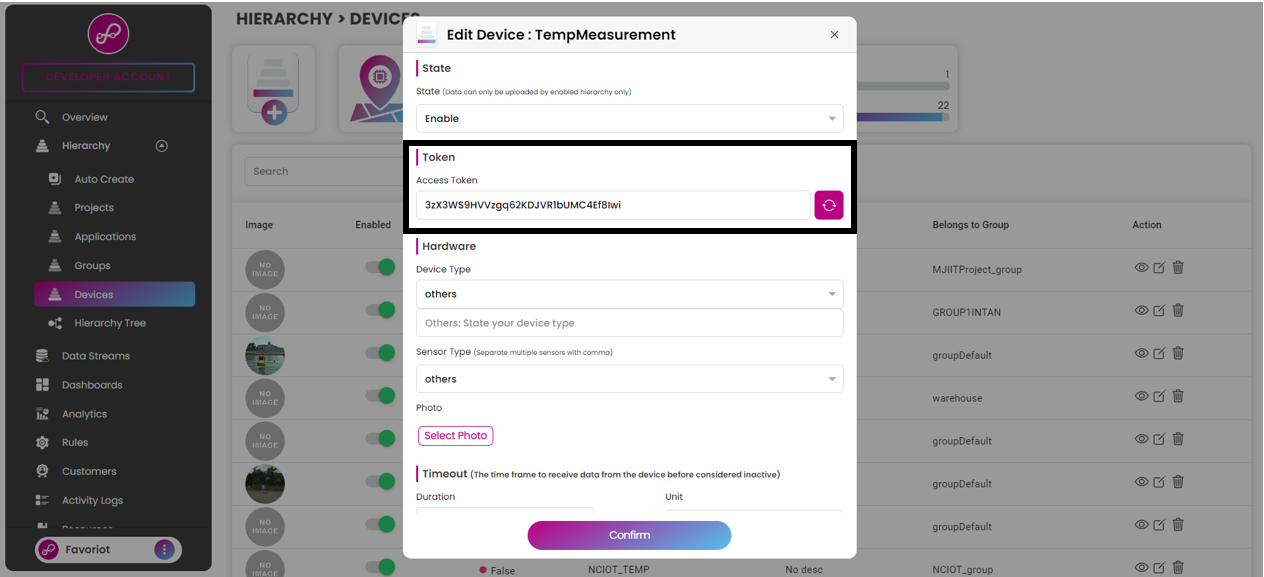
Note: To use the new device Access Token, include a property called 'accesstoken' or 'apikey' and its value in the http header.
Edge Gateway Access Token
How to find edge gateway access token
Navigate to "Edge Gateway" page and click on the view button (eye icon) to check the device's Access Token and popup will appear.
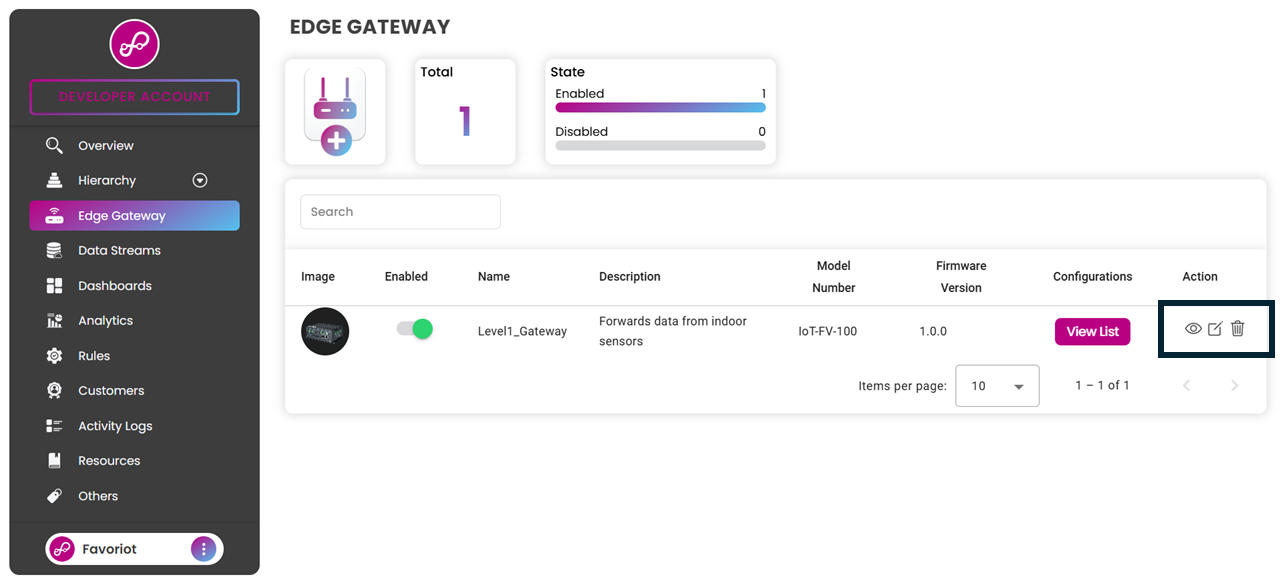
Take a look at the 'Access Token' label, now you can copy the access token by click copy button at the end.
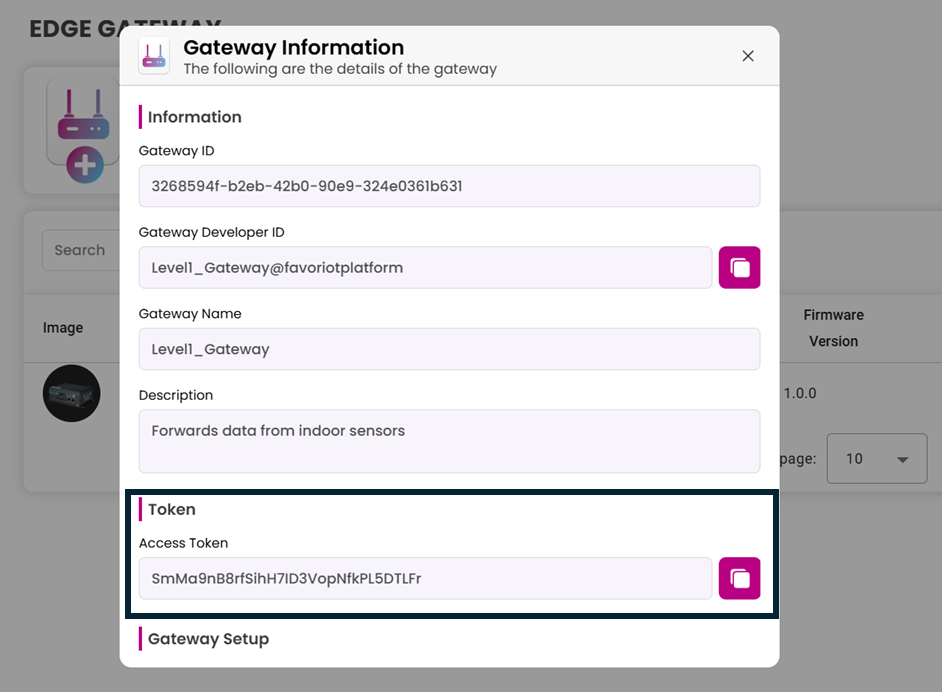
Regenerate access token
Click on the edit icon in the "Edge Gateway" page.

Then click on the refresh icon to generate a new Access Token.
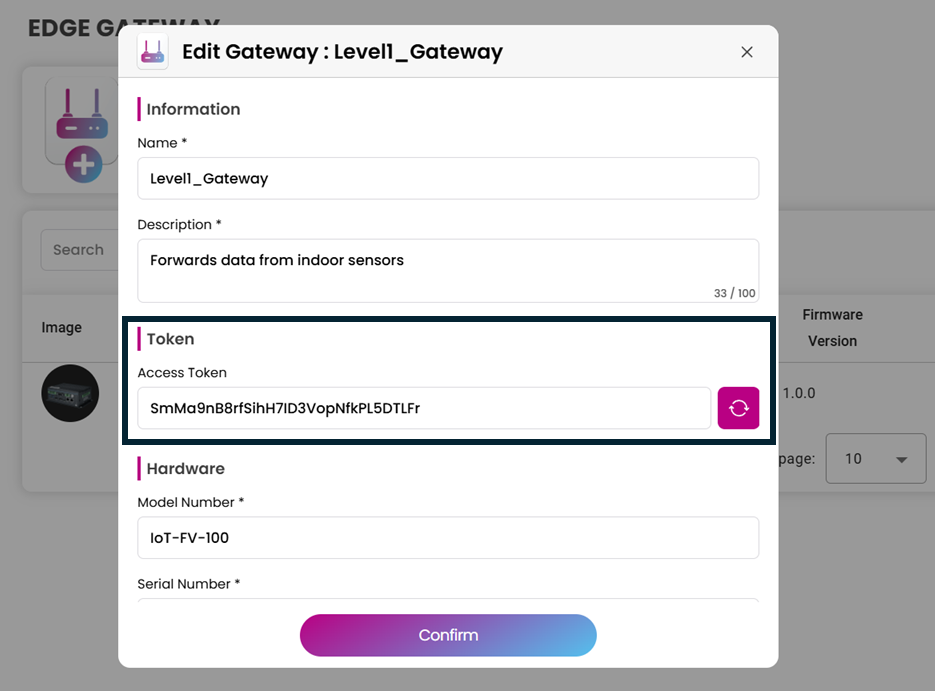
HTTP(S) Connection
To establish secure HTTP(S) connection to the Favoriot platform, create ca.crt file, copy and paste the following certificate inside it. remark: If your programme unable to handle self signed ssl/tls
-----BEGIN CERTIFICATE-----
MIIF3TCCA8WgAwIBAgIIeyyb0xaAMpkwDQYJKoZIhvcNAQELBQAwfDELMAkGA1UE
BhMCVVMxDjAMBgNVBAgMBVRleGFzMRAwDgYDVQQHDAdIb3VzdG9uMRgwFgYDVQQK
DA9TU0wgQ29ycG9yYXRpb24xMTAvBgNVBAMMKFNTTC5jb20gUm9vdCBDZXJ0aWZp
Y2F0aW9uIEF1dGhvcml0eSBSU0EwHhcNMTYwMjEyMTczOTM5WhcNNDEwMjEyMTcz
OTM5WjB8MQswCQYDVQQGEwJVUzEOMAwGA1UECAwFVGV4YXMxEDAOBgNVBAcMB0hv
dXN0b24xGDAWBgNVBAoMD1NTTCBDb3Jwb3JhdGlvbjExMC8GA1UEAwwoU1NMLmNv
bSBSb290IENlcnRpZmljYXRpb24gQXV0aG9yaXR5IFJTQTCCAiIwDQYJKoZIhvcN
AQEBBQADggIPADCCAgoCggIBAPkP3aMrfcvQKv7sZ4Wm5y4bunfh4/WvpOz6Sl2R
xFdHaxh3a3by/ZPkPQ/CFp4LZsNWlJ4Xg4XOVu/yFv0AYvUiCVToZRdOQbngT0aX
qhvIuG5iXmmxX9sqAn78bMrzQdjt0Oj8P2FI7bADFB0QDksZ4LtO7IZl/zbzXmcC
C52GVWH9ejjt/uIZALdvoVBidXQ8oPrIJZK0bnoix/geoeOy3ZExqysdBP+lSgQ3
6YWkMyv94tZVNHwZpEpox7Ko07fKoZOI68GXvIz5HdkihCR0xwQ9aqkpk8zruFvh
/l8lqjRYyMEjVJ0bmBHDOJx+PYZspQ9AhnwC9FwCTyjLrnGfDzrIM/4RJTXq/LrF
YD3ZfBjVsqnTdXgDciLKOsMf7yzlLqn6niy2UUb9rwPW6mBo6oUWNmuF6R7As93E
JNyAKoFBbZQ+yODJgUEAnl6/f8UImKIYLEJAs/lvOCdLToD0PYFH4Ih86hzOtXVc
US4cK38acijnALXRdMbX5J+tB5O2UzU1/Dfkw/ZdFr4hc96SCvigY2q8lpJqPvi8
ZVWb3vUNiSYE/CUapiVpy8JtynziWV+XrOvvLsi81xtZPCvM8hnIk2snYxnP/Okm
+Mpxm3+T/jRnhE6Z6/yzeAkzcLpmpnbtG3PrGqUNxCITIJRWCk4sbE6x/c+cCbqi
M+2HAgMBAAGjYzBhMB0GA1UdDgQWBBTdBAkHovV6fVJTEpKV7jiAJQ2mWTAPBgNV
HRMBAf8EBTADAQH/MB8GA1UdIwQYMBaAFN0ECQei9Xp9UlMSkpXuOIAlDaZZMA4G
A1UdDwEB/wQEAwIBhjANBgkqhkiG9w0BAQsFAAOCAgEAIBgRlCn7Jp0cHh5wYfGV
cpNxJK1ok1iOMq8bs3AD/CUrdIWQPXhq9LmLpZc7tRiRux6n+UBbkflVma8eEdBc
Hadm47GUBwwyOabqG7B52B2ccETjit3E+ZUfijhDPwGFpUenPUayvOUiaPd7nNgs
PgohyC0zrL/FgZkxdMF1ccW+sfAjRfSda/wZY52jvATGGAslu1OJD7OAUN5F7kR/
q5R4ZJjT9ijdh9hwZXT7DrkT66cPYakylszeu+1jTBi7qUD3oFRuIIhxdRjqerQ0
cuAjJ3dctpDqhiVAq+8zD8ufgr6iIPv2tS0a5sKFsXQP+8hlAqRSAUfdSSLBv9jr
a6x+3uxjMxW3IwiPxg+NQVrdjsW5j+VFP3jbutIbQLH+cU0/4IGiul607BXgk90I
H37hVZkLId6Tngr75qNJvTYw/ud3sqB1l7UtgYgXZSD32pAAn8lSzDLKNXz1PQ/Y
K9f1JmzJBjSWFupwWRoyeXkLtoh/D1JIPb9s2KJELtFOt3JY04kTlf5Eq/jXixtu
nLwsoFvVagCvXzfh1foQC5ichucmj87w7G6KVwuA406ywKBjYZC6VWg3dGq2ktuf
oYYitmUnDuy2n0Jg5GfCtdpBC8TTi2EbvPofkSvXRAdeuims2cXp71NIWuuA8ShY
Ic2wBlX7Jz9TkHCpBB5XJ7k=
-----END CERTIFICATE-----
MQTT(S) Connection
To establish secure MQTT(S) connection to the platform, create ca.crt file, copy and paste the following certificate inside it.
-----BEGIN CERTIFICATE-----
MIIDmTCCAoGgAwIBAgIJAMPWVA80Rf38MA0GCSqGSIb3DQEBDQUAMGMxGzAZBgNV
BAMMElNlY3VyZSBNUVRUIGJyb2tlcjERMA8GA1UECgwIRmF2b3Jpb3QxDDAKBgNV
BAsMA0lvVDEjMCEGCSqGSIb3DQEJARYUc3VwcG9ydEBmYXZvcmlvdC5jb20wHhcN
MTcwNjIwMDcxMjQyWhcNMzIwNjE2MDcxMjQyWjBjMRswGQYDVQQDDBJTZWN1cmUg
TVFUVCBicm9rZXIxETAPBgNVBAoMCEZhdm9yaW90MQwwCgYDVQQLDANJb1QxIzAh
BgkqhkiG9w0BCQEWFHN1cHBvcnRAZmF2b3Jpb3QuY29tMIIBIjANBgkqhkiG9w0B
AQEFAAOCAQ8AMIIBCgKCAQEAw6jfao9GPyXR2oIjFseVN2wGHHf321VaOB21NwS9
hobsh7o37mOJUurDon2j2cnwj3PzRLxr5+1jtMlTh18KR7YvtI4QNVC0yZ1kfeYw
doTVZ0JMm7kKqcwG75/HYTNehFTnTOKlCHcNG/lALOBUaF0Q8gccuP8w7mKsB/WY
Kct7sG3Kom09vHpg14QML/4BqfBso3nMy2UpilmFqkd3iBZOc3OP93wbfoMdv+TY
f3NuMC8GvjVj6w3y/ThVT5v9nW0hIOxnH0Z7/Z+StpKf66LEYrVK6wqrE+QOyPbt
7egm7xzufeMFYRG9D8yq1cdkgv91D+d0WZcGJ1WuhGmyGQIDAQABo1AwTjAdBgNV
HQ4EFgQU92lSlWRQCgYvnDR+yKqbrJhXH8cwHwYDVR0jBBgwFoAU92lSlWRQCgYv
nDR+yKqbrJhXH8cwDAYDVR0TBAUwAwEB/zANBgkqhkiG9w0BAQ0FAAOCAQEAA0HF
TipnY6COyJX9fPH9ZCW9+FitArf0liTJTOci2Wga6f7AWAvaqgEAYtOEwGmARTK8
i8MkAnf3rncvy/tegHIlklkmVHAnE8DaJIw+GwIQqg+CG+zW96M9ZicE2gP78I2d
oMTKznk4POPzZOs5GnsFD50y49TY/gy7YEsmRhsyegnew9Ny45ZvAEsI1CD4QDZN
nifCffGE5nNp7gcIlW5u66FvQ32deO9/Ag/83Qzj+MKvXtdkW+2PTG++g8qZnuZ6
51NjwKNY6DApQ5f7QN9WZHRs82s/SrWkMxv9HgIHMyQ6PxiRYZfaLdjTKgwv92P6
cDpPSjaUgpEJwiMvpQ==
-----END CERTIFICATE-----
After saving the certifcate in ca.crt file, provide the path to the certificate in the programme used to send MQTT data.
MQTT
code for sending data using MQTT
Command to publish: Mosquitto publish

mosquitto_pub -d -h mqtt.favoriot.com -p 1883 -u your-device-access-token -P your-device-access-token  -t your-device-access-token/v2/streams -m {data}

Command to publish : Mosquito publish secure version

mosquitto_pub -d -h mqtt.favoriot.com -p 8883 --cafile path_to_ca.crt_file -u your-device-access-token -P your-device-access-token  -t your-device-access-token/v2/streams -m {data} --insecure

data format example:
"{\"device_developer_id\":\"deviceDefault@{user_id}\",\"data\":{\"humidity\":\"10\",\"Temperature\":\"10\"}}"

Command to subscribe: Mosquitto subscribe

mosquitto_sub -d -h mqtt.favoriot.com -p 1883 -u your-device-access-token -P your-device-access-token  -t your-device-access-token/v2/streams/status

Command to subscribe : Mosquito subscribe secure version

mosquitto_sub -d -h mqtt.favoriot.com -p 8883 --cafile path_to_ca.crt_file -u your-device-access-token -P your-device-access-token -t your-device-access-token/v2/streams/status --insecure
var mqtt = require('mqtt')
var api = ''; // replace with your apikey
var url = 'mqtt://mqtt.favoriot.com' ;


var options = {
  port: 1883,
  clientId: 'mqttjs_' + Math.random().toString(16).substr(2, 8),
  username: api,
  password: api,
};

// Create a client connection
var client = mqtt.connect(url, options);

// or var client = mqtt.connect({ port: 1883, host: '192.168.1.100', keepalive: 10000});

var data = {
       "device_developer_id": "deviceDefault@favoriot", // replace with your device developer id
       "data": {"temperature":"30", "humidity":"40"}
           };

client.on('connect', function () {

client.subscribe(api+"/v2/streams/status");  // listen stream response
client.publish(api+'/v2/streams', JSON.stringify(data)); // publish to favoriot iot platform

})

client.on('message', function (topic, message) {
  // message is Buffer
  console.log(message.toString());
  client.end();
})
The code is only available in javascript and command line (bash)
The code is only available in javascript and command line (bash)
This section explains on how to use MQTT protocol to connect to FAVORIOT platform.
About MQTT
MQTT is an OASIS standard messaging protocol for the Internet of Things (IoT). It is designed as an extremely lightweight publish/subscribe messaging transport that is ideal for connecting remote devices with a small code footprint and minimal network bandwidth
JSON Data
FAVORIOT platform accepts JSON data from a MQTT device. The format is in the following format if using mosquitto_pub command from CLI:
"{\"device_developer_id\":\"deviceDefault@mqtttest7\",\"data\":{\"humidity\":\"10\"}}"
MQTT QoS supported by Favoriot platform
QoS 0 : received at most once
- The message is delivered at most once, or it is not delivered at all which means the delivery across the network is not acknowledged. The message is NOT stored. The message might be lost if the client is disconnected, or if the server fails. This is is the fastest mode of transfer. The MQTT protocol does not require servers to forward publications at QoS=0 to a client. If the client is disconnected at the time the server receives the publication, the publication might be discarded, depending on the server. The telemetry (MQXR) service does not discard messages sent with QoS=0. They are stored as nonpersistent messages, and are only discarded if the queue manager stops. In the QoS 0 delivery protocol, the Sender: MUST send a PUBLISH packet with QoS=0, DUP=0
In the QoS 0 delivery protocol, the Receiver: Accepts ownership of the message when it receives the PUBLISH packet.
QoS 1 : received at least once
- The message is always delivered at least once. If the sender does not receive an acknowledgment, the message is sent again with the DUP flag set until an acknowledgment is received. As a result receiver can be sent the same message multiple times, and might process it multiple times. The message must be stored locally at the sender and the receiver until it is processed. The message is deleted from the receiver after it has processed the message. If the receiver is a broker, the message is published to its subscribers. If the receiver is a client, the message is delivered to the subscriber application. After the message is deleted, the receiver sends an acknowledgment to the sender.
The message is deleted from the sender after it has received an acknowledgment from the receiver. This level could be used, for example, with ambient sensor data where it does not matter if an individual reading is lost as the next one will be published soon after.
- The message is always delivered at least once. If the sender does not receive an acknowledgment, the message is sent again with the DUP flag set until an acknowledgment is received. As a result receiver can be sent the same message multiple times, and might process it multiple times. The message must be stored locally at the sender and the receiver until it is processed. The message is deleted from the receiver after it has processed the message. If the receiver is a broker, the message is published to its subscribers. If the receiver is a client, the message is delivered to the subscriber application. After the message is deleted, the receiver sends an acknowledgment to the sender.
In the QoS 1 delivery protocol, the Sender:
- MUST assign an unused Packet Identifier each time it has a new Application Message to publish.
- MUST send a PUBLISH Packet containing this Packet Identifier with QoS=1, DUP=0.
- MUST treat the PUBLISH Packet as "unacknowledged" until it has received the corresponding PUBACK packet from the receiver.
The Packet Identifier becomes available for reuse once the Sender has received the PUBACK Packet. Note that a Sender is permitted to send further PUBLISH Packets with different Packet Identifiers while it is waiting to receive acknowledgements.
In the QoS 1 delivery protocol, the Receiver: -MUST respond with a PUBACK Packet containing the Packet Identifier from the incoming PUBLISH Packet, having accepted ownership of the Application Message -After it has sent a PUBACK Packet the Receiver MUST treat any incoming PUBLISH packet that contains the same Packet Identifier as being a new publication, irrespective of the setting of its DUP flag.
Establishing secure MQTT connection
In order to establish secure MQTT connection to the platform, create ca.crt file, copy and paste the following certificate inside it.
-----BEGIN CERTIFICATE----- MIIHSDCCBTCgAwIBAgIQBNtN7/pOmS90qJSSVsNZXjANBgkqhkiG9w0BAQsFADBp MQswCQYDVQQGEwJVUzEOMAwGA1UECAwFVGV4YXMxEDAOBgNVBAcMB0hvdXN0b24x GDAWBgNVBAoMD1NTTCBDb3Jwb3JhdGlvbjEeMBwGA1UEAwwVU1NMLmNvbSBSU0Eg U1NMIHN1YkNBMB4XDTIzMDUwNTA3MjMwOFoXDTI0MDQyNDA3MjMwOFowGTEXMBUG A1UEAwwOKi5mYXZvcmlvdC5jb20wggEiMA0GCSqGSIb3DQEBAQUAA4IBDwAwggEK AoIBAQCpxrAD7148cwPxE0+rnJkwTDKcY+yVm9RvGOB2Q8sR2uQQgGxXN8ZkpUie GqfS/miq/nKJs72UL/76iKgoUOLL6bgkawYZ+1sIN2Y9sxyQhsOz6MZyyxnjnf3D HlSJK2J2BuNn6YCYJppIte/5l8a31qVsMQ3ij3yM6JiQ1BqPlwmeyYUkO+MQyK4h OydxDI6sWss07VkV/s4O+N2zaxJFIB16lyfEuhHj3H2X8CjY5X8l1eWcW+iTmZlK efDyStk5QmxMJ+oA9mfzCQdeM3YRo3Ff0yvqeTweO2ch9nhi+pFG9Kz+laz60MnJ M4x1hA0lTrRczHOkAQj6FCHzP4VvAgMBAAGjggM6MIIDNjAMBgNVHRMBAf8EAjAA MB8GA1UdIwQYMBaAFCYUfuDc16b34tQEJ99h8cLs5zLKMHIGCCsGAQUFBwEBBGYw ZDBABggrBgEFBQcwAoY0aHR0cDovL2NlcnQuc3NsLmNvbS9TU0xjb20tU3ViQ0Et U1NMLVJTQS00MDk2LVIxLmNlcjAgBggrBgEFBQcwAYYUaHR0cDovL29jc3BzLnNz bC5jb20wJwYDVR0RBCAwHoIOKi5mYXZvcmlvdC5jb22CDGZhdm9yaW90LmNvbTBR BgNVHSAESjBIMAgGBmeBDAECATA8BgwrBgEEAYKpMAEDAQEwLDAqBggrBgEFBQcC ARYeaHR0cHM6Ly93d3cuc3NsLmNvbS9yZXBvc2l0b3J5MB0GA1UdJQQWMBQGCCsG AQUFBwMCBggrBgEFBQcDATBFBgNVHR8EPjA8MDqgOKA2hjRodHRwOi8vY3Jscy5z c2wuY29tL1NTTGNvbS1TdWJDQS1TU0wtUlNBLTQwOTYtUjEuY3JsMB0GA1UdDgQW BBRkISFi0U8TIkIyqKwKenYp74+5tzAOBgNVHQ8BAf8EBAMCBaAwggF+BgorBgEE AdZ5AgQCBIIBbgSCAWoBaAB3ADtTd3U+LbmAToswWwb+QDtn2E/D9Me9AA0tcm/h +tQXAAABh+rUPQMAAAQDAEgwRgIhAMWy+quftchrpVuNqhJ92+ZLQx7sDW00mgBa Z1BOMSfcAiEA1Rtru5ExM04FWg/DsmR6a0NCNZWSaESHkOgDoYzgDOUAdgDatr9r P7W2Ip+bwrtca+hwkXFsu1GEhTS9pD0wSNf7qwAAAYfq1D0kAAAEAwBHMEUCIEZX U1J6D31vrG1GYQwt0VxwIubOwyj/z4HTUPpMt7ZRAiEAq72VEqdxMpXA1za07FCP ayEmkK5YaaDtOt2fOuawbJ0AdQB2/4g/Crb7lVHCYcz1h7o0tKTNuyncaEIKn+Zn TFo6dAAAAYfq1D1FAAAEAwBGMEQCIH6YJP8o1ChZaH+GrpVrQ/bhCulozocj0aZo nV5/8qKzAiBLrsgdGUyvjDPHX35LyWhIbyJiU0mTTfCzLuUZwsgWhTANBgkqhkiG 9w0BAQsFAAOCAgEAO+p4GPffvKX/EoYhoVUxWyOAQowgTK1Swqfy50iGI3CbV1WV EgdNND3C2vDQxJvqn4tBoe+5vCSpjpOwhXfIDW42AfO7Z9P+L1qgig8s692/M9al Fb+9gREE8QSd54CYHsQN2Ob5nhNLH7j9tyxneClXAzpZuujfQVWLVH/co9KKyYYY 90eSNVPsnxyTb9NL4//YNW+E7HMoz5K6GQP0MDl3MuaR/GMt5Nx+ZhzUohX2Dact jKTP21v2rvKn44qeW4SZ3b71KiYiABCcKa/sSxOZA6S99X51FVtB0jkhgBzIudxA XsaYmH456T1fdcs5CH0AaObwJ6SB9FBj+QIW0uQwLxWH+59xRMRlAFdCK2uP2AZi hh+eWQ37eX+F4s7PYia8c9zAnDSovWmhcmM+6XqSQDZC24vYR6rkulmFmRakt8uS 9yo4oFJ7rGBf1ouQM8yQzRpUMUuoWYz/J4RP+sVGMKhWQnvwRAMiI4U3whm4Ywvj BQIIa7x/y0LfSTAuqauGftnCoNOxyFl5Zrg1zYErBsWcOaQ00Z4ERS22W4guJ/4B jwqDZB2+kYZNc87dXY9bFhLagSizCMa/prT0yaHIQF14V1OPStTqlu7gf6k7FQU+ Mx62lIX5pxyzc+efPWTlXPru+Y/Hues2xJYZrDtbLaGgrLPinKKXSrGcMqU= -----END CERTIFICATE-----
After saving the certifcate in ca.crt file, provide the path to the certificate in the programme used to send MQTT data. See the sample code in the right column.
MQTT Websocket
MQTT websocket allows browser to receive messages directly from a server as new messages arrives. Favoriot platform has enabled this feature that allows data to be stored, and the same time delivered to the MQTT client that subscribe to the same topic (a bi-directional communication). This is an important feature for the following use cases. • Display live data from a device • Receive alert and notifications • Communicate effectively with a mobile phone application *The data will be delivered "as-it-is" basis.
The Communication Architecture

Configuration
Send / Publish data
Use the following configuration to setup your device to send / publish data.
Host : mqtt.favoriot.com
Standard Ports: 1883 and 8883 ( for secure connection using TLS/SSL)
Websocket Port : 3000
Use your Device Access Token as username and password to connect to the platform.
(How to access your device access token)
ClientID (for some MQTT clients): Any name
Publish : {your-device-access-token}/v2/streams
Example : {your-device-access-token}/v2/streams
Receive / Subscribe
Use to the following configuration to receive / subscribe
Subscribe : {your-device-access-token}/v2/streams/status
Example : {your-device-access-token}/v2/streams/status
Whenever new data arrives at the Favoriot MQTT websocket, the same data will then be pushed to the subscribers. If you are having issues connecting your device to our platform, please contact us at support@favoriot.com.
CoAP
Code for sending data using CoAP
The code is only available in javascript and python
const coap = require('coap')
req = coap.request('coap://coap.favoriot.com/v2/streams')

var payload = {
                method:'POST',
                apikey:'Your API key here',
                parameters:{'device_developer_id':'deviceDefault@developer_id',
                            //example: 'device_developer_id':'arduino1@myaccount'
                            'data':{
                                    'temperature':'20',
                            }
                }
}

req.write(JSON.stringify(payload));

req.on('response', function(res) {
    res.pipe(process.stdout)
})

req.end()
The code is only available in javascript and python
import json
import socket
from coapthon.client.helperclient import HelperClient
#from coapthon.resources.resource import Resource

url = 'coap.favoriot.com'
port = 5683
path = "/v2/streams"

host = socket.gethostbyname(url) #used DNS Lookup to get coap.favoriot.com server IP

payload = {
            'method':'POST',
            'apikey':'Your API key here',
            'parameters':{
                        'device_developer_id':'deviceDefault@developer_id', #example: arduino1@myaccount
                        'data':{
                            'temperature':'20',
                            'humidity':'100',
                            'moisture':'100'
                        }
            }
}

BufferedData = json.dumps(payload) #convert json object format to string format

client = HelperClient(server=(host,port))
response = client.post(path,BufferedData)
print response.payload
client.stop()
This section explains on how to use CoAP protocol to connect to FAVORIOT platform.
About CoAP
Constrained Application Protocol (CoAP) is a simple protocol with low overhead specifically designed for constrained devices (such as microcontrollers) and constrained networks in Internet of Things (IoT). This protocol is used in M2M data exchange such as building automation and smart energy.
Configuration
Below is the configuration to connect your device with Favoriot platform using CoAP protocol
Host : ‘coap.favoriot.com’
Path : /v2/streams
apikey : <your api key>
device_developer_id : ‘deviceDefault@developer_id’
method : ‘POST’
JSON Data
FAVORIOT platform accepts JSON data from a devices using CoAP protocol. The following is the data format:
var payload = {

      method:'POST',

      apikey:'your api key',

        parameters:{'device_developer_id':'deviceDefault@developer_id',

                    'data':{

                    'temperature':'20',

                    }

         }

}
Remarks: Please use dns lookup in the code to get the IP address for coap.favoriot.com when sending data.
If you are having issues connecting your device to our platform, please contact us at support@favoriot.com.
RESPONSES
| Code | Description |
|---|---|
| 200 | Success |
| 424 | Failed |
WEBSOCKET
code for sending data using WebSocket
The code is only available in python and javascript
import asyncio
import socketio

sio = socketio.AsyncClient()

# connect event
@sio.event
async def connect():
    print('connection established')

# emit/broadcast request to event/namespace
@sio.event
async def emit_message():
    await sio.emit('v2/streams',{
          'request': "listen",
          'apikey':"Your API key here"
    })

    await sio.emit('v2/streams',{
          'request': "pull",
          'apikey':"Your API key here",
          'parameters': {
              'max': 2
           }
    })

    await sio.emit('v2/streams',{
        'request': 'push',
        'apikey' : "Your API key here",
        'parameters':{'device_developer_id':'deviceDefault@developer_id','data':{'temperature':'20'}}
    })

    await sio.emit('v2/streams',{
        'request': 'delete',
        'apikey' : "Your API key here",
        'parameters': {'stream_developer_id':'df777d9c-4b07-41a6-a0ab-0952797abbea@deviceDefault@developer_id'}
    })


# listen to event/namespace response
@sio.on('v2/streams')
def listen_event(data):
    print(data)

# check connection status
@sio.event
async def disconnect():
    print('disconnected from server')

async def main():
    await sio.connect('wss://io.favoriot.com')
    await emit_message()
    await sio.wait()

if __name__ == '__main__':
     asyncio.run(main())
  const io = require('socket.io-client');
  const socket = io("wss://io.favoriot.com");

  socket.on("connect"() =>{
      // emitting event
      socket.emit("v2/streams",{
        request: 'listen',
        apikey : "Your API key here"
      });

      socket.emit("v2/streams",{
        request: 'push',
        apikey : "Your API key here",
        parameters:{'device_developer_id':'deviceDefault@developer_id','data':{'temperature':'20'}}
      });

      socket.emit("v2/streams",{
        request: 'pull',
        apikey : "Your API key here",
        parameters: {'device_developer_id':'deviceDefault@developer_id','max': 100}
      });

      socket.emit("v2/streams",{
        request: 'delete',
        apikey : "Your API key here",
        parameters: {'stream_developer_id':'df777d9c-4b07-41a6-a0ab-0952797abbea@deviceDefault@developer_id'}
      });
  });

  //listening event
  socket.on('v2/streams',(data) => {
    console.log(data);
});
The code is only available in python and javascript
This section explains on how to use WebSocket protocol to connect to FAVORIOT platform.
About WebSocket
WebSocket is an advanced technology that makes it possible to open a two-way interactive communication session between the user's browser and a server. Now you can send messages to a server and receive event-driven responses without having to poll the server for a reply
Configuration
Below is the configuration to do connection with Favoriot platform using WebSocket protocol
Host : ‘io.favoriot.com’
namespace : v2/streams
Port : 443 (secure connection using TLS/SSL)
apikey : <your api key>
request : ‘push’ or ‘pull’ or ‘delete’ or ‘listen’
'request' descriptions
| Request | Description |
|---|---|
| listen | listen to data stream update that sending from device |
| push | send data stream to platform |
| pull | retrieve data stream from platform |
| delete | delete the data stream in platform |
*_Remarks: use namespace ‘v2/stream’ as event for emitting and listening activity. By default do some request to make sure your websocket client registered to websocket server. Once successfully get response from server, the websocket client will receive latest update of the data stream without do another request.
Listen/Receive update stream (listen)
- The following are required in the payload
- apikey
- request
Send stream (push)
- The following are required in the payload
- apikey
- request
- parameters
Example Parameters:
| Parameter | Type | Required | Description |
|---|---|---|---|
| device_developer_id | string | true | device developer ID |
| data | JSON | true | list of sensor parameters and values |
Retrieve stream (pull)
- The following are required in the payload
- apikey
- request
- parameters
Example Parameters:
| Parameter | Type | Required | Description |
|---|---|---|---|
| device_developer_id | string | false | Device developer ID |
| created_at | string | false | filter the list of results by field created_at (timestamp) |
| created_from_to | string | false | Allow to specify a range of streams creation (e.g. [ 2016-09-03T01:39:39.473Z TO NOW] ) |
| max | integer | false | define the number of results to be returned |
| order | string | false | sorting the results by creation date either ascending or descending (asc or desc) |
| offset | number | false | list the streams at given offset |
Send stream (delete)
- The following are required in the payload
- apikey
- request
- parameters
Example Parameters:
| Parameter | Type | Required | Description |
|---|---|---|---|
| stream_developer_id | string | true | stream developer ID |
REMOTE PROCEDURE CALL
About Remote Procedure Call
Remote Procedure Calls (RPC) feature allows to send command to devices and receive results of commands execution that broadcast by favoriot platform. The typical use cases of RPC calls is all sorts of remote control: reboot, turn the engine on/off, change state of the gpio/actuators, change configuration parameters, etc.
RPC via RestAPI
Use the following configuration to set up RPC via RestAPI
Connection
Host : https://apiv2.favoriot.com
Path : /v2/rpc
Port : 443 (TLS/SSL connection)
Method: GET, POST
Send command
Method: POST
HEADERS
| Parameter | In | Type | Required | Description |
|---|---|---|---|---|
| apikey | header | String | true | apikey or accesstoken |
BODY PARAMETERS
{
    "params":{
         "device_developer_id":"test1@favoriot",
         "button":"off",
         "other_command":"value"
     }
}
Note: Inside the params object, device_developer_id is required. You can add multiple other custom parameters to send as commands (e.g., "button": "off", "other_command": "value").
Receive command
Method: GET
QUERY PARAMETERS
| Parameter | In | Type | Required | Description |
|---|---|---|---|---|
| device_developer_id | query | String | true | Device developer ID |
| timeout | query | String | false | value of the processing timeout in milliseconds |
Note: timeoutparameter is the duration for client to retrieve the RPC command that execute from favoriot platform.The default value is 10000 (10 seconds). The minimum value is 5000 (5 seconds).
RPC via MQTT
Use the following configuration to set up RPC via MQTT
Connection
Host : mqtt.favoriot.com
Standard Ports: 1883 and 8883 ( for secure connection using TLS/SSL)
Websocket Port : 3000
ClientID (for some MQTT clients): Any name
Send / Publish command
Publish : {your-device-access-token}/v2/rpc
PAYLOAD PARAMETERS
{
    "params":{
         "device_developer_id":"test1@favoriot",
         "button":"off",
         "other_command":"value"
     }
}
Note: Inside the params object, device_developer_id is required. You can add multiple other custom parameters to send as commands (e.g., "button": "off", "other_command": "value").
Receive / Subscribe command
Subscribe : {your-device-access-token}/v2/rpc
Example : {your-device-access-token}/v2/rpc
RPC via COAP
Use the following configuration to set up RPC via COAP
Connection
Host : coap://coap.favoriot.com
Path : /v2/rpc
Standard Ports: 5683
Receive command
Following is the data format to get command:
var payload = {

      method:'GET',

      apikey:'your apikey or accesstoken',

      parameters:{

                   'device_developer_id':'deviceDefault@developer_id',

                   'timeout':'10000'

         }

}
Request Payload
| Payload | Type | Required | Description |
|---|---|---|---|
| method | string | true | Method to query using 'GET' |
| apikey | string | true | Use for authentication. Other option user can use (device accesstoken) |
| parameters | JSON | true | Configurations: 1. device_developer_id: Device developer ID2. timeout: value of the processing timeout in milliseconds |
Note: timeoutparameter is the duration for client to retrieve the RPC command that execute from favoriot platform. The default value is 10000 (10 seconds). The minimum value is 5000 (5 seconds).
RESPONSES
| Code | Description |
|---|---|
| 404 | Not Found |
| 408 | Timeout |
Note:When the command is available it will return custom command that set in control widget or rpc rules.
EDGE GATEWAY
This section explains on how to integrate any IoT Gateway to connect to our cloud Edge Gateway feature using HTTP or MQTT communications.
About Edge Gateway
Favoriot Edge Gateway is a service that connects IoT gateways directly to the Favoriot Platform. It bridges the "edge" (local devices) and the Favoriot Platform, enabling data from local devices to be processed, managed, and stored on the platform. Additionally, it allows for the selection of specific parameters in the payload to be stored, providing greater control over transmitted data.
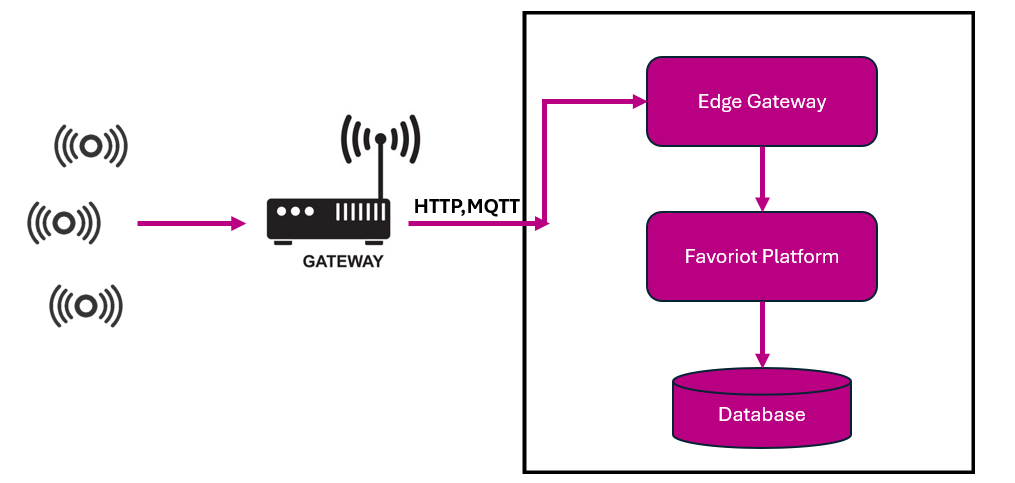
[Edge Gateway] Communication Architecture
Video Tutorial - Edge Gateway
How to create Edge Gateway in Favoriot Platform
Step 1: Create Edge Gateway
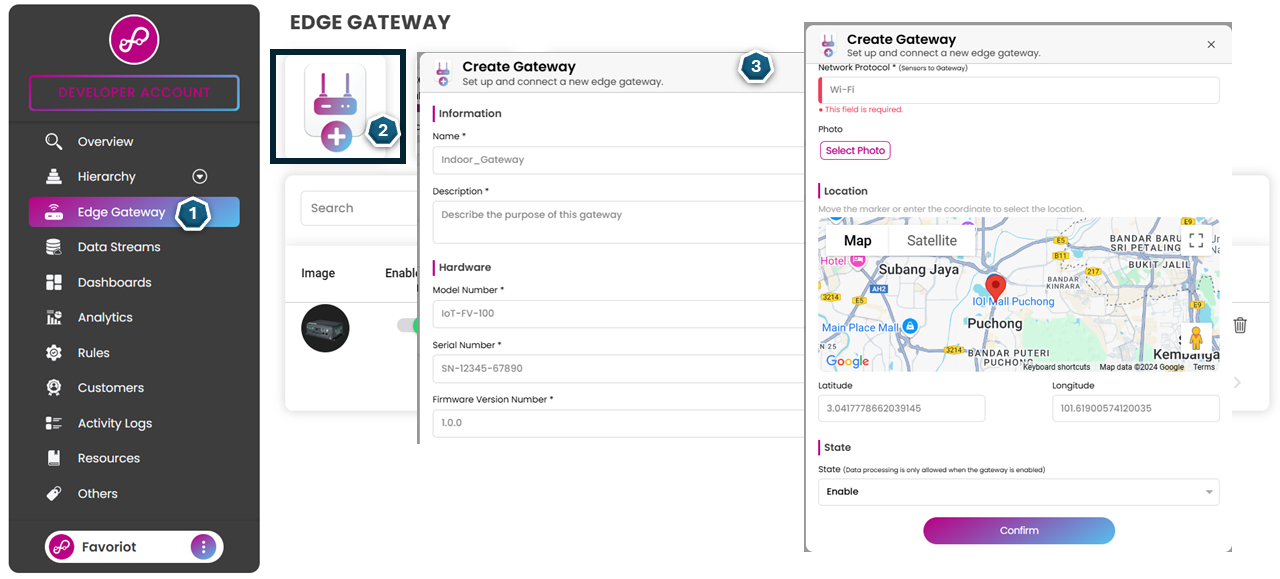
How to create Edge Gateway
Access Edge Gateway: In the left sidebar menu, click on "Edge Gateway" to access the gateway settings page.
Add New Gateway: On the Edge Gateway page, click on the "add" icon (with the plus symbol) to start creating a new gateway.
Create Gateway Form: The "Create Gateway" modal form will open. Fill out the following sections:
Information: Enter details about the gateway, including:
- Name: The name of the gateway (e.g., Indoor_Gateway)
- Description: A brief description of the gateway's purpose
Hardware: Provide hardware details:
- Model Number: Specify the model (e.g., IoT-FV-100)
- Serial Number: Enter the serial number (e.g., SN-12345-67890)
- Firmware Version Number: Enter the firmware version (e.g., 1.0.0)
- Network Protocol: Enter the communication protocol used from Sensor to IoT Gateway (e.g., LoRa)
- Photo: Optionally, upload a photo for the gateway
- Location: Use the map or manually input the latitude and longitude to set the gateway's location
State: Select the state of the gateway (e.g., Enabled) to allow data processing.
Confirm: After filling in the required details, click "Confirm" to save the new gateway.
Step 2: Forward Payload from IoT Gateway
#========== RESTAPI (HTTPS) ==========
#!/bin/bash

# Favoriot API details
url="https://apiv2.favoriot.com/v2/gateway/streams/your_gateway_developer_id"
api_key="your_access_token"

# JSON payload
payload='{
  "uid": "10001",
  "data": {
    "temperature": "30.51",
    "humidity": "45.31",
    "pressure": "100843.13"
  },
  "gateway_name": "Indoor_Gateway"
}'

# Send the HTTP POST request
response=$(curl -s -o /dev/null -w "%{http_code}" -X POST "$url" \
  -H "Content-Type: application/json" \
  -H "apikey: $api_key" \
  -d "$payload")

# Check response
if [ "$response" -eq 201 ]; then
  echo "Data sent successfully."
else
  echo "Failed to send data. HTTP response code: $response"
fi

#==========================
#========== MQTT ==========
#!/bin/bash

# MQTT details
broker="mqtt.favoriot.com"
port=1883  # Use 8883 for secure connection with TLS/SSL
topic="your_gateway_access_token/v2/gateway/streams"
access_token="your_access_token"

# JSON payload
payload='{
  "uid": "10001",
  "data": {
    "temperature": "30.51",
    "humidity": "45.31",
    "pressure": "100843.13"
  },
  "gateway_name": "Indoor_Gateway"
}'

# Publish message using mosquitto_pub
mosquitto_pub -h "$broker" -p "$port" -t "$topic" -u "$access_token" -P "$access_token" -m "$payload"

# Check if the message was published successfully
if [ $? -eq 0 ]; then
  echo "Message published successfully."
else
  echo "Failed to publish message."
fi
#==========================
#========== RESTAPI (HTTPS) ==========
import requests
import json

# Favoriot HTTP API details
url = "https://apiv2.favoriot.com/v2/gateway/streams/your_gateway_developer_id"
headers = {
    'Content-Type': 'application/json',
    'apikey': 'your_apikey_or_access_token'
}

# JSON payload to be sent
payload = {
    "uid": "10001",
    "data": {
        "temperature": "30.51",
        "humidity": "45.31",
        "pressure": "100843.13"
    },
    "gateway_name": "Indoor_Gateway"
}

# Send HTTP POST request
response = requests.post(url, headers=headers, data=json.dumps(payload))

# Check response
if response.status_code == 201:
    print("Data sent successfully:", response.json())
else:
    print("Failed to send data:", response.status_code, response.text)

#==========================
#========== MQTT ==========
import paho.mqtt.client as mqtt
import json

# MQTT broker details
broker_url = "mqtt.favoriot.com"
broker_port = 1883  # Use 8883 for secure connection (TLS/SSL)
topic = "your_gateway_access_token/v2/gateway/streams"

# MQTT credentials
client_id = "your_client_id"
username = "your_access_token"
password = "your_access_token"

# JSON payload to be published
payload = json.dumps({
    "uid": "10001",
    "data": {
        "temperature": "30.51",
        "humidity": "45.31",
        "pressure": "100843.13"
    },
    "gateway_name": "Indoor_Gateway"
})

# Define MQTT client
client = mqtt.Client(client_id)

# Set username and password
client.username_pw_set(username, password)

# Define connection and publishing callbacks
def on_connect(client, userdata, flags, rc):
    if rc == 0:
        print("Connected to Favoriot MQTT broker")
        client.publish(topic, payload, qos=1)
    else:
        print("Connection failed with code", rc)

def on_publish(client, userdata, mid):
    print("Message published:", payload)
    client.disconnect()

def on_disconnect(client, userdata, rc):
    print("Disconnected from MQTT broker")

# Assign callbacks
client.on_connect = on_connect
client.on_publish = on_publish
client.on_disconnect = on_disconnect

# Connect to the broker and start the loop
client.connect(broker_url, broker_port, keepalive=60)
client.loop_forever()
#==========================
//========== RESTAPI (HTTPS) ==========
const https = require('https');

const data = JSON.stringify({
  uid: "10001",
  data: {
    temperature: "30.51",
    humidity: "45.31",
    pressure: "100843.13"
  },
  gateway_name: "Indoor_Gateway"
});

const options = {
  hostname: 'apiv2.favoriot.com',
  port: 443,
  path: '/v2/gateway/streams/your_gateway_developer_id',
  method: 'POST',
  headers: {
    'Content-Type': 'application/json',
    'apikey': 'Your_apikey_or_accesstoken_here'
  }
};

const req = https.request(options, (res) => {
  let response = '';
  console.log(`Status Code: ${res.statusCode}`);

  res.on('data', (chunk) => {
    response += chunk;
  });

  res.on('end', () => {
    console.log('Response:', response);
  });
});

req.on('error', (error) => {
  console.error('Error:', error);
});

req.write(data);
req.end();

//==========================
//========== MQTT ==========
const mqtt = require('mqtt');

const options = {
  clientId: 'your_client_id',
  username: 'your_access_token',
  password: 'your_access_token',
  keepalive: 60,
  clean: true,
  reconnectPeriod: 1000,
  connectTimeout: 30 * 1000
};

const brokerUrl = 'mqtt://mqtt.favoriot.com:1883';
const topic = 'your_gateway_access_token/v2/gateway/streams';
const client = mqtt.connect(brokerUrl, options);

const message = JSON.stringify({
  uid: "10001",
  data: {
    temperature: "30.51",
    humidity: "45.31",
    pressure: "100843.13"
  },
  gateway_name: "Indoor_Gateway"
});

client.on('connect', () => {
  console.log('Connected to Favoriot MQTT broker');

  client.publish(topic, message, { qos: 1 }, (error) => {
    if (error) {
      console.error('Publish Error:', error);
    } else {
      console.log('Message published:', message);
    }
    client.end();
  });
});

client.on('error', (error) => {
  console.error('Connection Error:', error);
});
//==========================
//========== RESTAPI (HTTPS) ==========
import java.io.OutputStream;
import java.net.HttpURLConnection;
import java.net.URL;
public class FavoriotHttpExample {
public static void main(String[] args) {
try {
String url = "https://apiv2.favoriot.com/v2/gateway/streams/your_gateway_developer_id";
String apiKey = "your_access_token";
String payload = "{"
+ "\"uid\": \"10001\","
+ "\"data\": {"
+ "\"temperature\": \"30.51\","
+ "\"humidity\": \"45.31\","
+ "\"pressure\": \"100843.13\""
+ "},"
+ "\"gateway_name\": \"Indoor_Gateway\""
+ "}";
URL urlObj = new URL(url);
HttpURLConnection conn = (HttpURLConnection) urlObj.openConnection();
conn.setRequestMethod("POST");
conn.setRequestProperty("Content-Type", "application/json");
conn.setRequestProperty("apikey", apiKey);
conn.setDoOutput(true);
OutputStream os = conn.getOutputStream();
os.write(payload.getBytes());
os.flush();
os.close();
int responseCode = conn.getResponseCode();
if (responseCode == HttpURLConnection.HTTP_OK) {
System.out.println("Data sent successfully.");
} else {
System.out.println("Failed to send data. HTTP response code: " + responseCode);
}
conn.disconnect();
} catch (Exception e) {
e.printStackTrace();
}
}
}
//==========================
//========== MQTT ==========
import org.eclipse.paho.client.mqttv3.IMqttDeliveryToken;
import org.eclipse.paho.client.mqttv3.MqttCallback;
import org.eclipse.paho.client.mqttv3.MqttClient;
import org.eclipse.paho.client.mqttv3.MqttConnectOptions;
import org.eclipse.paho.client.mqttv3.MqttException;
import org.eclipse.paho.client.mqttv3.MqttMessage;
public class FavoriotMqttExample {
public static void main(String[] args) {
String broker = "tcp://mqtt.favoriot.com:1883";
String clientId = "your_client_id";
String accessToken = "your_access_token";
String topic = "your_gateway_access_token/v2/gateway/streams";
String payload = "{"
+ "\"uid\": \"10001\","
+ "\"data\": {"
+ "\"temperature\": \"30.51\","
+ "\"humidity\": \"45.31\","
+ "\"pressure\": \"100843.13\""
+ "},"
+ "\"gateway_name\": \"Indoor_Gateway\""
+ "}";
try {
MqttClient client = new MqttClient(broker, clientId);
MqttConnectOptions connOpts = new MqttConnectOptions();
connOpts.setUserName(accessToken);
connOpts.setPassword(accessToken.toCharArray());
connOpts.setCleanSession(true);
client.setCallback(new MqttCallback() {
@Override
public void connectionLost(Throwable cause) {
System.out.println("Connection lost: " + cause.getMessage());
}
@Override
public void messageArrived(String topic, MqttMessage message) {
System.out.println("Message arrived. Topic: " + topic + " Message: " + new String(message.getPayload()));
}
@Override
public void deliveryComplete(IMqttDeliveryToken token) {
System.out.println("Delivery complete: " + token.getMessageId());
}
});
client.connect(connOpts);
System.out.println("Connected to MQTT broker.");
MqttMessage message = new MqttMessage(payload.getBytes());
message.setQos(1);
client.publish(topic, message);
System.out.println("Message published.");
client.disconnect();
System.out.println("Disconnected from MQTT broker.");
} catch (MqttException me) {
me.printStackTrace();
}
}
}
//==========================
Configuration Details
Use the settings as given below in your IoT Gateway to forward the data payload.
Configuration using HTTP(S)
- Host:
https://apiv2.favoriot.com - Path:
v2/gateway/streams/{gateway_developer_id} - Port:
443(TLS/SSL connection) - Method:
POST - Headers:
{'Content-Type': 'application/json', 'apikey': 'Your apikey or accesstoken here'} - Body: Any JSON payload structure
Use the method in given in Security section for establish secure HTTP(S) connection to Favoriot platform
Responses
| Status | Description |
|---|---|
| 201 | Gateway streams uploaded |
| 401 | Un-authorized user or apikey or accesstoken |
| 403 | Gateway is inactive |
| 404 | Gateway not found |
Configuration using MQTT
- Host:
mqtt.favoriot.com - Standard Ports:
1883and8883(for secure connection using TLS/SSL) - Websocket Port:
3000 - ClientID: Any name
- Username: accesstoken
- Password: accesstoken
Send / Publish command
- Publish Topic:
{your-gateway-access-token}/v2/gateway/streams - Message: Any JSON payload structure
Receive / Subscribe command
- Subscribe Topic:
{your-gateway-access-token}/v2/gateway/streams/status
Use the method given in Security section for secure MQTT(S) connection to Favoriot platform
Remarks: Use the same selected gateway accesstoken as MQTT Client username & password and in the topic setup. Refer here to get the gateway access token
View Payload Uploaded
The payload forwarded from the IoT Gateway is not yet stored in the Favoriot Platform database until a mapping configuration is created. To view the uploaded payload, click the "Console" button.
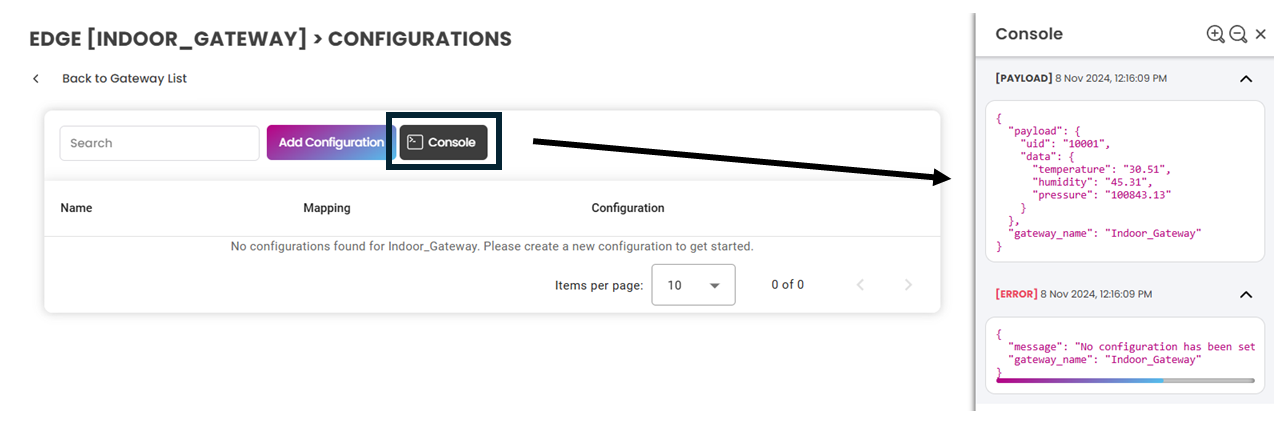
[Edge Gateway] Debug Console
Step 3: Add Edge Gateway Mapping Configuration
This mapping configuration is specifically designed to manipulate the received payload, allowing for key renaming and restructuring to match the data stream format structure for data storage in the Favoriot Platform. It also includes mapping the payload's unique ID to the corresponding device created on the Favoriot Platform.
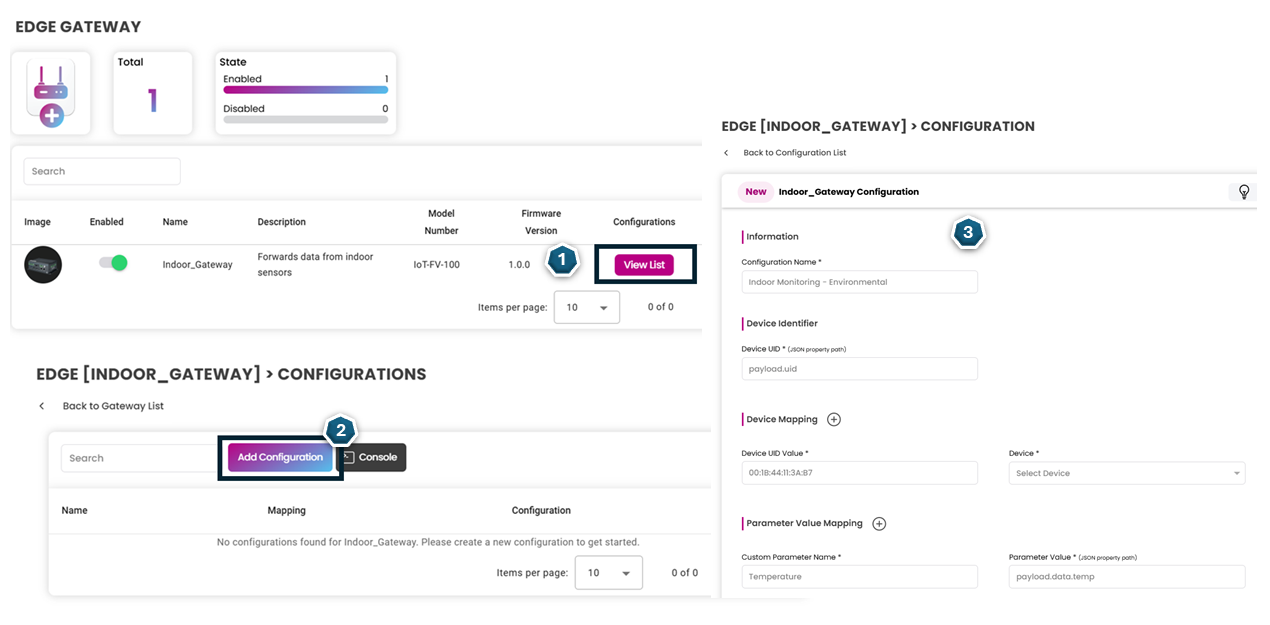
[Edge Gateway] How to Add Mapping Configuration
View List: In the "Edge Gateway" section, locate the gateway device you want to configure (in this case, "Indoor_Gateway"). Click the "View List" button to see existing configurations for that gateway.
Add Configuration: In the configurations section, click the "Add Configuration" button to create a new configuration for the selected gateway.
Fill in Configuration Details: In the configuration form that appears:
- Information: Enter a name for your configuration in the "Configuration Name" field.
- Device Identifier: Specify the device identifier by entering the Device UID JSON path (e.g.,
payload.uid). - Device Mapping: Enter the actual Device UID value and select the corresponding device from the "Device" dropdown.
- Parameter Value Mapping: Set a custom parameter name (e.g., "Temperature") and specify the JSON path for the parameter value (e.g.,
payload.data.temp).
After filling in the necessary fields, click the "Create" button to finalise the configuration.
Note: Always check the console debug to examine the structure of the JSON payload in order to set the UID and parameter JSON path values correctly.
FIRMWARE OTA
About Firmware OTA
Favoriot platform supports OTA (Over-the-Air) capabilities for IoT devices, enabling seamless remote updates of firmware, software, and configurations. This ensures devices remain secure, functional, and up-to-date without physical intervention. Key features include:
- Firmware and Software Updates: Delivering updates to fix bugs, enhance features, or patch vulnerabilities.
- Configuration Management: Pushing new settings to devices remotely.
- Security: Quickly deploying patches to address vulnerabilities.
- Scalability: Managing updates across large fleets of IoT devices efficiently.
Favoriot's firmware OTA functionality is essential for maintaining the performance, security, and longevity of IoT deployments in applications like smart homes, industrial IoT, and connected vehicles.
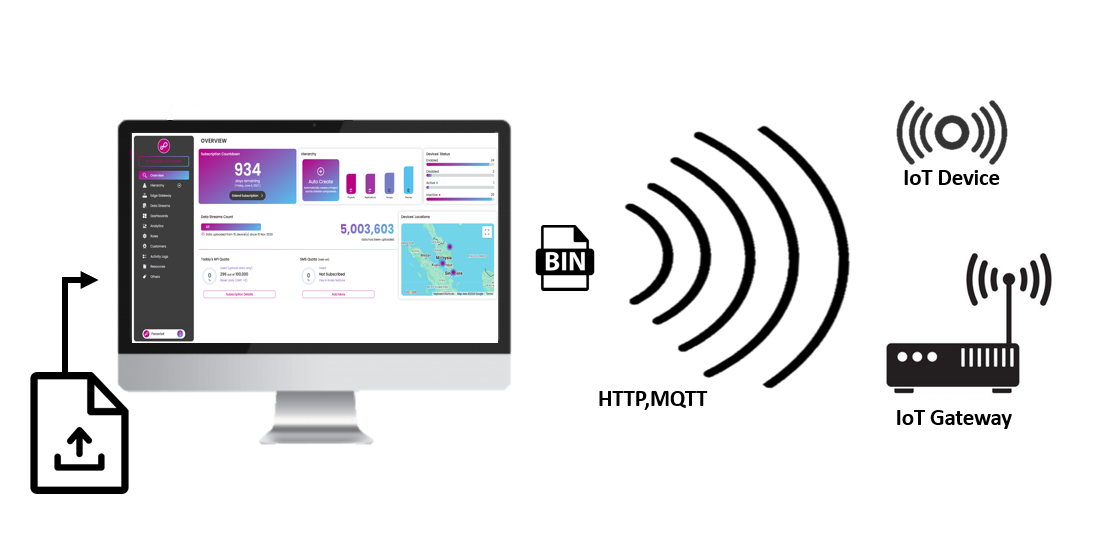
[Firmware OTA] Communication Architecture
Step 1: Upload Firmware Bin File in Favoriot Platform
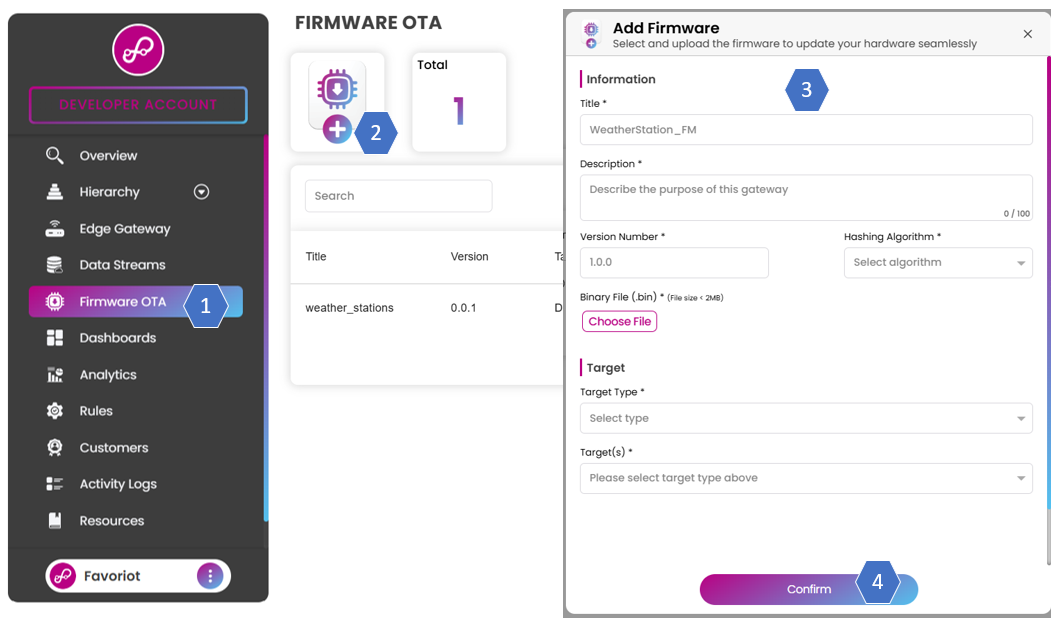
[Firmware OTA] How to add .bin file
Navigate to Firmware OTA
- In the Favoriot platform, go to the Firmware OTA section from the left-side menu. This section allows you to manage and upload firmware updates for your devices and gateways.
Click on Add Firmware
- Click the plus (+) button to initiate the process of adding new firmware. This will open the firmware upload form.
Fill in Firmware Details
- Enter the required information:
- Title: Name of the firmware (e.g., WeatherStation_FM).
- Description: Briefly describe the purpose of the firmware.
- Version Number: Specify the firmware version (e.g., 1.0.0).
- Hashing Algorithm: Select the algorithm used for integrity verification.
- Binary File: Upload the .bin file (maximum size 2MB).
- Target Type & Target(s): Choose the device type and specify which devices will receive the update.
- Enter the required information:
Confirm to Upload
- After filling in all required details, click the Confirm button to upload and register the firmware update.
Below is source code OTA using HTTPS and MQTTS using ESP32 board
Step 2: Setup Device/Gateway to Receive Firmware
Use the settings as given below in your IoT Device/Gateway to receive firmware file.
Configuration using HTTP(S)
- Host:
https://apiv2.favoriot.com - Path:
v2/firmware/update/{device or gateway developer_id} - Port:
443(TLS/SSL connection) - Method:
GET - Headers:
{'Content-Type': 'application/json', 'apikey': 'Your apikey or accesstoken here'}
Use the method in given in Security section for establish secure HTTP(S) connection to Favoriot platform
Responses
| Status | Description |
|---|---|
| 200 | Receive bin file |
| 401 | Un-authorized user or apikey or accesstoken |
| 404 | No update available / firmware not found |
Configuration using MQTT
- Host:
mqtt.favoriot.com - Standard Ports:
1883and8883(for secure connection using TLS/SSL) - Websocket Port:
3000 - ClientID: Any name (for some MQTT clients)
- Username: accesstoken
- Password: accesstoken
Receive / Subscribe command
- Subscribe Topic:
{your-device or gateway-access-token}/v2/firmware/update
Use the method given in Security section for secure MQTT(S) connection to Favoriot platform
Remarks: Use the same selected device or gateway accesstoken as MQTT Client username & password and in the topic setup. Refer here to get the device/gateway access token
How Favoriot Platform send .bin file
The process streams a firmware .bin file over MQTT using a chunk-based approach. The transfer follows these steps:
- Start marker ("start") → Notifies the receiving device that a firmware update is beginning.
- Chunk-based streaming → The .bin file is read and sent in smaller parts to prevent data loss.
- End marker ("end") → Informs the device that the transfer is complete.
How the Receiving Device Processes the Data
The receiving device must handle the MQTT messages as follows:
- Detect the "start" marker → Prepare to receive firmware.
- Receive and store all incoming chunks → Reconstruct the firmware file.
- Detect the "end" marker → Finalize the file and begin verification.
- Verify and apply firmware update → Ensure the integrity of the received file before flashing.
Step 3: Setup Device/Gateway Update Firmware Status Installation
Use the settings as given below in your IoT Device/Gateway to update firmware installation status.
Configuration using HTTP(S)
- Host:
https://apiv2.favoriot.com - Port:
443(TLS/SSL connection) - Method:
POST - Headers:
{'Content-Type': 'application/json', 'apikey': 'Your apikey or accesstoken here'} - Body: JSON object
Body Parameters
| Key | Value | Description |
|---|---|---|
| status | success | operation was completed |
| failed | operation encountered an error |
Device
- Path:
/v2/firmware/status?device_developer_id={your_device_developer_id}
Gateway
- Path:
/v2/firmware/status?gateway_developer_id={your_gateway_developer_id}
Use the method in given in Security section for establish secure HTTP(S) connection to Favoriot platform
Responses
| Status | Description |
|---|---|
| 201 | Successfully update status installation |
| 401 | Un-authorized user or apikey or accesstoken |
Configuration using MQTT
- Host:
mqtt.favoriot.com - Standard Ports:
1883and8883(for secure connection using TLS/SSL) - Websocket Port:
3000 - ClientID: Any name (for some MQTT clients)
- Username: accesstoken
- Password: accesstoken
- Message: JSON object
Send / Publish command
- Publish Topic:
{your-device or gateway-access-token}/v2/firmware/update/status
Device Message
| Key | Value | Description |
|---|---|---|
| status | success | operation was completed |
| failed | operation encountered an error | |
| device_developer_id | your device developer id | Unique identifier for specific device |
Gateway Message
| Key | Value | Description |
|---|---|---|
| status | success | operation was completed |
| failed | operation encountered an error | |
| gateway_developer_id | your gateway developer id | Unique identifier for specific gateway |
Use the method given in Security section for secure MQTT(S) connection to Favoriot platform
Remarks: Use the same selected device or gateway accesstoken as MQTT Client username & password and in the topic setup. Refer here to get the device/gateway access token
Step 4: Publish Firmware File from Favoriot Platform
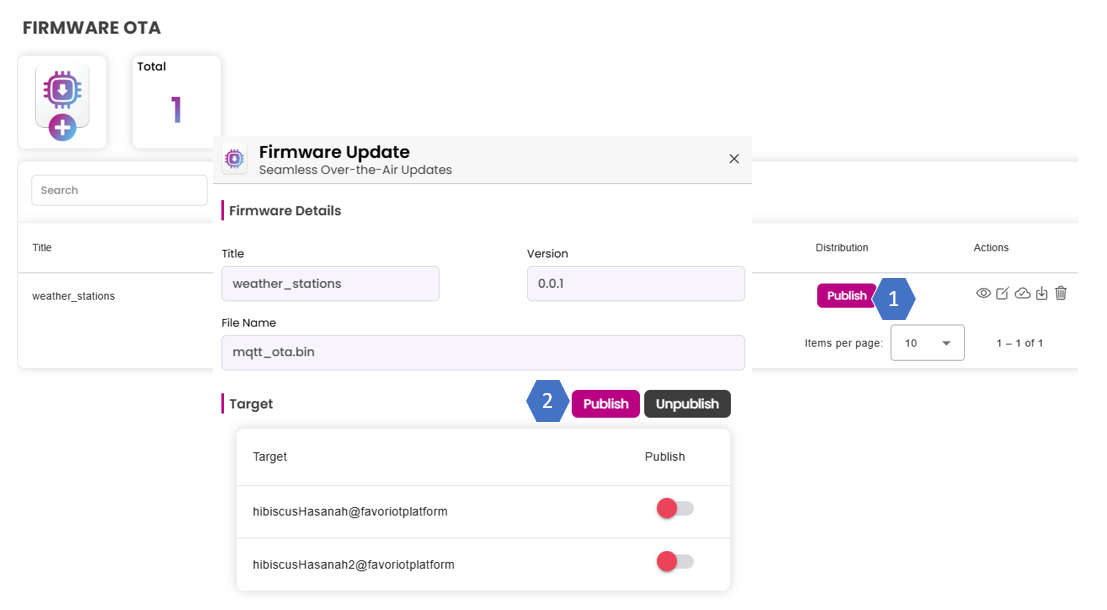
Publish firmware to targets device/gateway
Clicking the "Publish" button for a specific firmware will open a modal window displaying relevant information and two types of buttons:
Push button
- Publish button: Publishes the firmware update to all listed targets at once.
- Unpublish button: Unpublishes the firmware update from all listed targets at once.
Toggle button
- Allows publishing the firmware update to individual targets by enabling or disabling the toggle for each target.
DASHBOARD
Visualise the data with a collection of widgets in a dashboard. Allows developers to publicise their dashboard for viewing purposes. A public url is generated (when activated), which then allows the developer to share the public url to other people.
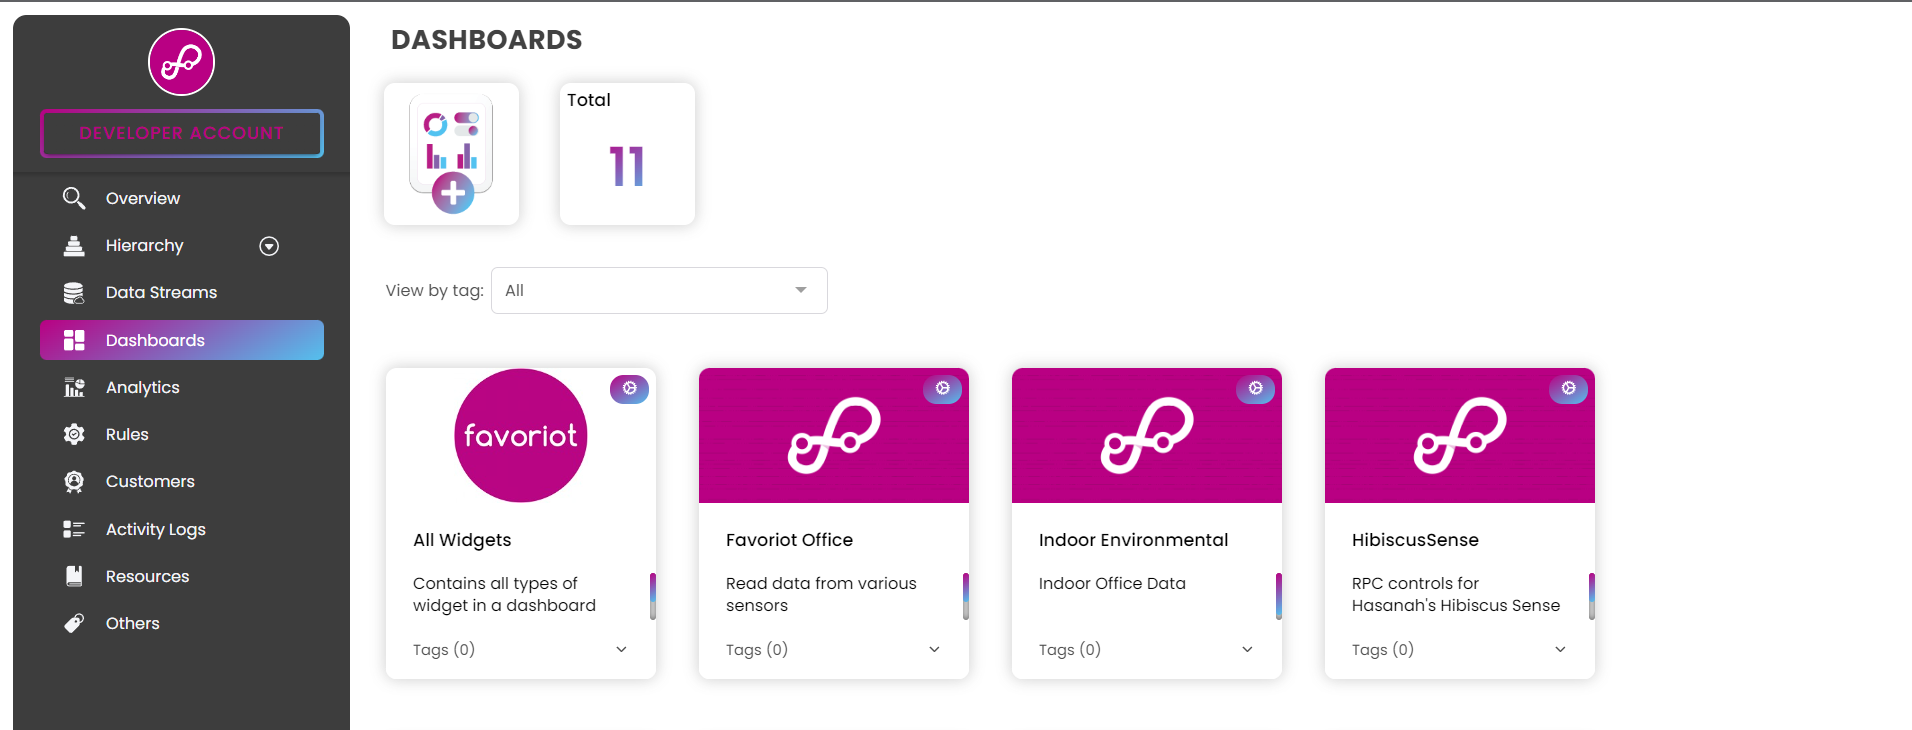
Image: "Dashboards" page
Video: [HOW-TO] - Create Dashboard
Create a Dashboard
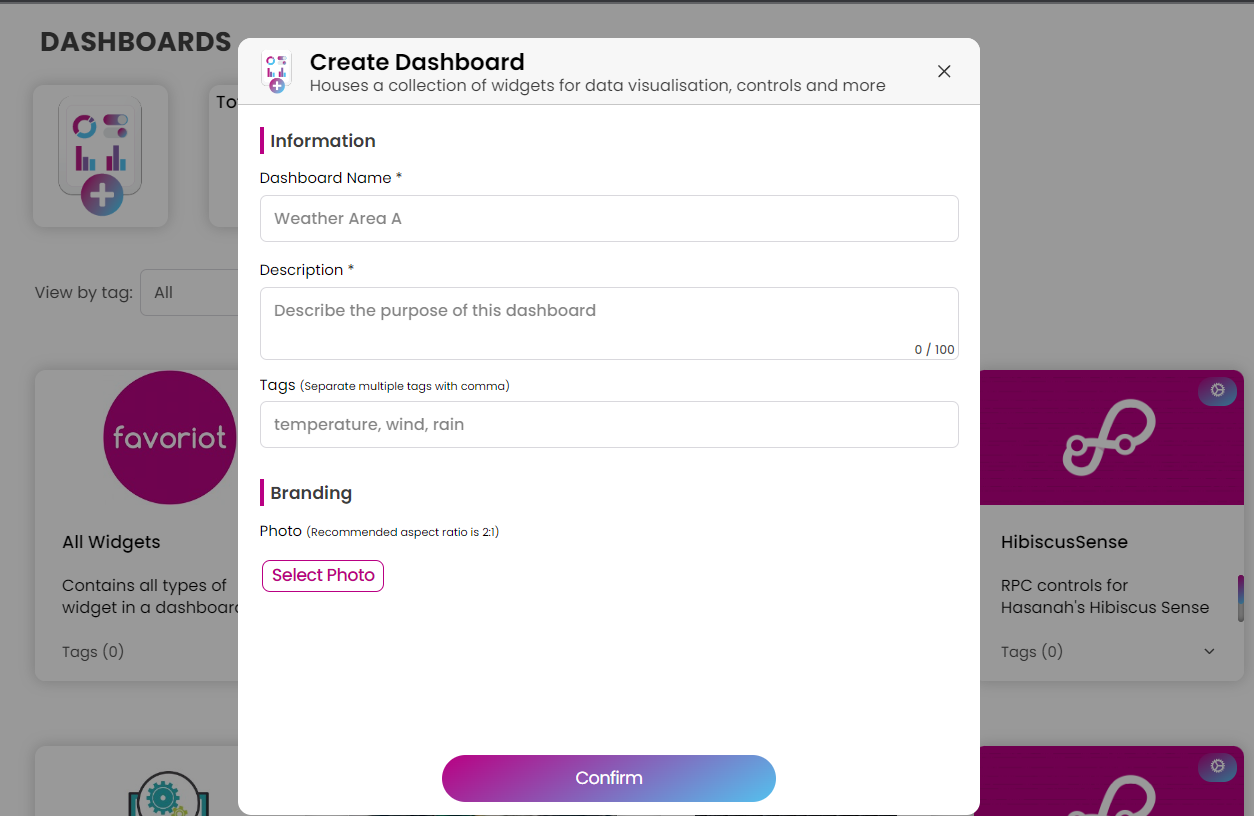
Image: "Create Dashboard" popup window
- Click on the "Create Dashboard" button, in which a popup window should appear.
- Fill in the following inputs and click on the "Create" button to create the dashboard.
- Dashboard Name (mandatory)
- Dashboard Description (mandatory)
- Dashboard Tags (optional) - filter list of dashboard based on tag name.
- Dashboard Image (optional) - upload logo for white-labeling purpose. Image dimension: 200px (h) x 200px (w).
- Select Image Position (if Dashboard Image uploaded) - Assign image position in the public dashboard's header. By default set to left.
- All of the created dashboards will be shown in the "Dashboards" page.
Enable Public Dashboard
Allows other people to access (view only) the dashboard by enabling the "Public" option and share the Public URL.
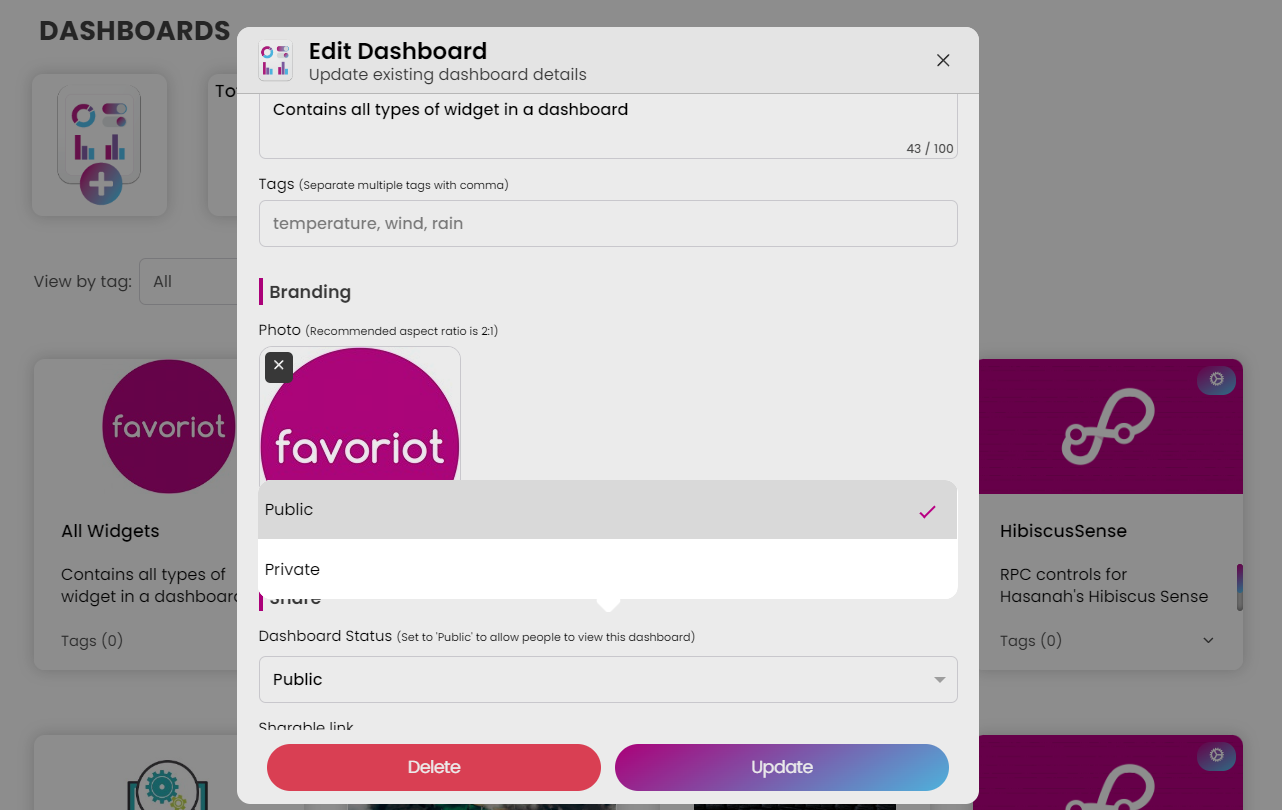
Image: How To Enable Public Dashboard
- At the top right corner of the dashboard tile, click on the gear icon and a popup window will appear.
- Select dropdown list the "Public" to enable public access.
- Public URL will be generated and use that URL to share with others.
- Click the "Update" button to save the changes.
- Open the Public URL in a browser to view the Dashboard.
Disable Public Dashboard
- At the top right corner of the dashboard tile, click on the gear icon and a popup window will appear.
- Select dropdown list the "Private" to disable public access.
- Click the "Update" button to save the changes.
Edit Dashboard
![]()
Image: Edit dashboard icon (right: Specific dashboard page)
- Click the gear icon located at the "Dashboards" page a popup window will appear.
- Once the editing is done, click on the "Update" button to save the changes.
Specific Dashboard
All of the created dashboards are shown in the "Dashboards" page. Click on the dashboard tile to view the contents of the selected dashboard.
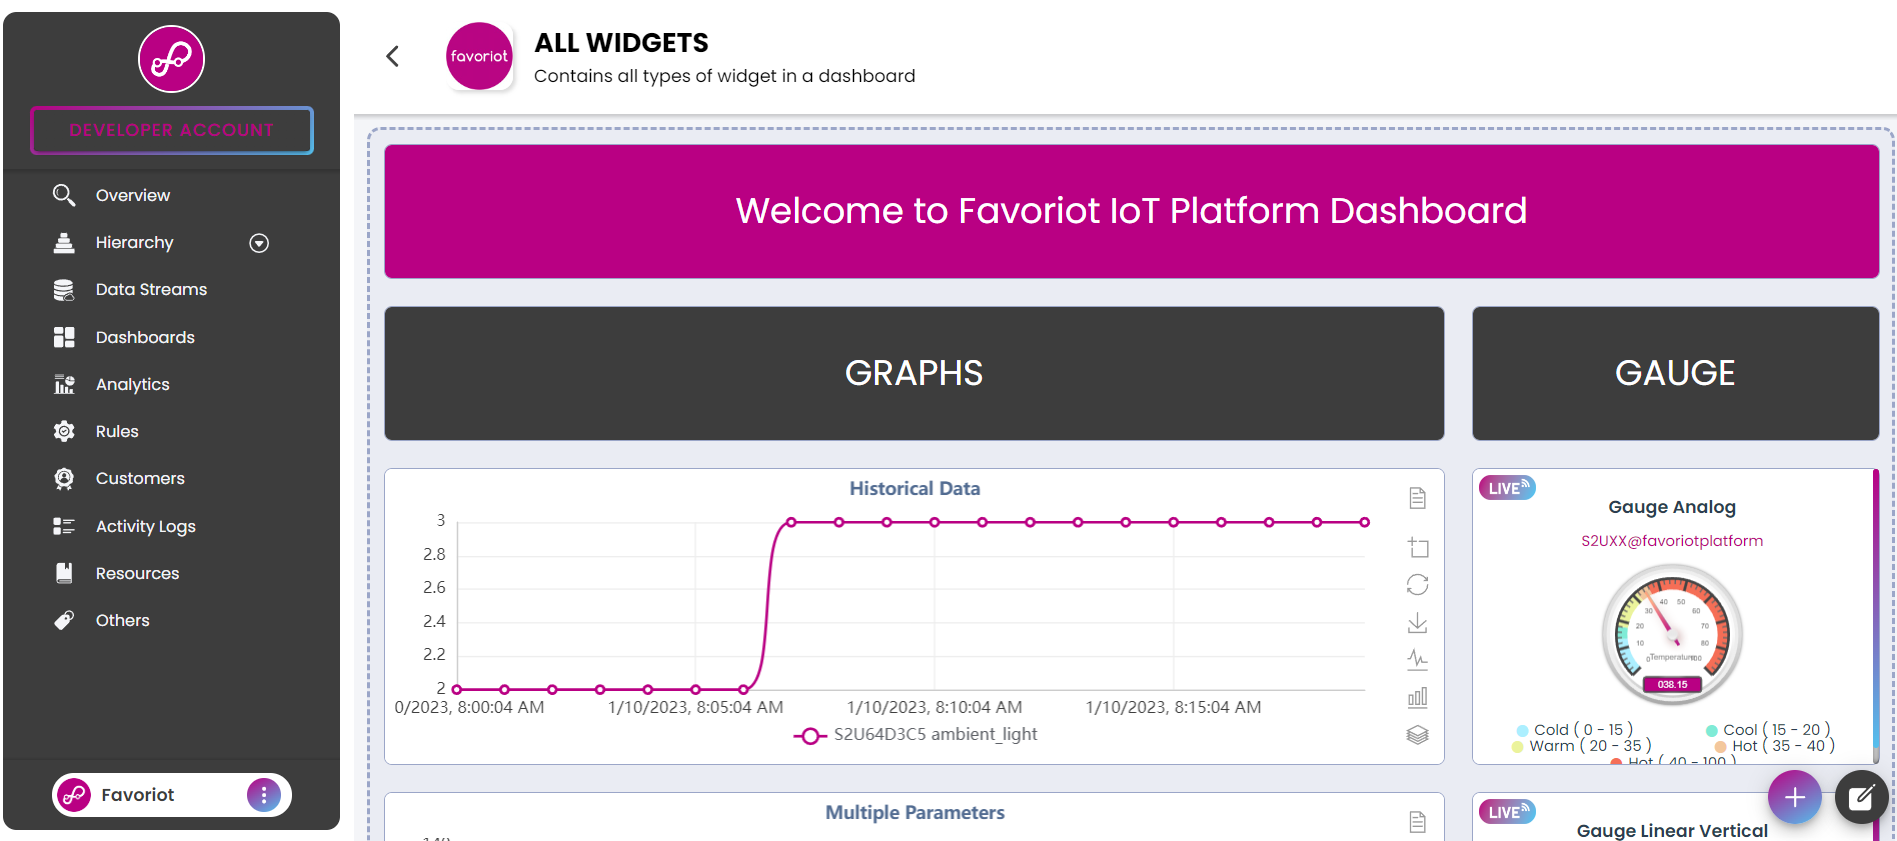
Image: Dashboard Widgets Contents
Add Widgets
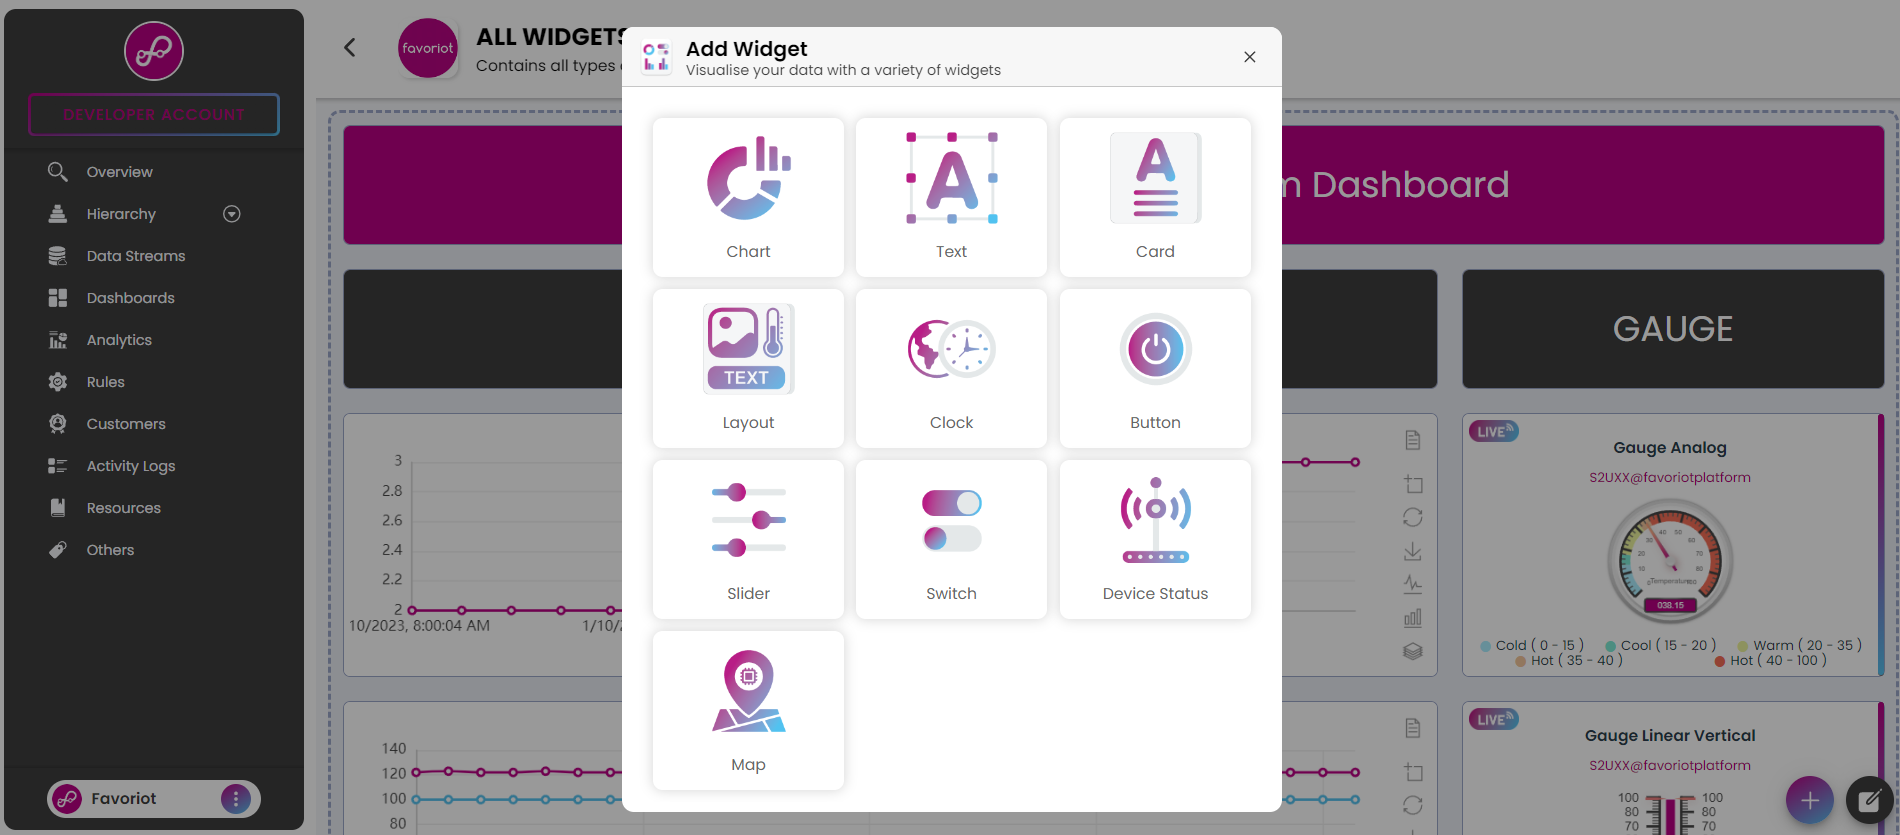
Image: "Add Widgets" popup window
- Click on the "+" icon button, in which a popup window should appear.
- Select the preferred widget type and configure the selected widget to the desired options.
- Once finished, click the "confirm" to add the configured widget to the dashboard.
- The added widget will appear in the dashboard content.
Related: How To Configure Widgets
Edit Widgets
Enter the editing mode to delete or change the created widget's configuration, position or size.
![]()
Widget: Edit buttons in editing mode
Enter editing mode:
- Click on the Edit button (pencil icon) to start editing the widget(s) (editing mode entered).
- Once the page is in the editing mode, the Confirm button (check icon) and Cancel button (cross icon) will appear.
- All of the created widgets will have a header with the Edit button (spanner icon) and Delete button (bin icon) at the top right corner of it.
Exit editing mode:
- Click on the Confirm button (check icon) to save the changes or Cancel button (cross icon) to exit the editing mode without saving the changes.
Delete widget:
- In editing mode, click on the Bin icon at the top right corner of the widget's header.
- A popup window will appear, click on the "Confirm" button to delete the selected widget from the dashboard.
Change widget's configuration:
- In editing mode, click on the Spanner icon at the top right corner of the widget's header.
- A popup window with the selected widget's configuration will appear. The developer may change the widget's type here too.
- Once the editing is done, click on the "Confirm" button to save the changes.
Change widget's position:
- In editing mode, hover over the widget, click and hold the widget to move it to preferred position.
- Click on the Confirm button (check icon) to save the changes.
Change widget's size:
- In editing mode, hover over the widget's box border and the cursor will change to double arrow cursor.
- Click+hold+move the cursor to resize the widget.
- Click on the Confirm button (check icon) to save the changes.
Dashboard Widgets
Visualise your data with a variety of widget types.
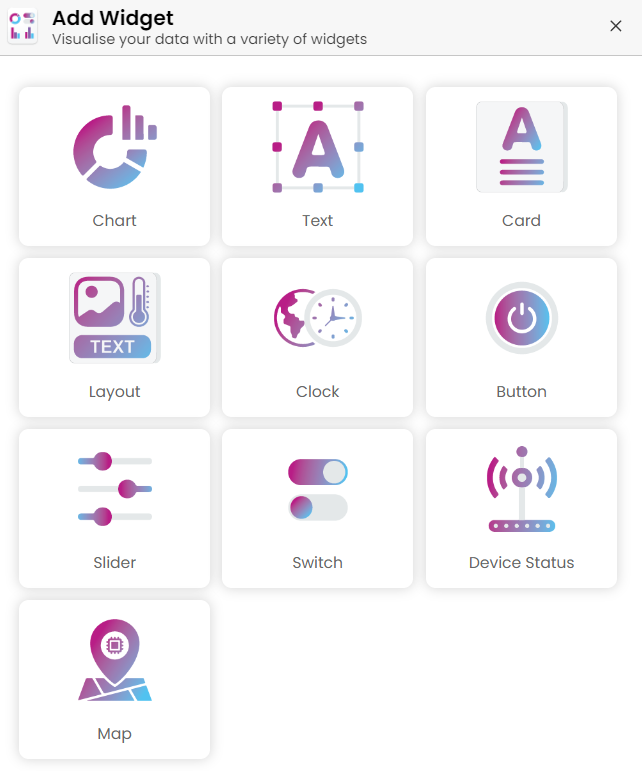
Image: Widget types
Video: [Walkthrough] - Dashboard Widgets
- Graphs
- Line
- Area
- Bar
- Gauge Basic
- Gauge Analog
- Gauge Linear
- Text
- Card
- Clock
- Button
- Slider
- Switch
- Device Status
- Map
- Layout
- Alarm
Graph: Line/Area/Bar
- The following are the graph's configuration:
- Graph Title (mandatory)
- Type (mandatory) - By default set to "Line".
- Line Curve (mandatory) - By default set to "Straight".
- Selected Parameters (mandatory) - Data to be plotted
- Plot Data - Real-time or Historical Data
- X Axis Title (optional) - Label for X-axis.
- Y Axis Title (optional) - Label for Y-axis.
- Show Graph Toolbar (optional) - Enable option to show the download graph button in the graph widget.
- Enable Zoom (if disabled real-time data) - Enable option to allows zooming feature and to show the zoom buttons in the graph widget.
- Show Annotation (optional) - Add note markings inside a graph to assist in indicating a threshold, level and or limit. Currently only available for Y Axis annotations.
- Style (optional) - Theme style.
Assign data parameters to be plotted:
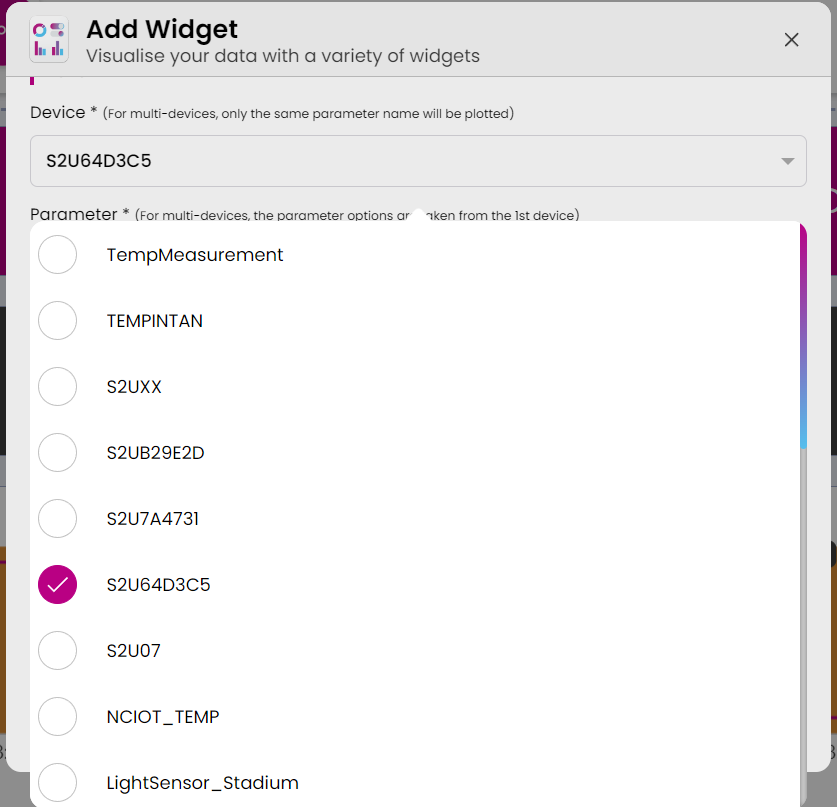
Image: Select device(s) to be plot
- All devices available will be listed.
- Check the selected device(s) one or more.

Image: List of available parameters
Select any of the parameter(s) to be added into the graph. Multiple parameters supported.
To add another devices, make sure is has the same parameters (at least one) as the selected parameters from the primary device (available for historical plot only).
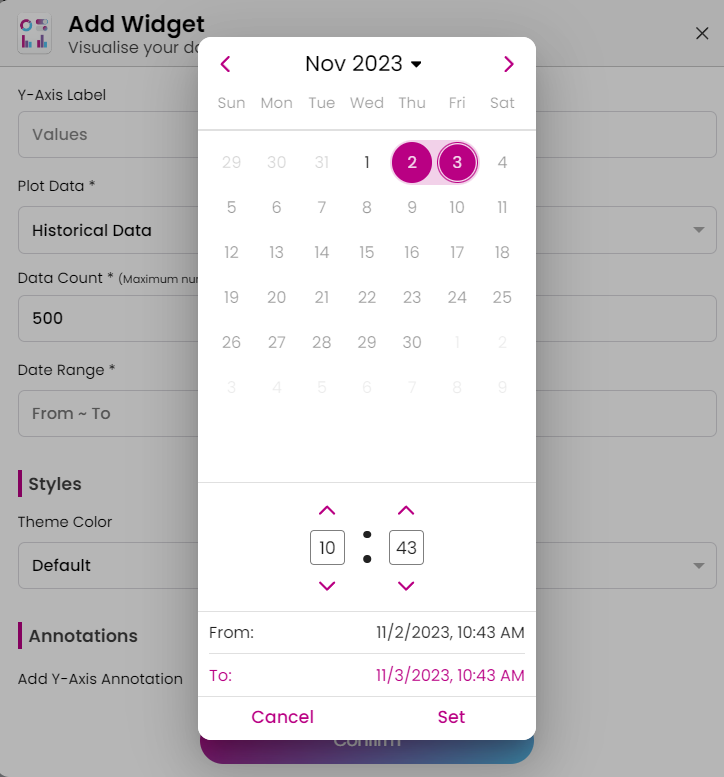
Image: "Select Date Range" popup window
- To plot a graph with the historical data instead of a real-time data, choose the "historical data" from options.
- Configure the following settings:
- Data Count (mandatory) - Total number of data within the above date range to be plotted on the graph.
- Date Time Range (mandatory) - Data within this date range will be use for plotting graph.
Show annotations :
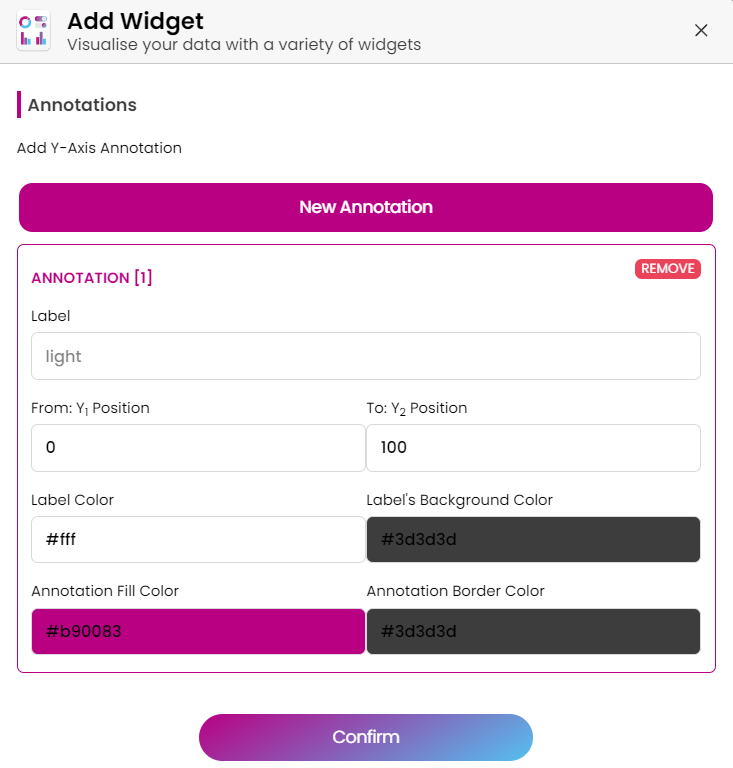
Image: Y-axis Annotation Configuration
- Click "new add" annotation button configuration window will appear.
- Configure the following settings (available for Y-axis only):
- Label (mandatory)
- Y Position (mandatory) - Y-axis value. If "Range?" enabled, it will be the starting point to highlight the annotation area. By default set to 0.
- Y2 Position (mandatory) - The 2nd Y-axis value, which is the end point of the highlighted annotation area. By default set to 0.
- Label Color (mandatory) - The "Text" color. By default set to #fff.
- Background Color (mandatory) - The "Text" background color. By default set to #3d3d3d.
- Annotation Fill Color(mandatory) - The "Annotation" background color. By default set to #b90083.
- To delete the added annotation(s), simply click on the remove button at the top right corner of the selected annotation box. To add another, repeat Step 2.
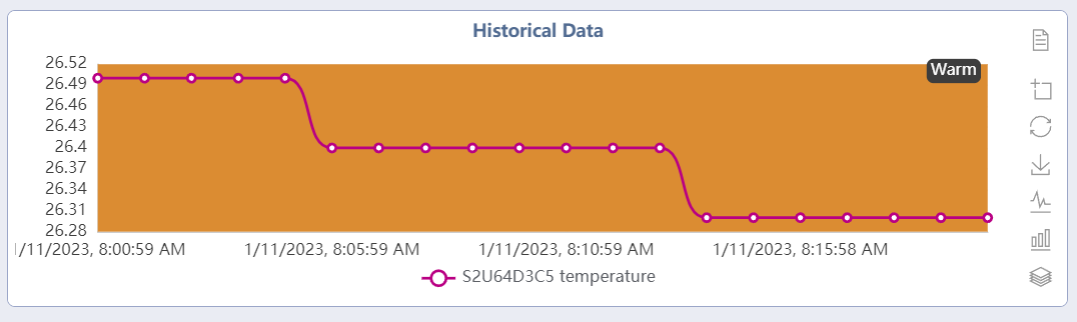
Image: Line Graph with Y-axis Annotation
Graph: Gauge
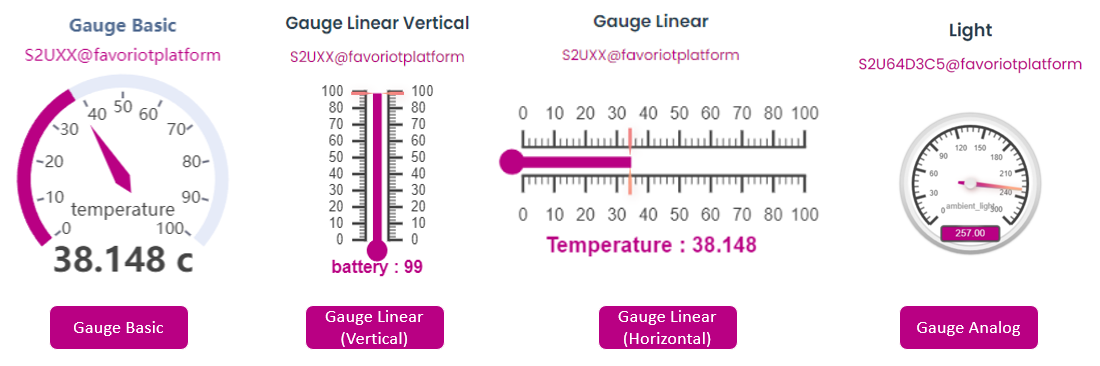
Image: Gauge Types
- The following are the gauge's configuration:
- Graph Title (mandatory)
- Type (mandatory) - Select "Gauge". By default set to "Line".
- Selected Parameters (mandatory) - Data to be plotted
- Gauge Type (mandatory) - By default set to "Basic".
- Parameter Unit (optional) - Value's unit. By default set to %.
- **Layout (if "Gauge Type" is "Linear") - Gauge orientation.
- **Minimum (if "Gauge Type" is "Linear"/"Analog") - Minimum scale.
- **Maximum (if "Gauge Type" is "Linear"/"Analog") - Maximum scale.
- Style (optional) - Theme style.
Text
Widget to display a simple text. Useful as a text banner or to display textual information.

Image: Text Widget
- The following are the text's configuration:
- Text (mandatory) - Text inside the box.
- Font Weight - Font style (Normal,Light,Bold,Bolder)
- Text Color (mandatory) - By default set to #fff.
- Background Color (mandatory) - Box's color. By default set to #b90083.
Card
Widget to display the latest data from a device (one parameter only).
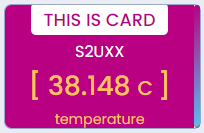
Image: Card Widget
- The following are the card's configuration:
Text
- Label (optional) - Label at the top.
- Color (optional) - Label's color. By default set to #b90083.
Value
- Device (mandatory)
- Parameter (mandatory) - Data to be plotted.
- Parameter Unit (optional) - Parameter value's unit. By default set to "C".
- Color (mandatory) - Value's color. By default set to #fff.
Background
- Background Image (optional) - Image as the background.
- Background Color (optional) - Plain color as the background.
Layout
Widget to display or label position device(s) on top an background/image.
Image: Layout Widget
- The following are the layout's configuration:
- Background image(mandatory) - Upload image e.g(building layout map)
- Background image size(mandatory) - Size of image to set in layout (fixed,cover or contain)
- Object(optional) - Select object either image,text, or device. The object will be shown on top of the background
Clock
Widget to display digital date and time.

Image: Clock Widget
- The following are the clock's configuration:
- Label (optional) - Label below the clock. By default set to "Clock".
- Timezone(mandatory) - By default getting from user location.
- Type(mandatory) - Can choose either analog or digital
- Label Color (optional) - Label's color. By default set to #b90083.
- Clock Color (optional) - Date and time color. By default set to #3d3d3d.
Button
Widget that acts as an interactive button that will publish the configured value(s) via MQTT when clicked.

Image: Button Widget
- The following are the button's configuration:
Target Device
- Send to Device (mandatory) - Device to received the value.
Button Styles
- Label (mandatory) - Label on the button.
- Button Color (mandatory) - By default set to #b90083.
- Text Color (mandatory) - Label's color. By default set to #fff.
Data Properties - Support multi-value. Make sure to click on the "new property" button to add the configured properties to the button widget.
- Key (mandatory) - Value's name (accept only alphabets and numbers without space character)
- Value (mandatory) - Value to be send.
Slider
Widget that acts as an interactive slider that will publish the configured value via MQTT when the knob is dragged within specified range.

Image: Slider Widget
- The following are the slider's configuration:
- Label (optional) - Label above the slider's value.
- Minimum Range (mandatory) - Minimum value for the slider's range. By default set to 0.
- Maximum Range (mandatory) - Maximum value for the slider's range. By default set to 100.
- Send to Device (mandatory) - Device to received the value.
- Property Name (mandatory) - Value's name (accept only alphabets and numbers without space character)
- Save State (optional) - Enable option to keep the last value changes of the slider. By default it will reset to 1 everytime the dashboard is loaded.
- Style (optional) - Slider color by default #b90083.
Switch
Widget that acts as an interactive switch that will publish the configured values for "On" and "Off" via MQTT when clicked.
Image: Switch Widget
- The following are the switch's configuration:
- Label (optional) - Label above the switch.
- Send to Device (optional) - Device to received the value.
- Property Name (mandatory) - Value's name (accept only alphabets and numbers without space character)
- On Value (mandatory) - Value to indicate "ON".
- Off Value (mandatory) - Value to indicate "OFF".
- Save State (optional) - Enable option to keep the last state of the switch. By default it will reset to off everytime the dashboard is loaded.
- Style (optional) - Slider color by default #b90083.
Device Status
Widget to display the connection status of the devices.

Image: Device Connection Widget
- The following are the device status's configuration:
- Label (optional) - Label above the device status.
- Device(s) (mandatory) - Device(s) to be shown. Support multiple devices.
Map
Widget to display device's location configured during the creation of the device.
Image: Map Widget
- The following are the map's configuration:
- Label (optional)
- Device(s) (mandatory) - Device(s) to be plot on the map (location based on the device coordinate configured in the "Devices" page).
- Zoom Level (optional) - Zoom out map view
Alarm Widget
Widget to display alarm information and logs.
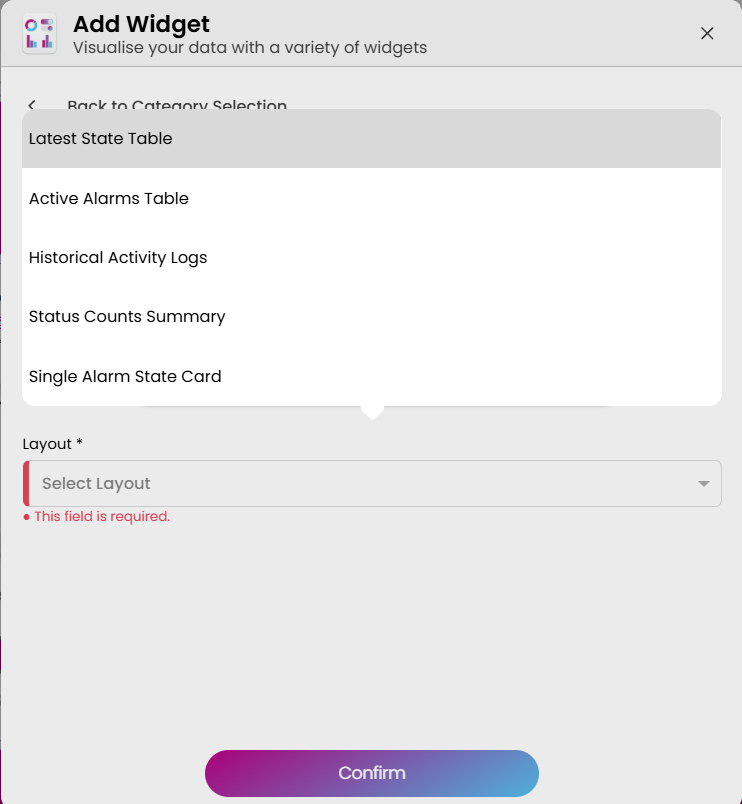
Image: Alarm Widget
- The following are the alarm widget's configuration:
- Type (mandatory) - Select the layout type for the alarm widget. The available options are:
- Latest State Table
- Active Alarms Table
- Historical Activity Logs
- Status Counts Summary
- Single Alarm State Card
- Layout (mandatory) - Select the layout for the selected alarm type. Each layout has its own specific configuration settings.
Latest State Table
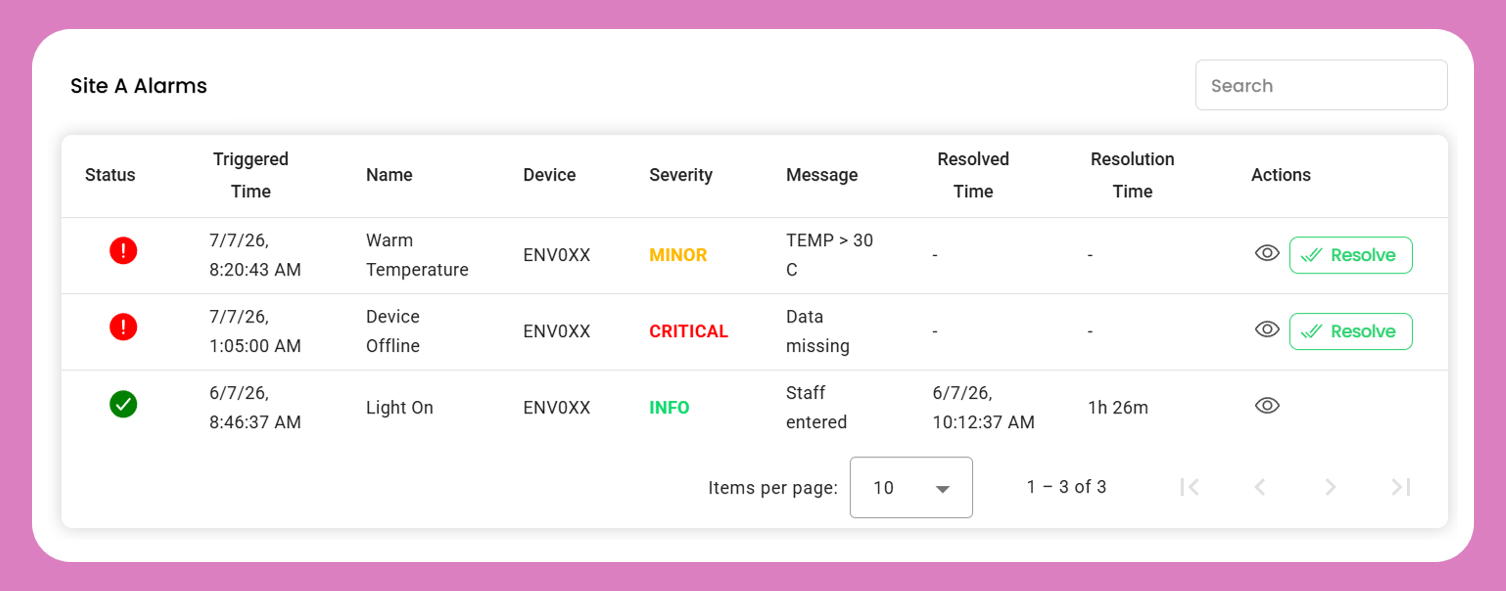
Image: Latest State Table
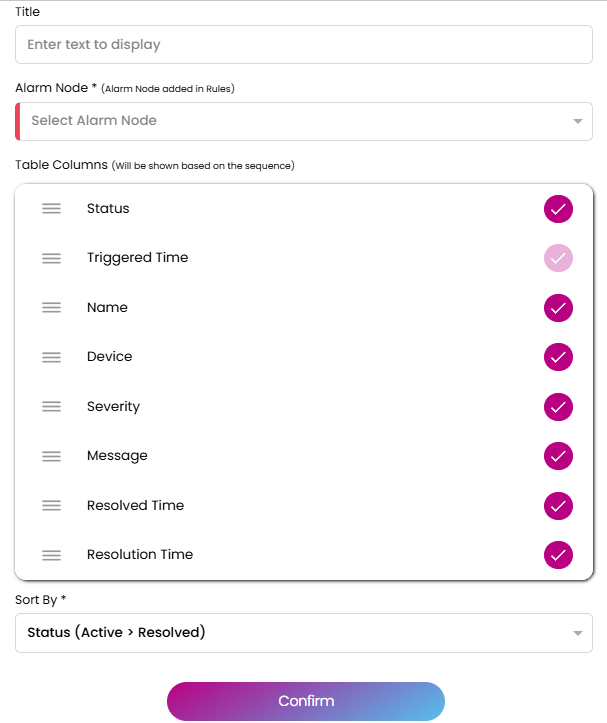
Image: Latest State Table Configuration
- The following are the configuration options specific to the Latest State Table:
- Title (optional): Enter text to display as the title above the table.
- Alarm Node (mandatory): Select the Alarm Node added in Rules to filter the active alarms.
- Table Columns (optional): Choose which columns to display and their sequence (e.g., Status, Triggered Time, Name, Device, Severity, Message, Resolved Time, Resolution Time).
- Sort By (mandatory): Choose the default sorting for the table.
Active Alarms Table
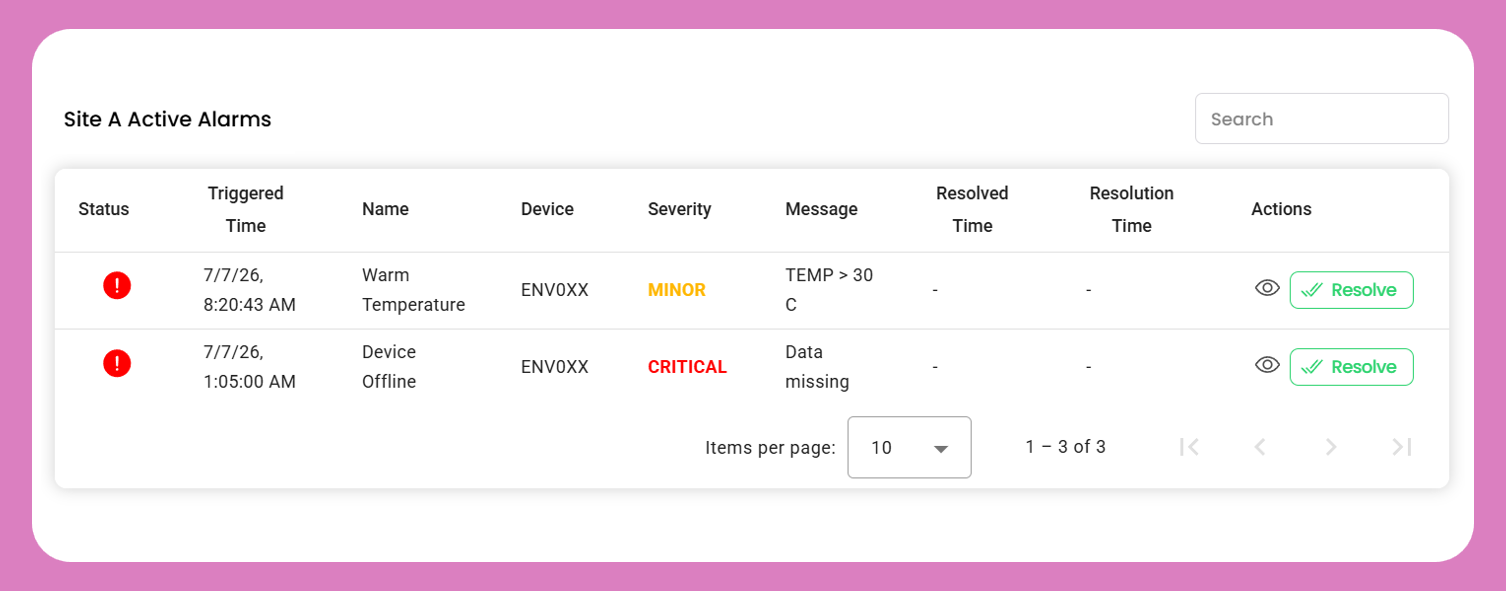
Image: Active Alarms Table
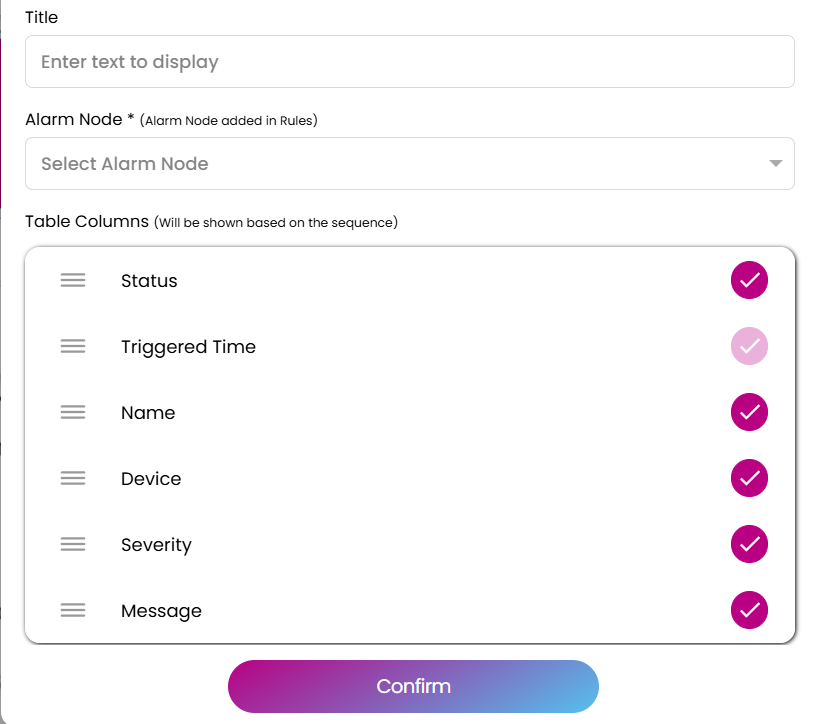
Image: Active Alarms Table Configuration
- The following are the configuration options specific to the Active Alarms Table:
- Title (optional): Enter text to display as the title above the table.
- Alarm Node (mandatory): Select the Alarm Node added in Rules to filter the active alarms.
- Table Columns (optional): Choose which columns to display and their sequence (e.g., Status, Triggered Time, Name, Device, Severity, Message).
Historical Activity Logs
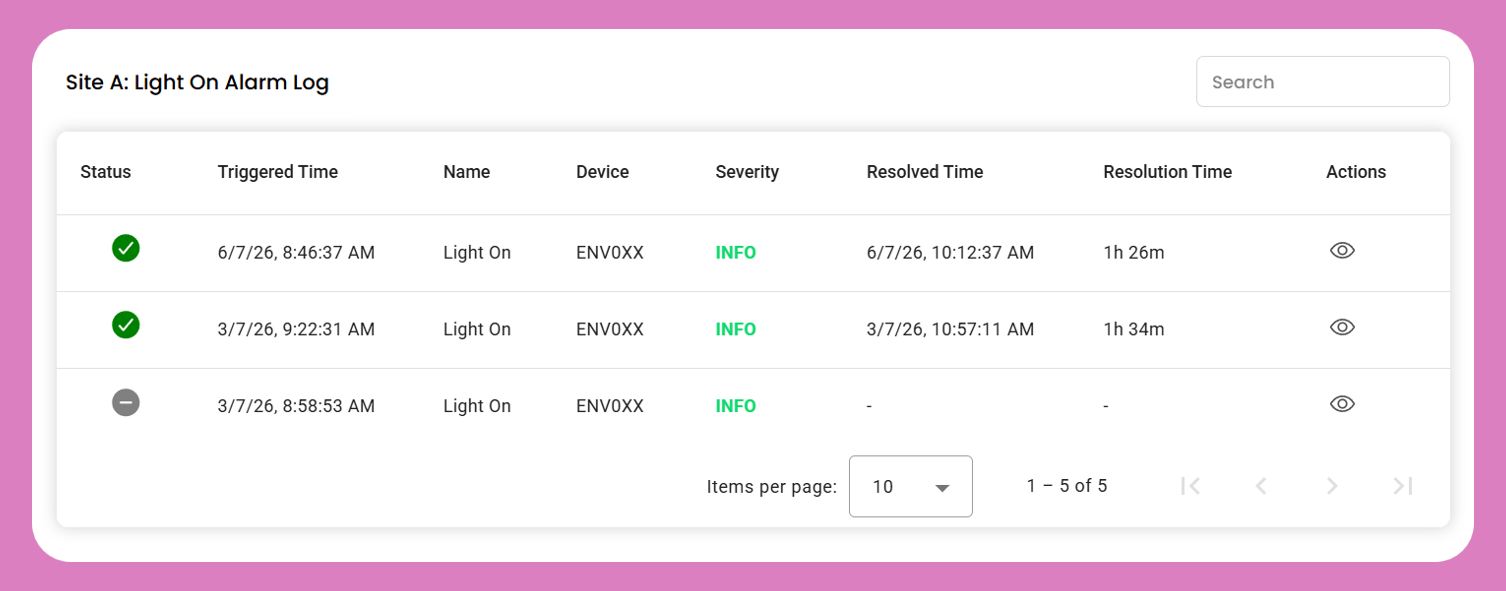
Image: Historical Activity Logs
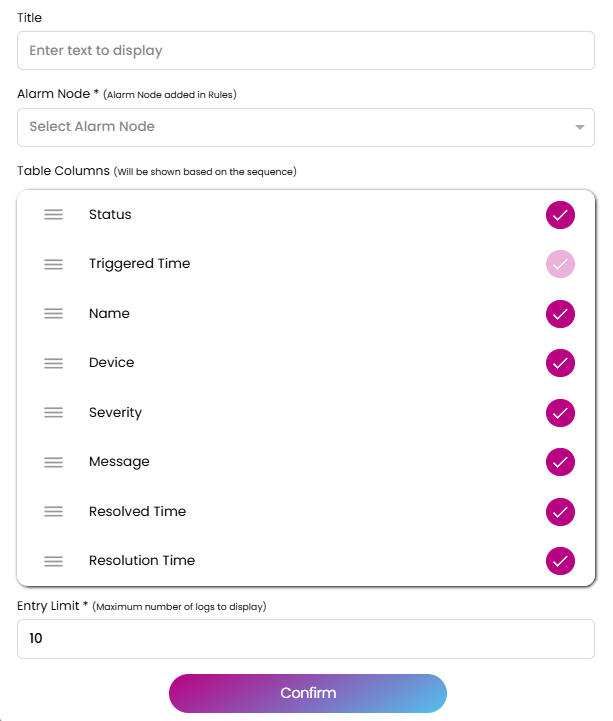
Image: Historical Activity Logs Configuration
- The following are the configuration options specific to the Historical Activity Logs:
- Title (optional): Enter text to display as the title above the table.
- Alarm Node (mandatory): Select the Alarm Node added in Rules to filter the alarms.
- Table Columns (optional): Choose which columns to display and their sequence (e.g., Status, Triggered Time, Name, Device, Severity, Message, Resolved Time, Resolution Time).
- Entry Limit (mandatory): Maximum number of logs to display.
Status Counts Summary
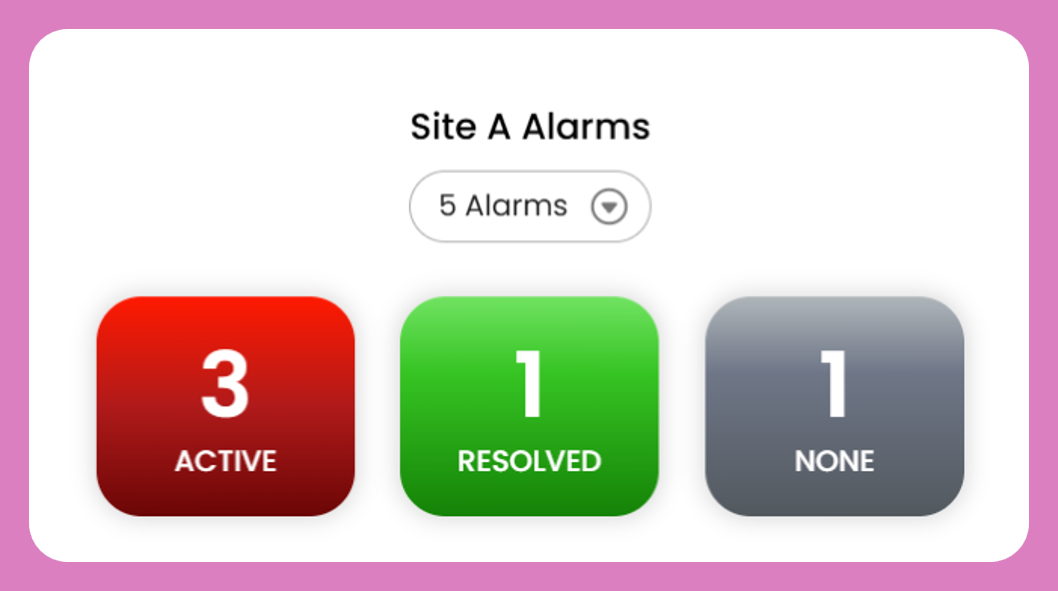
Image: Status Counts Summary
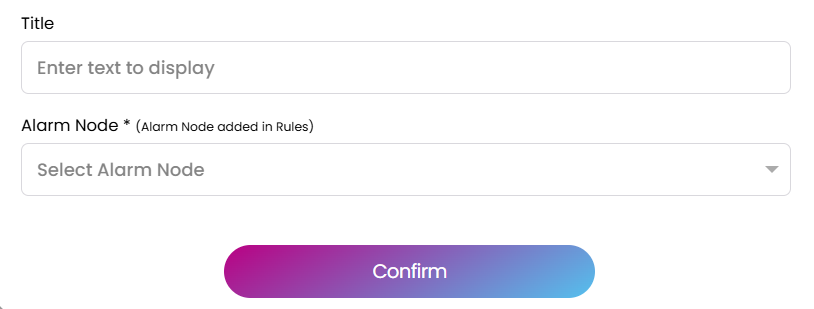
Image: Status Counts Summary Configuration
- The following are the configuration options specific to the Status Counts Summary:
- Title (optional): Enter text to display as the title above the counts.
- Alarm Node (mandatory): Select the Alarm Node added in Rules to compute the counts.
Single Alarm State Card
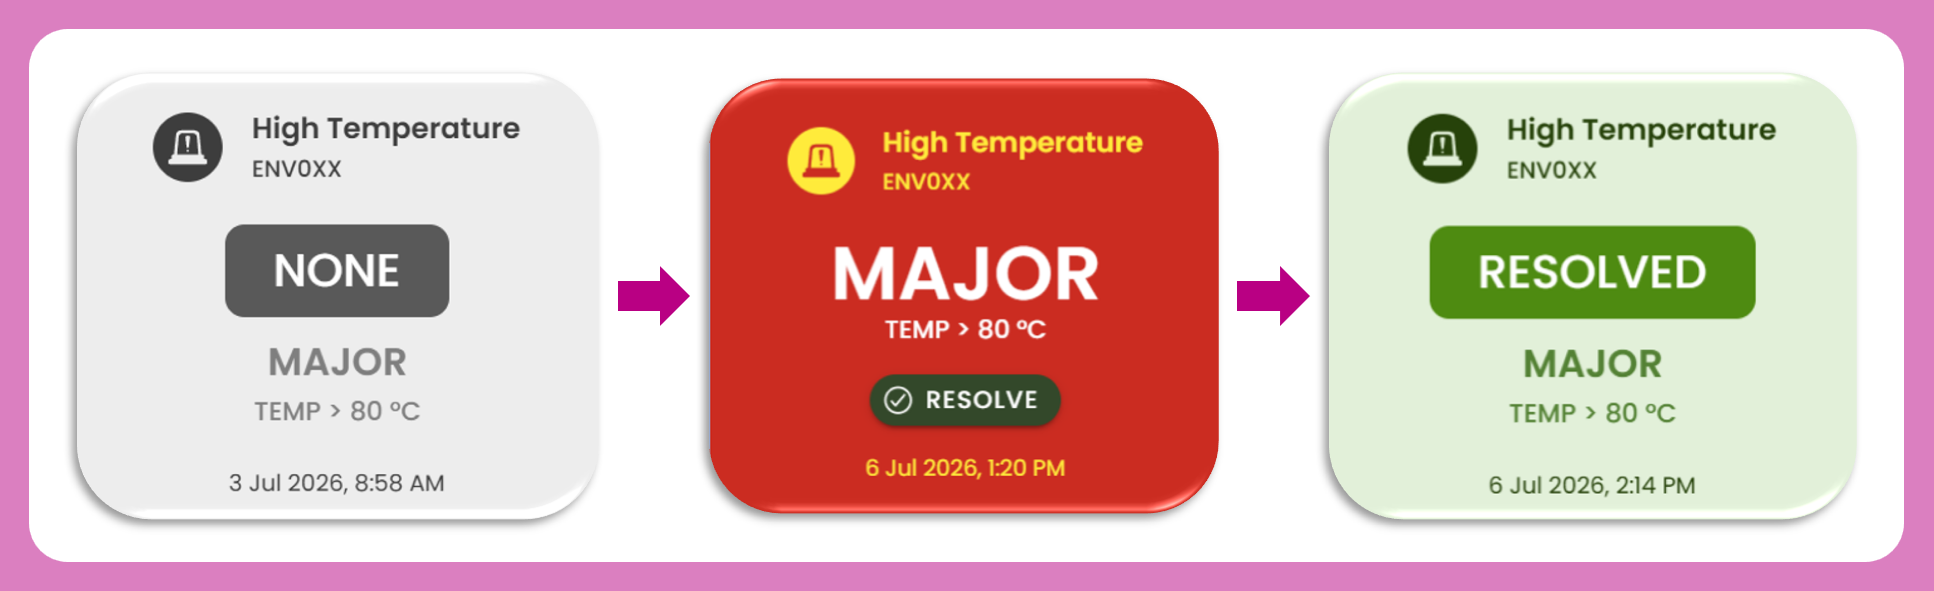
Image: Single Alarm State Card
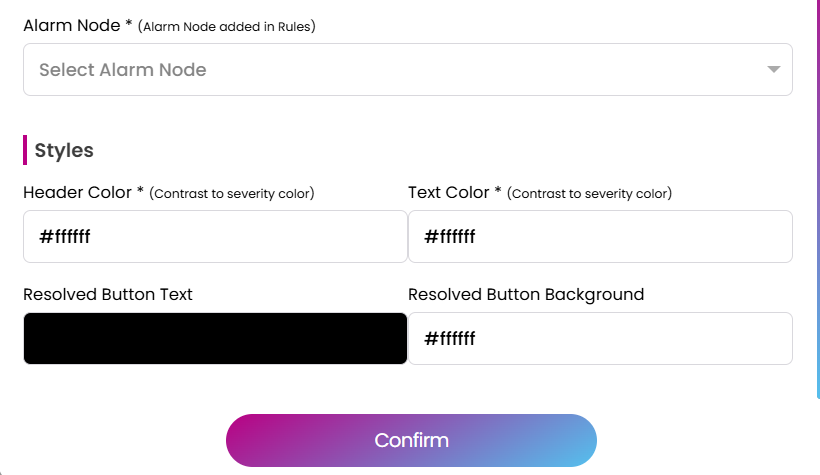
Image: Single Alarm State Card Configuration
- The following are the configuration options specific to the Single Alarm State Card:
- Alarm Node (mandatory): Select the Alarm Node added in Rules to observe.
- Styles:
- Header Color (mandatory): Background color for the header area (recommended: contrast to severity color).
- Text Color (mandatory): Color for the text (recommended: contrast to severity color).
- Resolved Button Text (optional): Custom text for the resolution button.
- Resolved Button Background (optional): Custom background color for the resolution button.
ANALYTIC
Analyzing the data with a collection of widgets in a analytic dashboard. Allows developers to get more insight about the data. A public url is generated (when activated), which then allows the developer to share the public url to other people. Analytic features only available for developer account. To create analytic dashboard its similar how we manage Dashboard refer here How To Manage Dashboard.
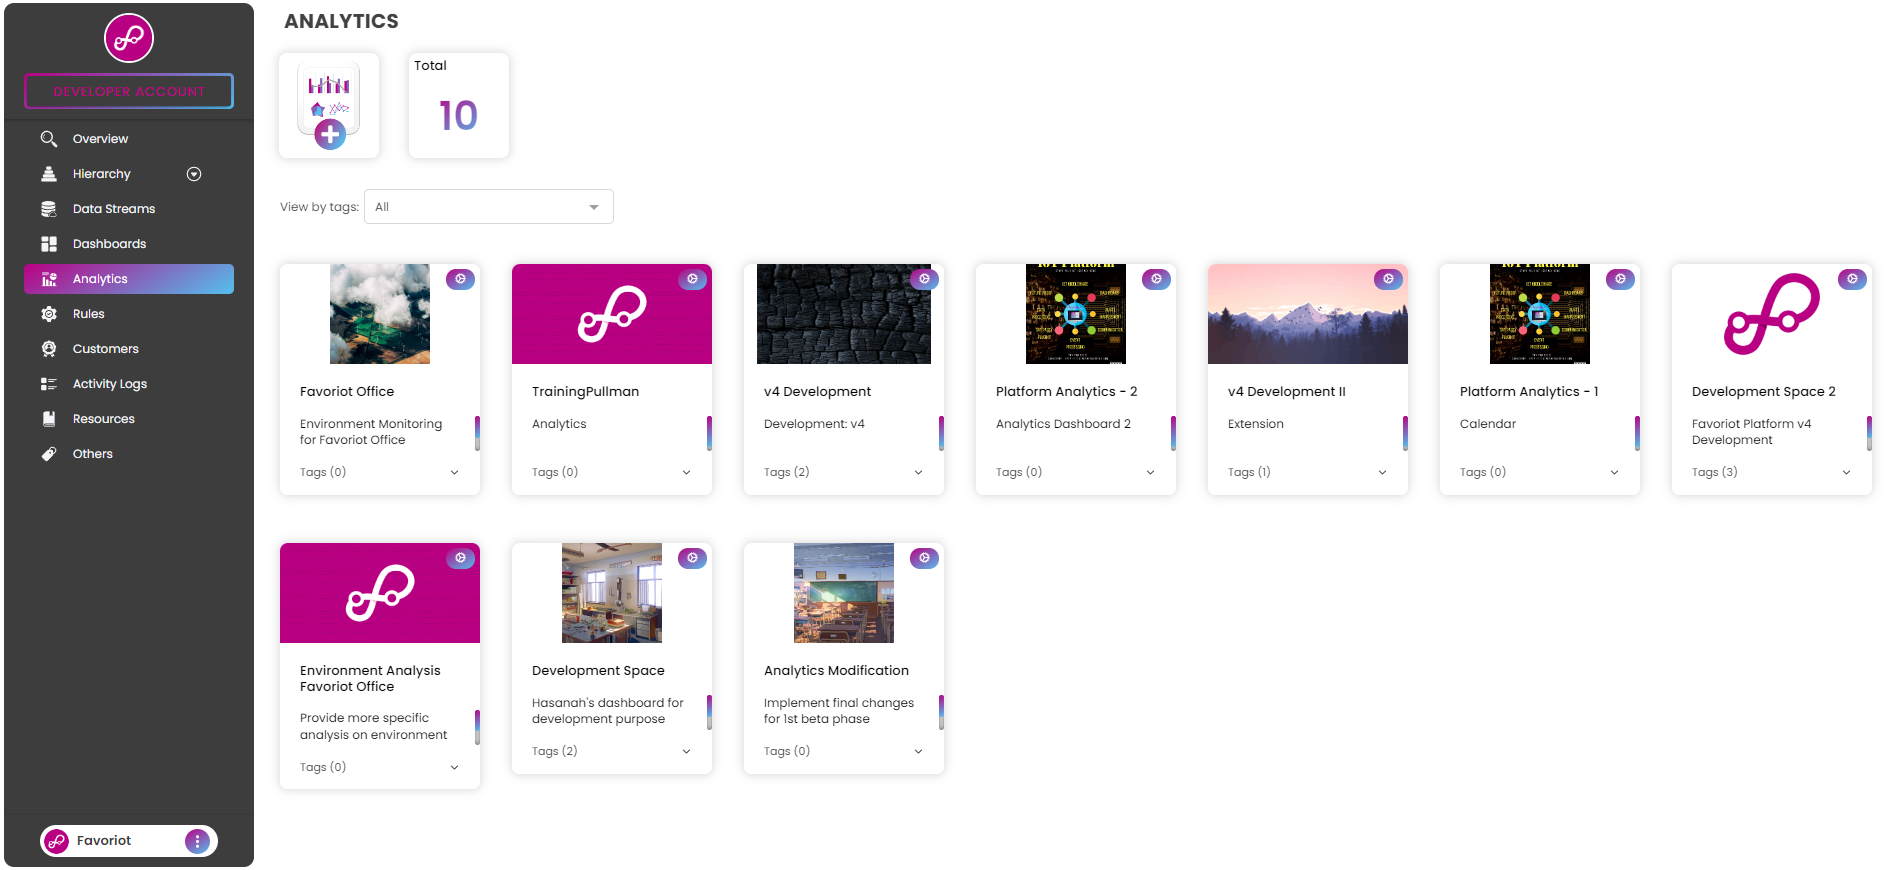
Image: "Analytic Dashboards" page
Video: [HOW-TO] - Create Analytic Dashboard
Analytic Widgets
Visualise your analyse data with a variety of widget types.
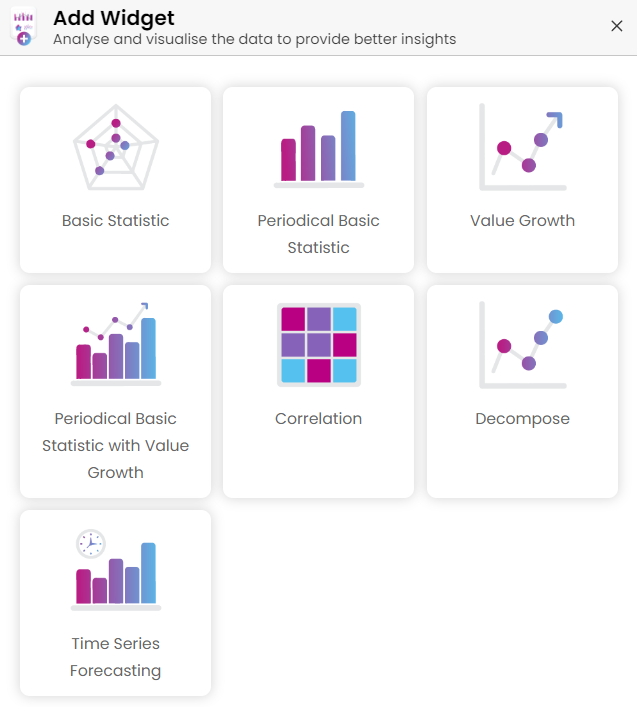
Image: Analytic Widget types
Basic Statistic - Display basic statistic value(s) for single period only.
Periodical Basic Statistic - Display basic statistic value(s) based on period basis (eg:hourly,daily,monthly).
Value Growth - Display value growth based on period basis (eg:hourly,daily,monthly).
Periodical Basic Statistic with Value Growth - Display basic statistic value(s) and its growth based on period basis (eg:hourly,daily,monthly).
Correlation - Display the relationship between two or more variables,which indicates whether a change in one variable corresponds to a change in another.
Decompose - Display the various components of time series after decomposition.
- Observe: Refers to the original time series data
- Trend: Represents the underlying long-term progression or direction in the data. It captures the overall movement or tendency of the time series over time.
- Seasonal:Captures the repeating patterns or fluctuations that occur at fixed intervals, such as daily, monthly, or yearly cycles. Seasonality reflects systematic variations that repeat regularly.
- Residual:Represents the unexplained variability in the time series after removing the trend and seasonal components. It includes the noise, irregularities, and random fluctuations that are not accounted for by the identified trend and seasonality.
Machine Learning (ML) Model Result - Display ML model results that has been trained. For more information about ML models, see Machine Learning.
Video: [Walkthrough] - Analytic Widgets
MACHINE LEARNING
The Machine Learning (ML) feature in the Favoriot platform enables IoT data to be automatically analyzed to generate intelligent and predictive insights. Apply predictive analytics and automated decision-making directly within the platform—no complex ML code required.
Note: This feature is available for Developer accounts only.
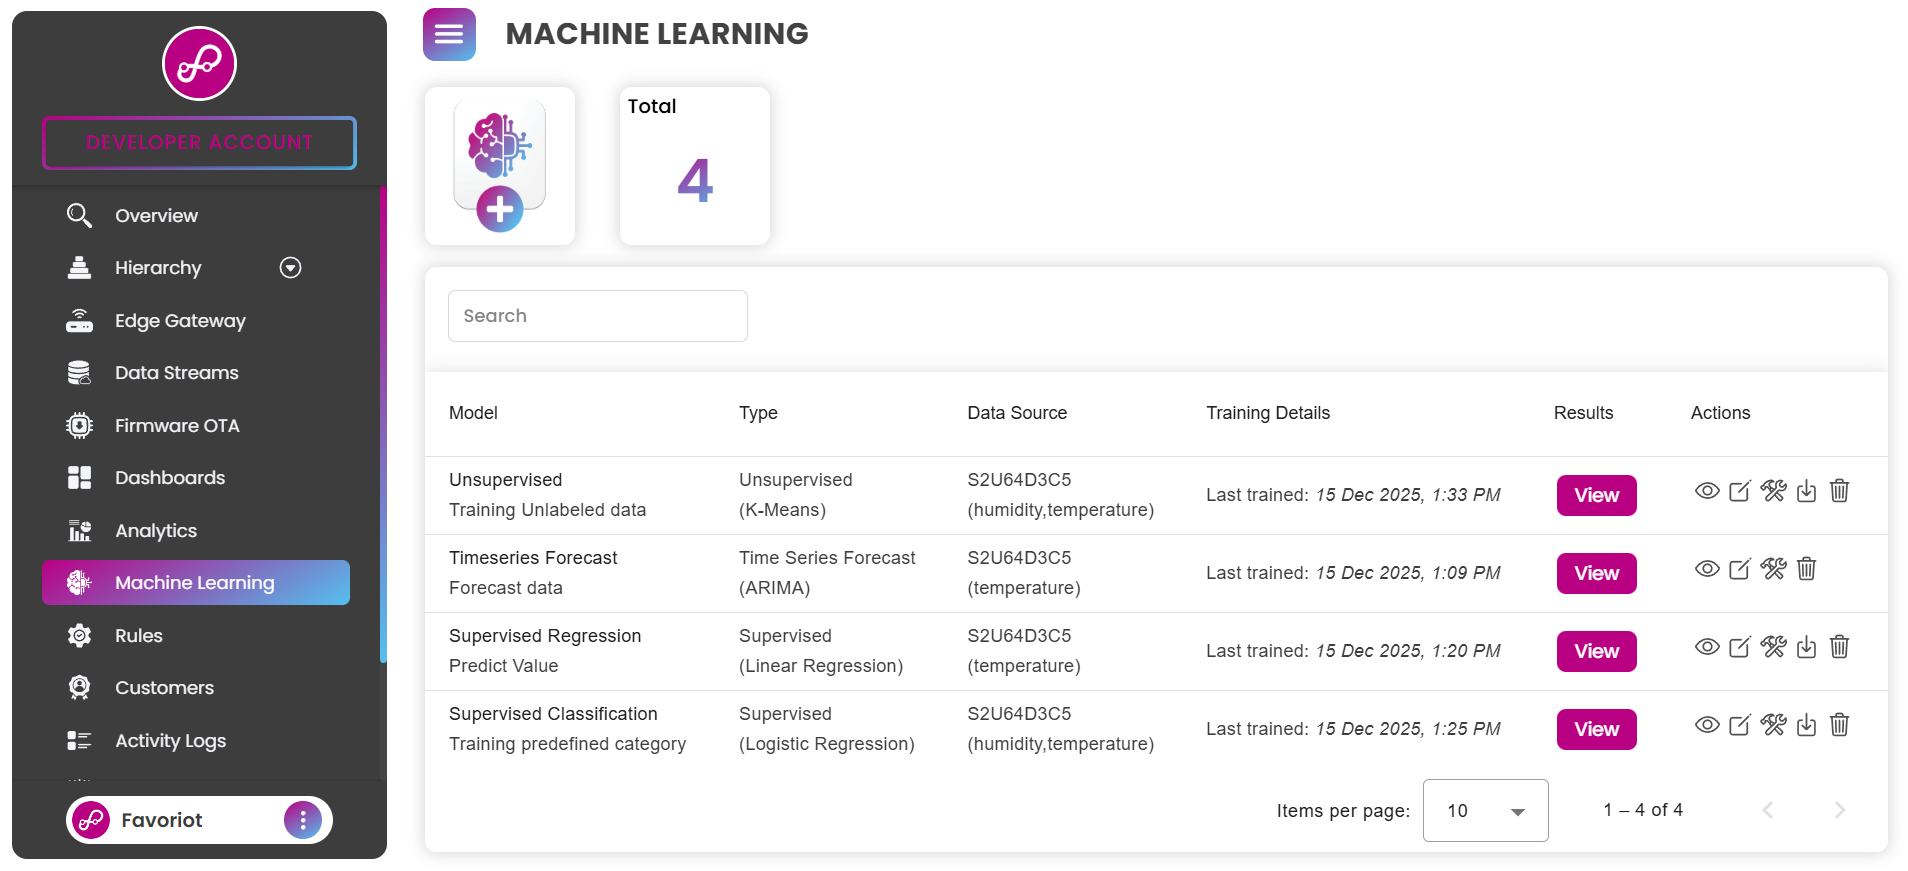
What You Can Do
- Predict Future Trends: Forecast sensor values, energy consumption, or system behavior
- Detect Anomalies: Identify unusual patterns or outliers in your IoT data
- Classify Events: Automatically categorize device states (Normal, Warning, Critical)
- Discover Patterns: Find hidden groupings in your data without predefined labels
Machine Learning Types
1. Time Series Forecasting
Predict future values based on historical time-ordered data.
Use Cases:
- Energy consumption forecasting
- Temperature/humidity prediction
- Traffic or system load estimation
Available Algorithms:
- ARIMA: Best for stable data with clear patterns (short-term forecasts)
- AutoRegression: Fast and simple for linear trends
- LSTM: Deep learning for complex, non-linear patterns
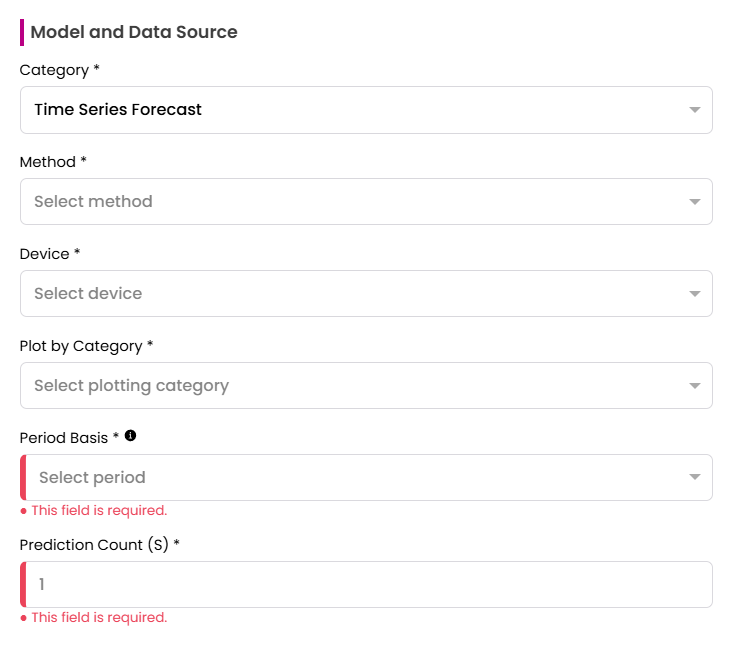
Configuration:
- Select your device and parameter to forecast
- Choose aggregation period (Hourly, Daily, Weekly, Monthly)
- Set prediction count (how many steps ahead to forecast)
- Platform automatically selects optimal model parameters
2. Supervised Classification
Classify IoT data into predefined categories based on historical labels.
Use Cases:
- Device health status (Normal, Warning, Critical)
- Fault detection and categorization
- Security event identification
Available Algorithms:
- SVM: Effective for clear class separation
- Logistic Regression: Simple, fast baseline
- Random Forest: Robust with feature importance
- XGBoost: State-of-the-art accuracy
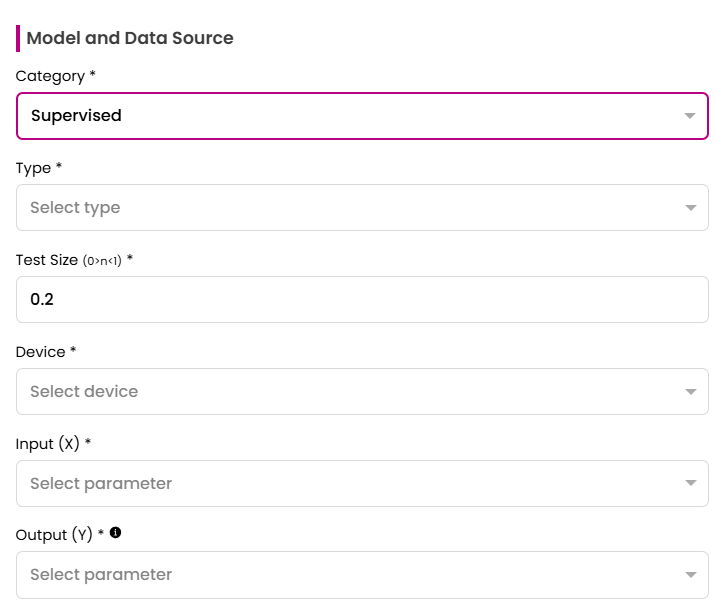
Configuration:
- Select input features (sensor readings for prediction)
- Choose output target (what to classify)
- Define rules (optional) to map conditions to labels
- Platform trains model and evaluates accuracy
Example Rules:
1. Device Health Status (Multi-Condition):
condition:
- rule: "temperature > 35 or vibration > 0.8"
label: "Critical"
- rule: "temperature > 25 or vibration > 0.5"
label: "Warning"
- rule: "temperature <= 25 and vibration <= 0.5"
label: "Normal"
2. Environmental Conditions (Combined Sensors):
condition:
- rule: "temperature > 30 and humidity < 50"
label: "Hot_Dry"
- rule: "temperature > 30 and humidity >= 50"
label: "Hot_Humid"
- rule: "temperature <= 30 and temperature > 20"
label: "Moderate"
- rule: "temperature <= 20"
label: "Cold"
3. Battery Status (Multi-Feature):
condition:
- rule: "battery_level < 20 or signal_strength < -80"
label: "Low_Battery"
- rule: "battery_level >= 20 and battery_level < 50"
label: "Medium_Battery"
- rule: "battery_level >= 50"
label: "Good_Battery"
4. Fault Detection (Complex Logic):
condition:
- rule: "current > 10 and voltage < 200"
label: "Overcurrent_Fault"
- rule: "temperature > 40 and pressure > 1020"
label: "Overheat_Fault"
- rule: "vibration > 0.9 and rpm > 3000"
label: "Mechanical_Fault"
- rule: "default"
label: "Normal"
Rule Syntax:
- Comparison operators:
>,<,>=,<=,==,!= - Logical operators:
and,or - Numeric values: Integers or decimals
- Feature names: Must match exact sensor/parameter names
- Default rule: Use
"default"or last rule as fallback
Important Notes:
- Rules are evaluated sequentially (top to bottom)
- First matching rule is applied
- If no rule matches, label defaults to
"unknown" - Use parentheses for complex conditions:
(temp > 30) and (humidity < 50 or pressure > 1000)
3. Supervised Regression
Predict continuous numerical values from IoT data.
Use Cases:
- Remaining useful life (RUL) prediction
- Power consumption estimation
- Sensor value prediction
Available Algorithms:
- Linear Regression: Simple linear relationships, interpretable model
- Random Forest: Complex non-linear patterns, robust model
- XGBoost: Maximum accuracy, structured data
- SVR: Non-linear relationships, small-medium datasets
Formula-Based Target Calculation:
The platform supports dynamic mathematical formulas to compute custom target values from multiple sensor readings. This allows you to create derived metrics without modifying your data source.
Example Formulas:
# Air Quality Index from multiple sensors
"PM2.5 * 0.8 + PM10 * 0.2"
# Heat Index from temperature and humidity
"temperature * 0.5 + humidity * 0.3 - 5.3"
# Power Consumption from voltage and current
"voltage * current * power_factor"
# Weighted Composite Score
"temperature * 0.4 + pressure * 0.3 + humidity * 0.3"
Supported Math Operations:
| Category | Available Items |
|---|---|
| Type Conversion | float, int |
| Math Functions | abs, round, max, min, pow, sum |
| Math Constants | math, pi, e |
| Operators | +, -, *, /, ** (power) |
Blocked Keywords (for security): and, or, not, if, else, for, while
How It Works:
- Formula Retrieval: Platform reads from your configuration
- Variable Extraction: Automatically identifies feature names (e.g.,
PM2.5,temperature) - Safe Substitution: Replaces variables with actual sensor values
- Controlled Evaluation: Executes in a restricted environment with safe built-ins
- Validation: Ensures result is numeric (not boolean, NaN, or Inf)
Error Handling:
- Missing variables default to
0.0with warning - Boolean results raise error
- Non-numeric results raise error
- NaN/Inf results raise error
Use Cases for Formulas:
- Composite Indices: Combine multiple sensors into single metric
- Physical Calculations: Power, energy, efficiency calculations
- Weighted Scores: Custom business logic from multiple inputs
- Derived Metrics: Calculate values not directly measured
Configuration:
- Select input features for prediction
- Define target parameter to predict
- Optional: Use formula to compute target from multiple sensors
- Platform evaluates with RMSE, MAE, MAPE, MASE metrics
4. Unsupervised Learning (Clustering)
Discover hidden patterns and groupings without predefined labels.
Use Cases:
- Device behavior clustering
- Anomaly detection
- Customer/usage segmentation
Available Algorithms:
- K-Means: General-purpose clustering (automatic optimal K via Elbow Method)
- DBSCAN: Density-based, excellent for outlier detection
- GMM: Probabilistic clustering with automatic model selection (AIC/BIC)
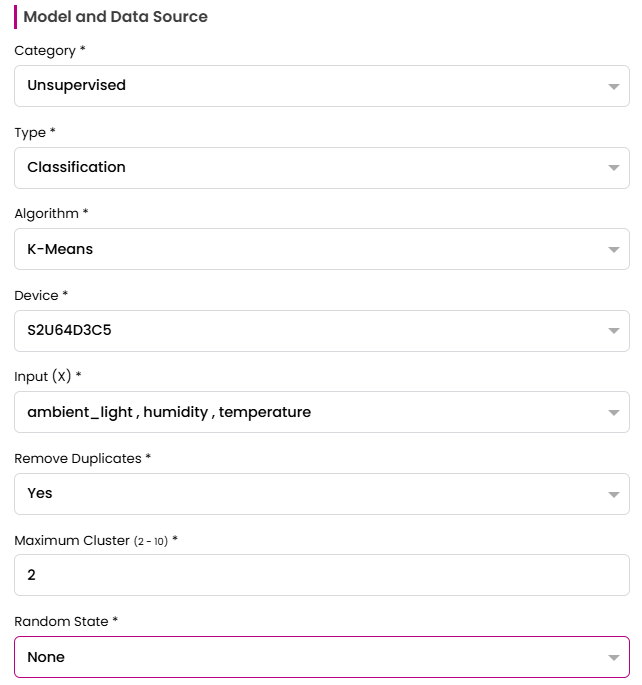
Configuration:
- Select input features for clustering
- Choose algorithm (K-Means, DBSCAN, or GMM)
- Set maximum clusters (platform finds optimal automatically)
- Platform evaluates with Silhouette Score, Davies-Bouldin Index, Calinski-Harabasz Index
Quick Start Guide
Step 1: Create ML Model

- Click Create Machine Learning
- Enter model title and description
- Select category (Timeseries, Supervised, or Unsupervised)
- Choose data date range for training
- Click Confirm
Step 2: Configure Model
Configure based on selected category:
Time Series:
- Select device and parameter
- Choose period (Hourly/Daily/Weekly/Monthly)
- Set prediction count
Supervised:
- Select input features (X) and output target (Y)
- Choose algorithm
- Optionally define classification rules
Unsupervised:
- Select input features
- Choose clustering algorithm
- Set maximum clusters
Step 3: Train Model
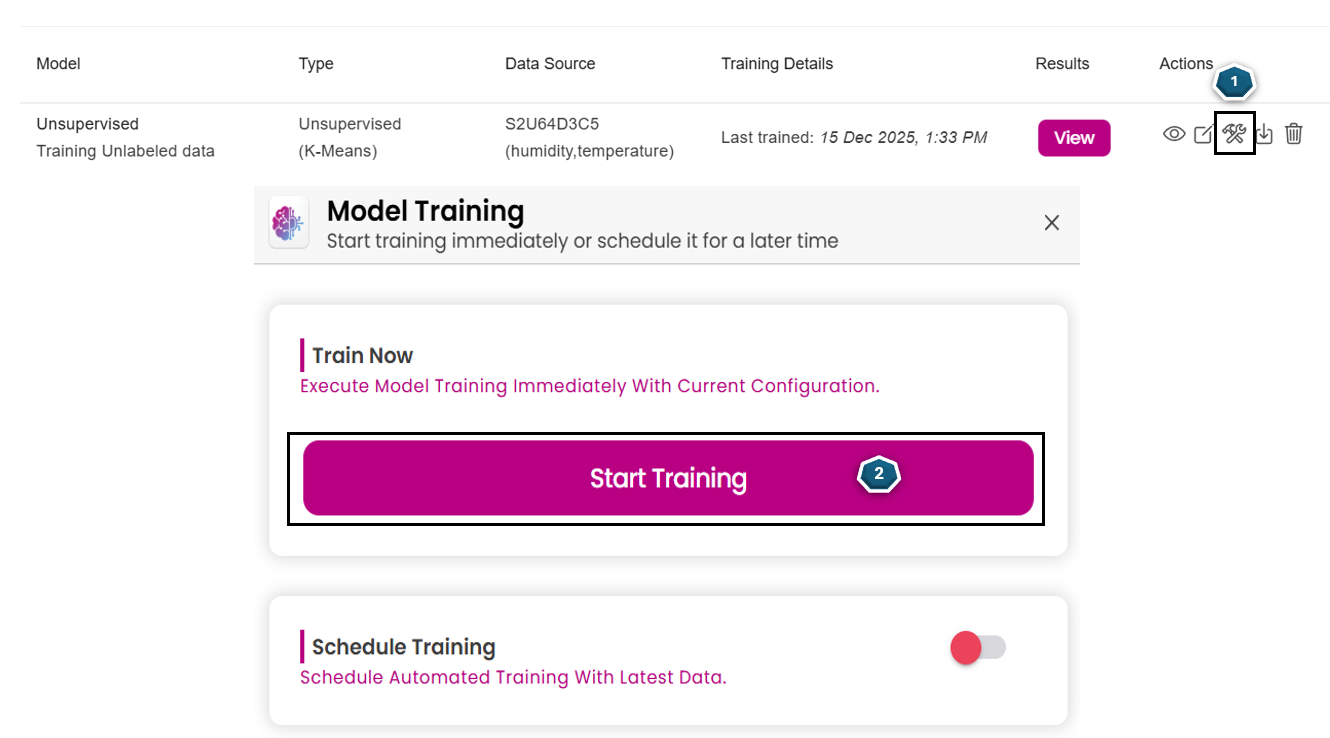
- Click the Tools Icon (wrench) in Actions column
- Click Start Training
- Wait for training to complete (1-10 minutes depending on data size)
Step 4: View Results

Click View to see:
- Graph: Visual representation of predictions or clusters
- Performance Metrics: Accuracy, error rates, or cluster quality scores
- Processing Info: Training time and data statistics
Schedule Automatic Retraining
Keep your models up-to-date with scheduled retraining.

Schedule Options:
- Interval: Retrain every few hours (max 12 hours)
- Daily: Specific time every day
- Weekly: Specific day and time
- Monthly: Specific date and time
Recommendations:
- Fast-changing data: Interval training (6-12 hours)
- Daily patterns: Daily training (off-peak hours)
- Stable systems: Weekly or monthly training
Use ML Results
Display in Dashboard
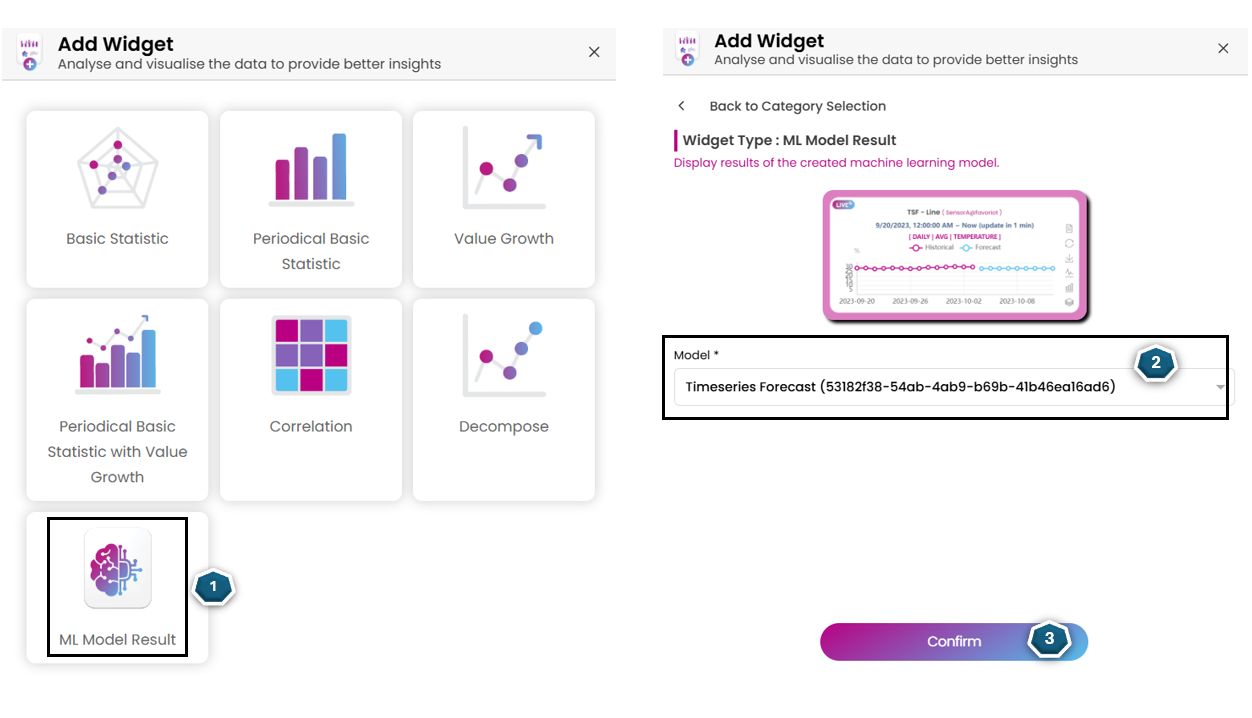
- Go to Dashboard → Add Widget
- Select ML Model Result
- Choose your trained model
- Widget displays real-time predictions
Apply in Rule Engine
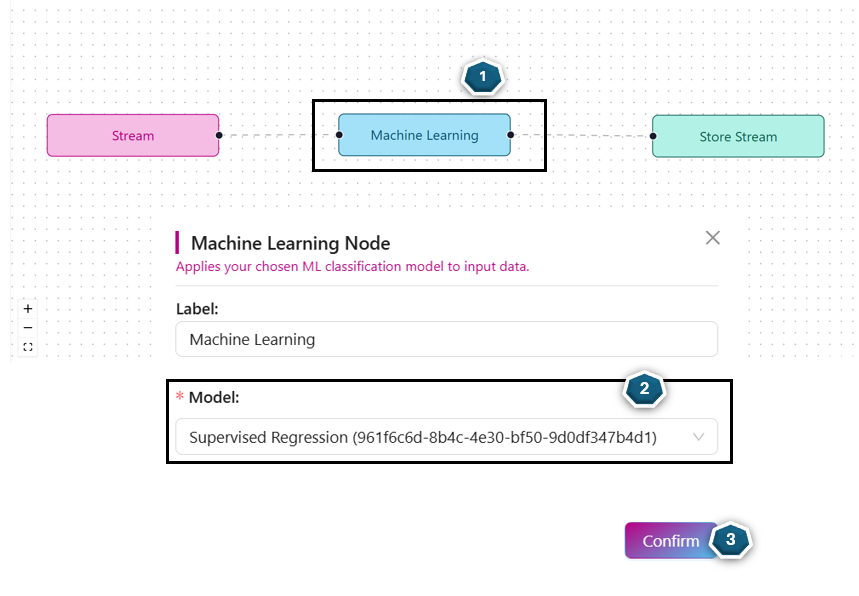
- Add Machine Learning node to workflow
- Select your trained model
- Use predictions to trigger actions:
- Send alerts on anomaly detection
- Schedule maintenance on predicted failures
- Route data based on classification
Video Tutorial - Machine Learning
Video: [Walkthrough] - How to setup machine learning
Performance Metrics
Classification Metrics
- Accuracy (%): Overall correctness (correct predictions / total predictions)
- Precision (%): Positive prediction accuracy (TP / (TP + FP))
- Recall (%): True positive rate (TP / (TP + FN))
- F1 Score (%): Harmonic mean of precision and recall
Regression Metrics
- MAPE (%): Mean Absolute Percentage Error (0% = perfect fit)
- MASE: Mean Absolute Scaled Error (< 1 = better than naive forecast)
- RMSE: Root Mean Squared Error (penalizes larger errors, same units as target)
- MAE: Mean Absolute Error (robust to outliers, same units as target)
Clustering Metrics
- Silhouette Score: Cluster separation (-1 to 1, higher is better)
- Davies-Bouldin Index (DBI): Cluster similarity (0 to ∞, lower is better)
- Calinski-Harabasz Index (CH): Cluster quality (0 to ∞, higher is better)
Technical Notes
Data Requirements
| ML Type | Minimum Data Points | Recommended | Notes |
|---|---|---|---|
| Time Series | 50 | 100+ | More data for LSTM (500+) |
| Supervised | 30 per class | 100+ per class | Balanced classes preferred |
| Unsupervised | 20 | 50+ | Depends on feature count |
Train/Test Split
The platform automatically splits your data:
- Training Set (80%): Used to train the model
- Testing Set (20%): Used to evaluate accuracy
This ensures the model generalizes well to unseen data.
Feature Scaling
Some algorithms require feature scaling (automatically handled by platform):
| Algorithm | Scaling Required |
|---|---|
| SVM/SVR | ✅ StandardScaler |
| Logistic Regression | ✅ StandardScaler |
| Linear Regression | ✅ StandardScaler |
| Random Forest | ❌ Not required |
| XGBoost | ❌ Not required |
| K-Means | ✅ StandardScaler |
| GMM | ✅ StandardScaler |
| DBSCAN | ✅ StandardScaler |
Categorical Feature Encoding
The platform automatically encodes categorical features:
| Algorithm | Encoding Method |
|---|---|
| ARIMA | One-Hot Encoding (drop first to prevent multicollinearity) |
| LSTM | Label Encoding (integer classes) |
| AutoRegression | Categorical features dropped (uses cyclic time features) |
| Supervised | Label Encoding for target, One-Hot for features |
Automatic Model Selection
The platform automatically selects optimal hyperparameters:
| Algorithm | Auto-Selection Method |
|---|---|
| ARIMA | Tests candidate models, selects by AIC minimization |
| AutoRegression | Tests lags 1-10, selects by AIC |
| LSTM | Auto-recommends lookback based on period |
| K-Means | Elbow Method (perpendicular distance) |
| GMM | Tests 2-max_cluster, selects by AIC/BIC |
Export for Offline Inference
Supported Models:
- ✅ Supervised: SVM, Logistic Regression, Random Forest, XGBoost, Linear Regression, SVR
- ✅ Clustering: K-Means, GMM, DBSCAN
Formats: Joblib (.pkl, .joblib) and ONNX (.onnx)
Change Detection (Retraining Optimization)
The platform uses data hashing to detect if retraining is needed:
- Generates MD5 hash of training data
- Compares with previous training hash
- Skips retraining if data unchanged (saves resources)
Model Format
Files per model:
- Model file (
.pkl) - Scaler file (
.joblib) if required - Config file (
.pkl) with training metadata - Encoder files for categorical features
Processing Time
Typical training times:
| Algorithm | Small Data (<1K) | Medium (1K-10K) | Large (10K+) |
|---|---|---|---|
| ARIMA | 30-60 sec | 1-3 min | 3-5 min |
| AutoRegression | 10-30 sec | 30-60 sec | 1-2 min |
| LSTM | 2-5 min | 5-10 min | 10-20 min |
| Supervised | 30-60 sec | 1-2 min | 2-5 min |
| Unsupervised | 30-60 sec | 1-3 min | 3-5 min |
Algorithm Selection Guide
Time Series:
- ARIMA: Stable patterns, seasonality, interpretable model needed
- AutoRegression: Simple linear trends, fast training preferred
- LSTM: Complex non-linear patterns, high accuracy required, large dataset
Classification:
- SVM: Small-medium data, clear class margins
- Logistic Regression: Binary classification, baseline model
- Random Forest: Complex patterns, feature importance needed
- XGBoost: Maximum accuracy, can tune hyperparameters
Regression:
- Linear: Linear relationships, interpretability needed
- Random Forest: Non-linear patterns, robust model
- XGBoost: Maximum accuracy, structured data
- SVR: Non-linear, small-medium dataset
Clustering:
- K-Means: Spherical clusters, fast results needed
- DBSCAN: Arbitrary shapes, outlier detection needed
- GMM: Overlapping clusters, probability estimates needed
Export for Offline Use
Download trained models for edge deployment and local inference.
Supported Export Formats
| Format | File Extension | Runtime Required |
|---|---|---|
| Joblib | .joblib, .pkl |
scikit-learn, joblib |
| ONNX | .onnx |
onnxruntime |
Model Download Format
After training, models are saved as:
Files per trained model:
{model_id}_model.pklor{model_id}_model.joblib- Trained model{model_id}_scaler.joblib- Feature scaler (if required){model_id}_preprocessor.jsonor.joblib- Preprocessing artifacts (encoders, feature config){model_id}_config.pkl- Training metadata
Python SDK (Edge ML SDK)
Use the Favoriot Edge ML SDK for Python-based local inference with automatic preprocessing.
Installation:
git clone https://github.com/Favoriot/edge-ml-sdk.git
cd edge-ml-sdk
pip install -e .
Requirements: Python 3.9+ (fully compatible with 3.12+), numpy, scikit-learn, joblib, onnxruntime (for ONNX models)
Quick Start:
from favoriotml.config import ModelConfig
from favoriotml.model_loader import ModelLoader
from favoriotml.inference import EdgeInference
# Configure model
config = ModelConfig(
model_path="path/to/model.pkl",
preprocessor_path="path/to/preprocessor.json",
model_type="joblib",
task_type="classification",
feature_order=["temperature", "humidity", "pressure"]
)
# Load model and preprocessing artifacts
model, scaler, label_encoder, _, cat_encoders, _ = ModelLoader(
config.model_path, config.model_type, config.preprocessor_path
).load()
# Initialize inference engine
inference = EdgeInference(
model=model, model_type=config.model_type, task_type=config.task_type,
feature_order=config.feature_order, scaler=scaler,
label_encoder=label_encoder, categorical_encoders=cat_encoders
)
# Predict from raw sensor payload (auto-preprocessing)
payload = {"temperature": 28.5, "humidity": 65.2, "pressure": 1013.25}
prediction = inference.predict_from_payload(payload)
print(f"Prediction: {prediction}")
SDK Features:
- ✅ Python 3.12+ Compatible (JSON preprocessor artifacts)
- ✅ Dual Format Support (
.jsonand.joblib) - ✅ Zero-Config Encoding (raw categorical strings accepted)
- ✅ ONNX-Optimized (native float32 handling)
- ✅ DBSCAN Support (custom label assignment)
Source: Favoriot Edge ML SDK
Node-RED Integration
Use node-red-contrib-favoriot-ml for ONNX model inference in Node-RED flows.
Installation:
cd ~/.node-red
npm install https://github.com/Favoriot/node-red-contrib-favoriot-ml
# Restart Node-RED
Requirements: Node.js v14+, Node-RED v2+, onnxruntime-node
Usage:
- Send input:
{"temperature": 28.5, "humidity": 65.2, "status": "active"} - Output:
{"prediction": 1, "status": "success", "timestamp": "..."}
Features:
- ✅ Categorical Encoding (raw strings supported)
- ✅ Automatic Scaling
- ✅ Feature Alignment
- ✅ Robust Error Handling
Source: node-red-contrib-favoriot-ml
Performance Comparison
| Format | Load Time | Inference Speed | File Size | Best For |
|---|---|---|---|---|
| Joblib | Fast (~10ms) | Fast (~1-5ms) | Medium | Python-only deployments |
| ONNX | Very Fast (~5ms) | Very Fast (~0.5-2ms) | Small | Cross-platform, production |
Source Code Repositories
- Edge ML SDK: https://github.com/Favoriot/edge-ml-sdk
- Node-RED Node: https://github.com/Favoriot/node-red-contrib-favoriot-ml
- Offline Inference Examples: https://github.com/Favoriot/Favoriot-ml-offline-inference
Best Practices
- Data Quality: Ensure sufficient historical data (minimum 50-100 data points)
- Feature Selection: Use relevant features, avoid irrelevant ones
- Start Simple: Begin with simpler algorithms (Linear, ARIMA) as baseline
- Schedule Retraining: Keep models current with automatic retraining
- Monitor Performance: Regularly check prediction accuracy and retrain if needed
- Test Before Deploy: Validate model predictions before using in production rules
Common Use Cases
Predictive Maintenance
- Type: Supervised Classification or Regression
- Input: Vibration, temperature, operating hours
- Output: Failure prediction or remaining useful life
Energy Forecasting
- Type: Time Series
- Input: Historical consumption data
- Output: Future energy usage prediction
Anomaly Detection
- Type: Unsupervised Clustering
- Input: Multiple sensor readings
- Output: Normal vs. anomalous behavior clusters
Device Health Monitoring
- Type: Supervised Classification
- Input: Battery level, signal strength, error codes
- Output: Health status (Normal, Warning, Critical)
MCP
MCP (Model Context Protocol) server for the Favoriot Platform. This server enables AI assistants like Claude, Codex, Antigravity, Cursor, OpenClaw, Hermes, and others to manage your IoT infrastructure through natural language.
What it does
Exposes 23 tools that cover the full Favoriot IoT hierarchy:
Project → Application → Group → Device → Data Stream
| Category | Tools | Operations |
|---|---|---|
| Hierarchy | provision_device_pipeline,get_hierarchy |
Bulk environment provisioning and fetching |
| Projects | list_projects, create_project, update_project, delete_project |
Full CRUD |
| Applications | list_applications, create_application, update_application, delete_application |
Full CRUD |
| Groups | list_groups, create_group, update_group, delete_group |
Full CRUD |
| Devices | list_devices, create_device, update_device, delete_device |
Full CRUD |
| Data Streams | list_streams, create_stream, get_stream, delete_streams |
Send & query sensor data |
| RPC | send_rpc |
Send commands to devices |
Predefined Workflows (MCP Prompts)
The server includes built-in AI workflows to reduce token usage and enforce best practices:
Troubleshoot device: Standard operating procedure for diagnosing offline devices.Generate daily report: Extracts 24-hour stream data, detects statistical anomalies (or uses user-provided thresholds), and outputs Markdown tables.Audit inactive devices: Scans the hierarchy to isolate offline or decommissioned devices.Onboard new hierarchy: Rapidly provisions a complete, isolated IoT environment using a single backend pipeline request.
Direct Connection (SSE) Configuration
The server uses Streamable HTTP transport (MCP 2025-11-25 spec). Unlike older SSE implementations, this server uses a single unified endpoint for both establishing the SSE stream (GET) and receiving messages (POST), relying on the mcp-session-id header or query parameter for routing. When running in SSE mode, it exposes:
https://mcp.favoriot.com/mcp— canonical StreamableHTTP endpoint (formcp-remote, Claude, Codex, and modern clients)https://mcp.favoriot.com/sse— alias endpoint (for AntigravityserverUrland legacy SSE clients)
Unified Endpoints: There is no separate /message endpoint to configure. Clients should send their POST messages to the exact same base /mcp or /sse URL they connected to.
Favoriot MCP Proxy Installation Guide
This guide explains how to install and configure the Favoriot MCP Server using the standalone proxy binaries. The proxy allows AI clients that only support stdio connections to seamlessly connect to a remote Favoriot MCP server running over HTTP/SSE.
1. Download the Proxy Binary
Download the correct pre-compiled proxy binary for your operating system from the GitHub Releases page.
- Windows:
favoriot-mcp-proxy-windows.exe - Linux:
favoriot-mcp-proxy-linux - macOS (Intel/x64):
favoriot-mcp-proxy-macos-x64 - macOS (Apple Silicon/M-series):
favoriot-mcp-proxy-macos-arm64
Save the binary to a permanent location on your machine (e.g., C:\mcp\favoriot-mcp-proxy-windows.exe or ~/.local/bin/favoriot-mcp-proxy-linux). Ensure the binary is executable on Linux (chmod +x favoriot-mcp-proxy-linux).
macOS Specific Setup
If you are on a Mac, you must grant the file execution permissions and remove Apple's Gatekeeper quarantine (which might falsely flag the file as "damaged" when opening).
Open your Terminal and run these two commands (replace /path/to/ with your actual file path):
1. Make it executable (fixes "Permission denied" error):
chmod +x /path/to/favoriot-mcp-proxy-macos
2. Remove quarantine flag (fixes "damaged" error):
xattr -cr /path/to/favoriot-mcp-proxy-macos
2. Get a Favoriot API Key
Before configuring your AI client, you need a Favoriot API Key:
- Log in to or sign up at the Favoriot Platform.
- Copy your API Key (see the Security Tutorial for detailed instructions).
3. Configuration by AI Agent Platform
Option 1: Remote Server (Native SSE / StreamableHTTP)
Example using /sse (Recommended for Antigravity & legacy clients):
{
"mcpServers": {
"favoriot": {
"serverUrl": "https://mcp.favoriot.com/sse",
"headers": {
"apikey": "your-api-key-here"
}
}
}
}
Example using /mcp (Recommended for modern StreamableHTTP clients):
{
"mcpServers": {
"favoriot": {
"serverUrl": "https://mcp.favoriot.com/mcp",
"headers": {
"apikey": "your-api-key-here"
}
}
}
}
Many modern AI assistants (like Antigravity) natively support remote StreamableHTTP / SSE servers via the serverUrl key. No proxy bridge needed.
Depending on your client, you can use either the canonical /mcp endpoint or the /sse alias endpoint:
Option 2: Proxy Binary (stdio)
Below are the configuration file locations for the most popular AI agent platforms. Add the JSON configuration block below to the respective config file for your platform. Replace /absolute/path/to/favoriot-mcp-proxy with the actual path to the downloaded binary, and insert your FAVORIOT_API_KEY.
{
"mcpServers": {
"favoriot": {
"command": "/absolute/path/to/favoriot-mcp-proxy",
"args": [],
"env": {
"FAVORIOT_API_KEY": "YOUR_FAVORIOT_API_KEY"
}
}
}
}
| AI Agent | Config File Path |
|---|---|
| Antigravity | C:\Users\<user>\.gemini\config\mcp_config.json |
| Claude Desktop (macOS) | ~/Library/Application Support/Claude/claude_desktop_config.json |
| Claude Desktop (Windows) | %APPDATA%\Claude\claude_desktop_config.json |
| Codex | Workspace .codex/mcp.json or global ~/.codex/mcp.json |
| Cursor | Workspace .cursor/mcp.json or global ~/.cursor/mcp.json |
| OpenClaw | ~/.openclaw/mcp.json |
| Hermes | ~/.hermes/mcp.json |
(Note 1: Antigravity natively supports remote SSE, so you do not technically need the proxy if the server is remote. However, if you wish to use the proxy binary directly, use the config below) (Note 2: For Cursor, you can alternatively configure this directly via the settings UI under "Features" -> "MCP")
RULE ENGINE
Rule Engine 1.0 (deprecated)
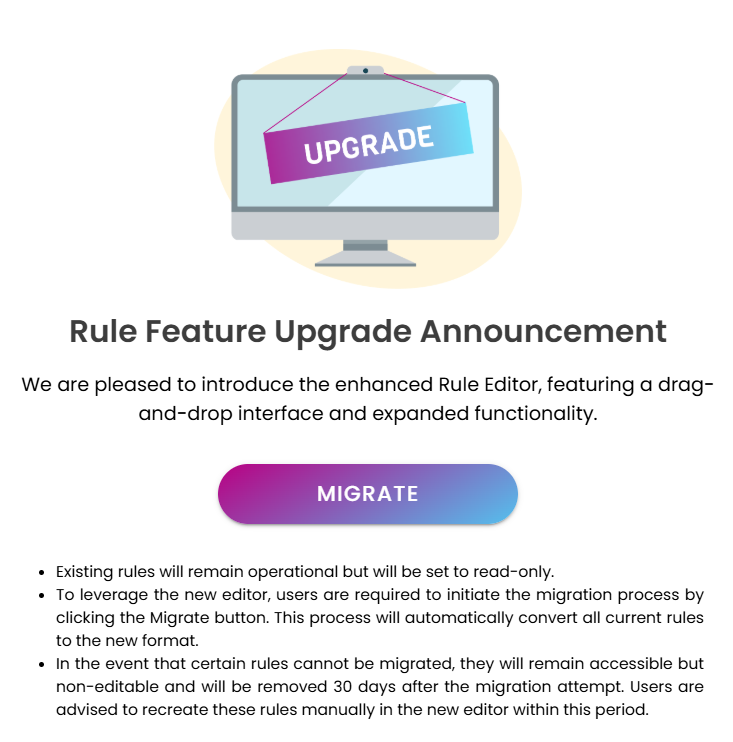
Rule Engine 2.0
The Rules Engine 2.0 is a visual rule engine that allows you to build automation workflows by connecting nodes. Each node represents a specific function in the flow — from receiving input data, filtering or transforming it, and finally sending it to an output.
Nodes are grouped into four main categories: Input, Filter, Function, and External. Each category plays a unique role in automation workflows, from receiving data to making decisions, transforming values, and sending results out of Favoriot.
Typical Use Cases
IoT Device Monitoring & Automation
Collect sensor data, apply conditions, and trigger automated responses (e.g., fan ON when temperature > 30°C).Scheduled Tasks
Automate device actions or notifications at specific times (e.g., turn lights off at 8 AM daily).Alerting & Notifications
Notify users via Email, SMS, or Telegram when thresholds, geofence events, or device status changes occur.Data Processing & Transformation
Clean, convert, and enrich data before storage or forwarding (e.g., Celsius → Fahrenheit, calculate averages).Geofencing & Location-Based Triggers
Trigger workflows when devices enter/exit defined areas (e.g., fleet management, delivery tracking).Integration with External Systems
Forward processed data to third-party platforms using HTTP POST or MQTT.Device Control & Closed-Loop Automation
Send RPC/control commands to devices (e.g., activate relays, turn on buzzer, or change LED color).
How to Create Rule
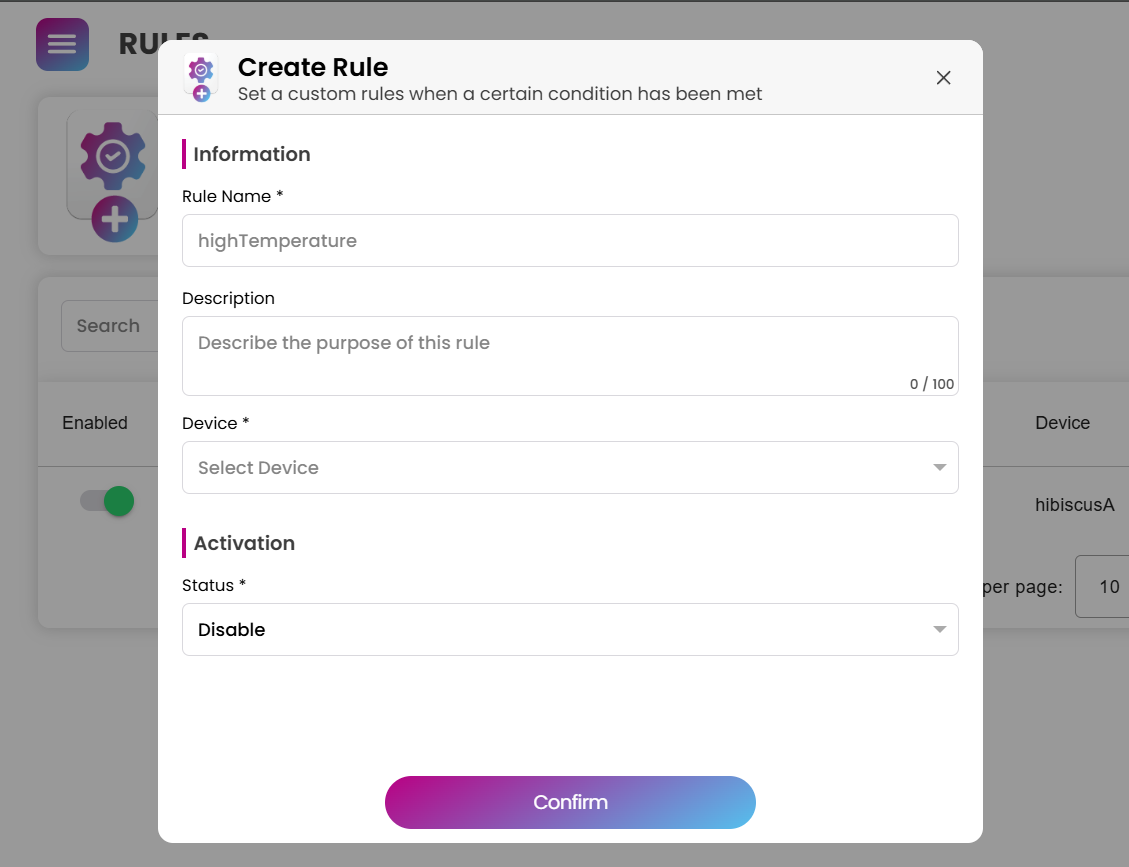
- Click the "+" Button: In the Favoriot platform, locate and click the plus button, likely colored purple with a cogwheel icon, to open the "Create Rule" dialog box.
- Enter Rule Information:
- Rule Name: Type a descriptive name for your rule (e.g.,
highTemperature). - Description: (Optional) Add a brief explanation of the rule's purpose.
- Device: Select the specific device that will be monitored by this rule.
- Set Activation Status: In the "Activation" section, select the desired status for the rule. It's set to Disable by default, but you can change it to Enable if you want it to be active immediately.
- Rule Name: Type a descriptive name for your rule (e.g.,
- Click "Confirm": Once all fields are filled, click the "Confirm" button to save the basic rule settings. This action will likely lead you to a new interface to define the specific conditions and actions of the rule's workflow.
Rule Editor
This is a visual rule editor interface that allows you to create and manage automation workflows by connecting nodes together.
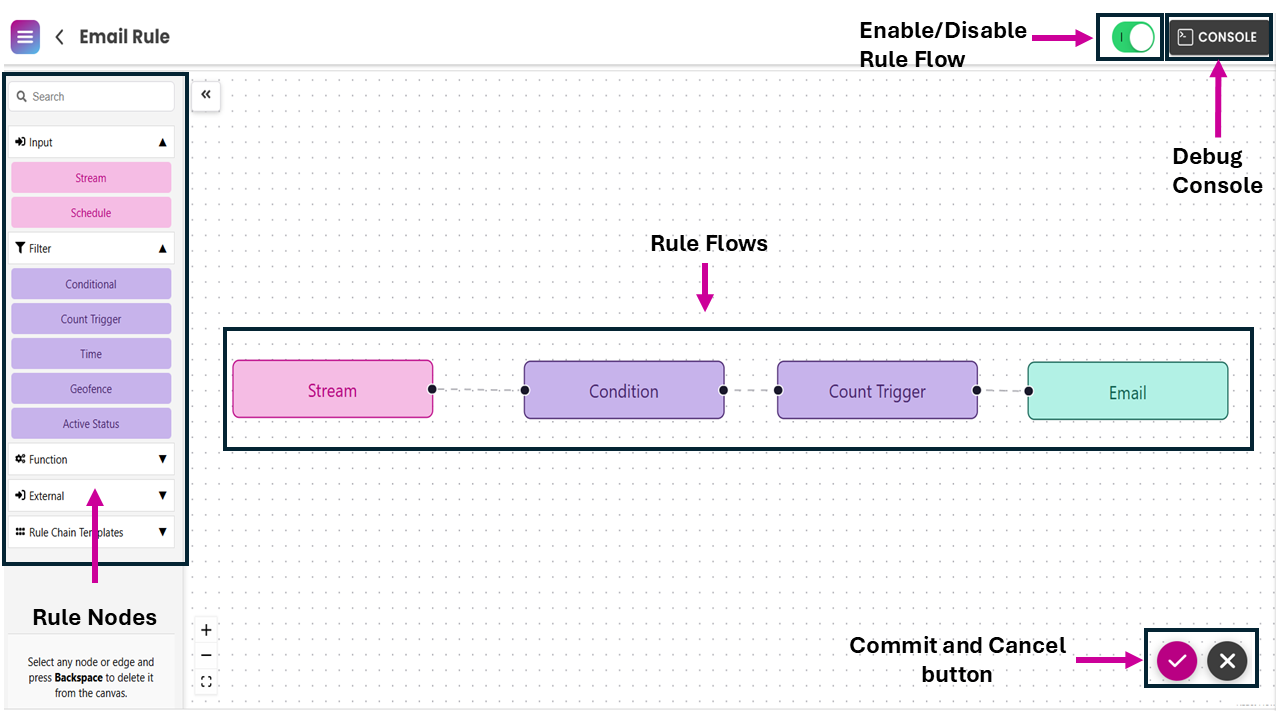
Key Components
Rule Nodes (Left Panel)
- This is the toolbox where all available node types are listed.
- Categories include:
- Input: Nodes that start the flow.
- Filter: Nodes that filter or control flow based on logic.
- Function: Nodes for performing transformations or computations.
- External: Nodes that connect to outside services or actions.
- Rule Chain Templates: Predefined node chains for reuse.
Rule Flows (Canvas - Center Area)
- This is the workspace where you design the automation by linking nodes together.
- Each arrow represents the flow of data/events through the rule.
Enable/Disable Rule Flow (Top-Right Toggle)
- A switch to activate or deactivate the whole rule flow.
- Green = enabled, Red = disabled.
Debug Console (Top-Right Button)
- Opens a console to monitor and debug the execution of rule flows in real time.
- Useful for checking if data passes through nodes correctly.
Commit and Cancel Button (Bottom-Right)
- ✔ Commit: Saves your rule flow.
- ✖ Cancel: Discards changes.
Input Nodes
Nodes that start the flow by providing incoming data or events. They define when and how a rule begins execution.
Stream
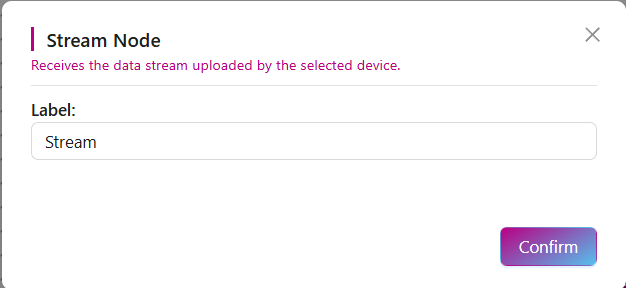
- Description: Triggered when normal telemetry data is published by a device. This is the most common entry point for data processing chains.
- How it works: Every incoming device reading (temperature, humidity, GPS, etc.) is captured and enters the rule flow immediately.
- Use case: Start an automation whenever new sensor data arrives.
- Setting:
- Label: The name for the stream node. By default it is "Stream".
Schedule
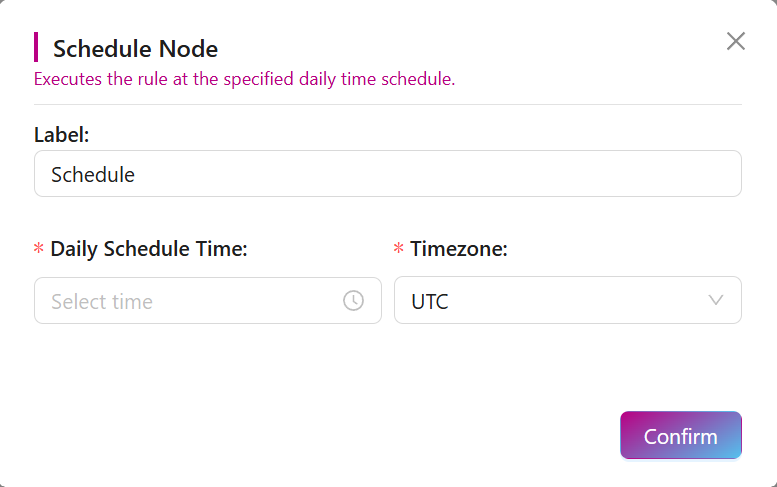
- Description: Triggered on a schedule (e.g., cron jobs) generated by the platform. The payload originates from the scheduler service and triggers the specific chain and node specified.
- How it works: Define cron-like schedules (e.g every 8 AM daily).
- Use case: Automate daily tasks such as turning on/off lights
- Setting:
- Label: The name for the schedule node. By default it is "Schedule".
- Daily Schedule Time (mandatory): The specific time of day for the rule to be executed. You must select a time.
- Timezone (mandatory): The time zone to be used for the daily schedule. By default, it is set to UTC.
Data Upload Status
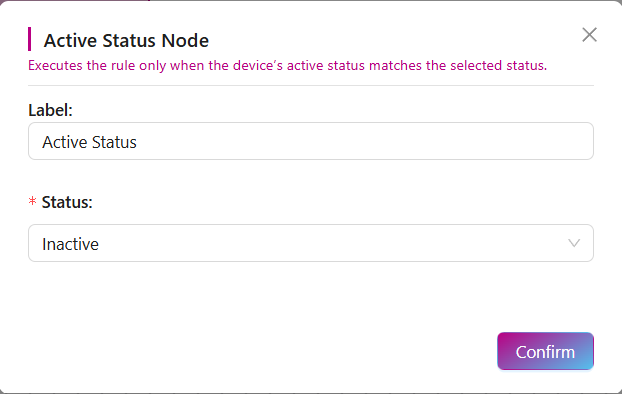
- Description: Triggered by device connection or disconnection events.
- How it works: Checks device connectivity status and proceeds only if it matches the required state. Adding this node automatically enables offline alarm detection for the device. If the data payload is empty, it injects the current connectivity state.
- Use case: Send alerts when a device goes offline unexpectedly.
- Setting:
- Label: The name for the active status node. By default it is "Data Upload Status".
- Status (mandatory): Choose either inactive or active to check the status of device
Filter Nodes
Nodes that evaluate conditions to decide whether the flow continues or stops. They act as checkpoints to ensure only valid or relevant data passes through.
Conditional
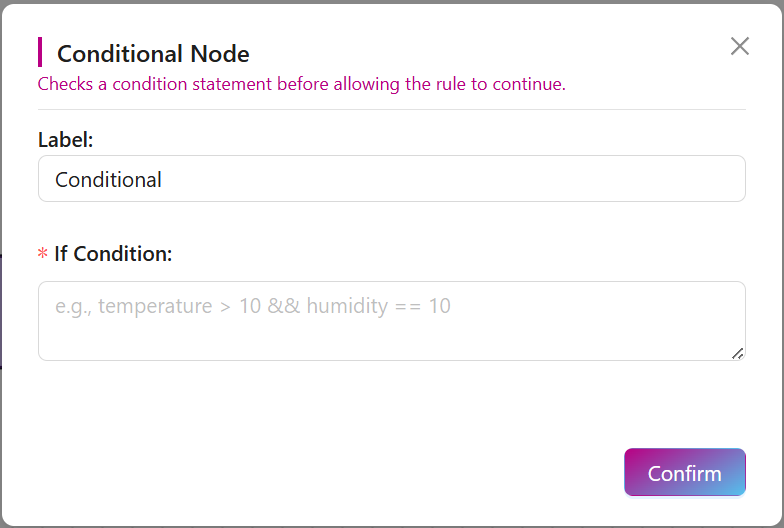
- Description: Evaluates a if/else expression against payload values.
- How it works: Numeric strings are auto-converted to floats. It stops the chain if the condition is falsy (unless
branch of falseis enabled). It uses a compiled function cache for performance. - Use case: Send alerts only if a threshold is exceeded.
- Setting:
- Label: The name for the conditional node. By default it is "Conditional".
- If Condition (mandatory): The logical statement that must be evaluated as true for the rule to continue (e.g., temperature > 30).
Count Trigger
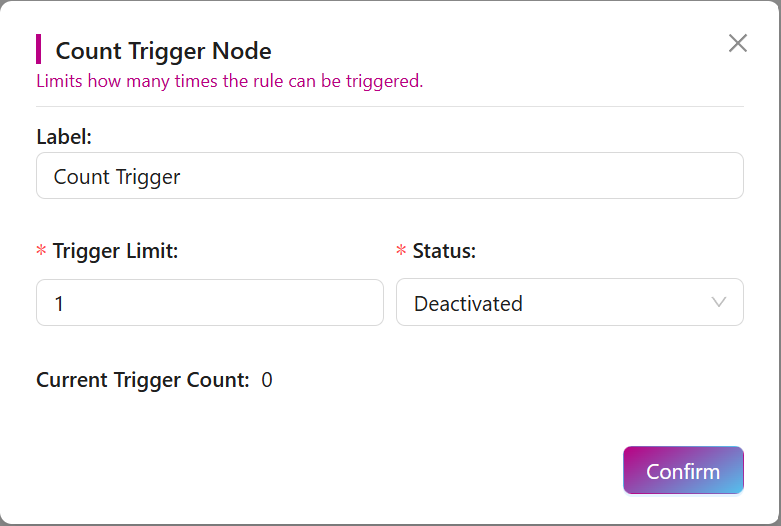
- Description: Count-based trigger with configurable auto-reset. Disables when count limit is reached.
- How it works: The internal count is persisted to the database after each execution. The node automatically resets its count when crossing the configured reset frequency boundary (daily, weekly, or monthly) compared to the last reset time.
- Use case: Prevents spamming notifications (e.g., send max 3 alerts per day).
- Setting:
- Label: The name for the count trigger node. By default it is "Count Trigger".
- Trigger Limit (mandatory): The maximum number of times the rule can be triggered before it stops. The default value is 1.
- Reset Frequency (mandatory): default(daily). Options: (never,daily,weekly,monthly)
- Status (mandatory): This field determines whether the count trigger is active or not. The default status is Deactivated.
- Current Trigger Count: This field displays how many times the rule has already been triggered. In the image, the count is 0.
Time
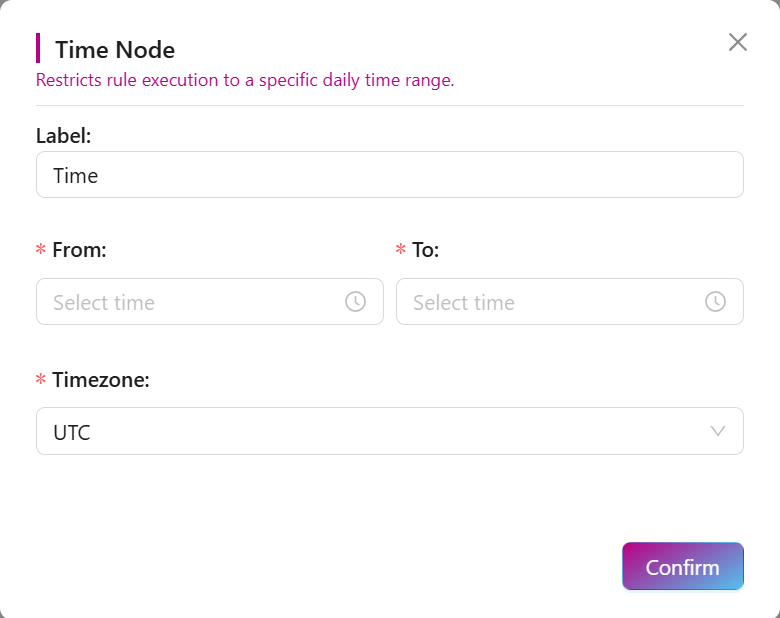
- Description: Checks if current time falls within scheduled window and allowed days (timezone-aware).
- How it works: It converts the current execution time to the specified
timezoneand checks if it falls between thefromandtohours/minutes, and if the current day of the week is in thedaysarray. If outside this window, execution stops. - Use case: Only allow actions during business hours.
- Setting:
- Label: The name for the time node. By default it is "Time".
- From (mandatory): The start time of the daily window during which the rule can execute.
- To (mandatory): The end time of the daily window during which the rule can execute.
- days: Allow days to be executed. If not selected, the rule will execute every day.
- Timezone (mandatory): The time zone used for the specified time range. The default value is UTC.
Geofence
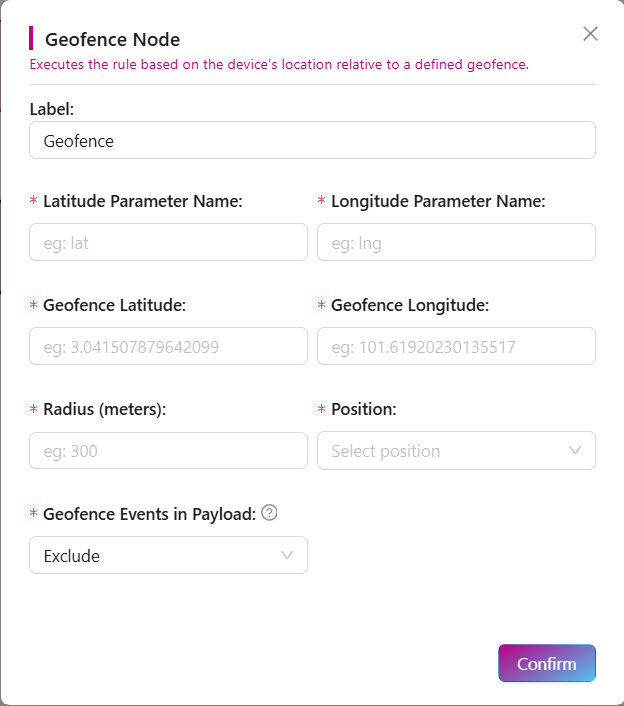
- Description: Haversine distance check against center point + range.
- How it works: It calculates the distance between the incoming telemetry coordinates (specified by
latitudeandlongitude) and the fixedcentre latitude/centre longitude. Produces "inside" or "outside" position and "enter"/"exit" events. - Use case: Fleet management, delivery tracking, or geo-based alerts.
- Setting:
- Label: The name for the geofence node. By default it is "Geofence".
- Latitude Parameter Name (mandatory): The name of the variable in the data that holds the latitude value.
- Longitude Parameter Name (mandatory): The name of the variable in the data that holds the longitude value.
- Geofence Latitude (mandatory): The latitude coordinate that defines the center of the geofence area.
- Geofence Longitude (mandatory): The longitude coordinate that defines the center of the geofence area.
- Radius (meters) (mandatory): The size of the circular geofence area, specified in meters.
- Position (mandatory): This determines the rule's trigger condition based on the device's location. The rule will activate if the device is either "Inside" or "Outside" the geofence.
- Geofence Events in Payload? (mandatory): This setting controls whether geofence-related event data, such as entry or exit events, are "include" or "exclude" in the rule's data payload.
Function Nodes
Nodes that process, manipulate, or transform data before passing it forward. They make data more useful by reformatting, calculating, or restructuring values.
Parameter Selector
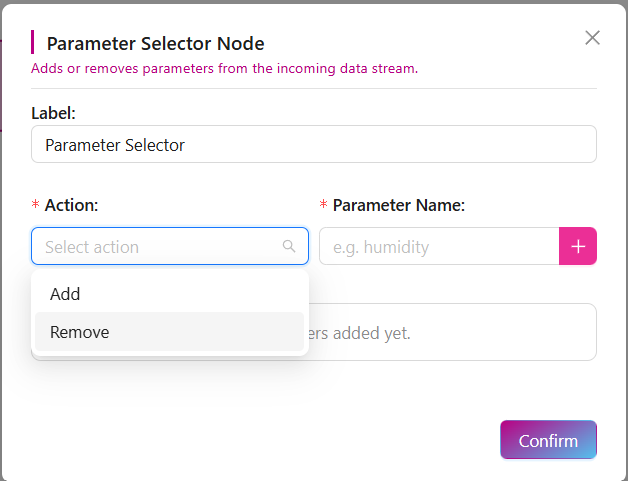
- Description: Filters the payload object, either keeping only the specified keys, or removing the specified keys.
- How it works: It uses
addanddeleteinternally to prune the object. - Use case: From {temperature, humidity, gps}, only forward temperature.
- Setting:
- Label: The name for the parameter selector node. By default it is "Parameter Selector".
- Action (mandatory): This defines what the node will do. The two options are Add to include a new parameter or Remove to delete an existing one from the data stream.
- Parameter Name (mandatory): The name of the parameter to be added or removed. The example provided is humidity.
Transform
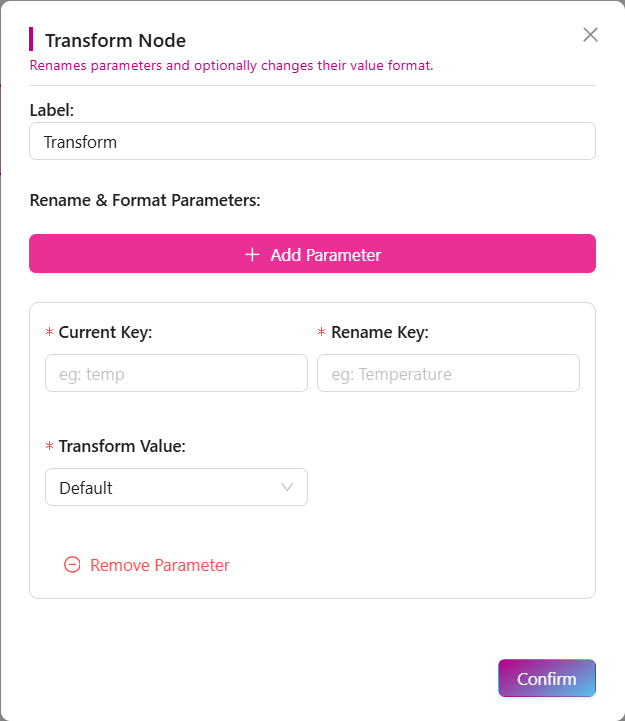
- Description: Applies lightweight data format transformations to payload values, injecting the transformed value into a
new Key. - How it works: Example:
temp→temperature. - Use case: Standardize data field names for consistency.
- Setting:
- Label: The name for the transform node. By default it is "Transform".
- Current Key (mandatory): The current name of the parameter you wish to modify. The example shown is temp.
- Rename Key (mandatory): The new name you want to give the parameter. The example shown is Temperature.
- Transform Value (mandatory): This option allows you to change the format of the parameter's value. The default is "Default," but it can be changed to other formats like "String," "Number," or "Boolean."
- Add Parameter: A button to add more parameters to be renamed or formatted.
- Remove Parameter: A button to remove a parameter entry.
Script
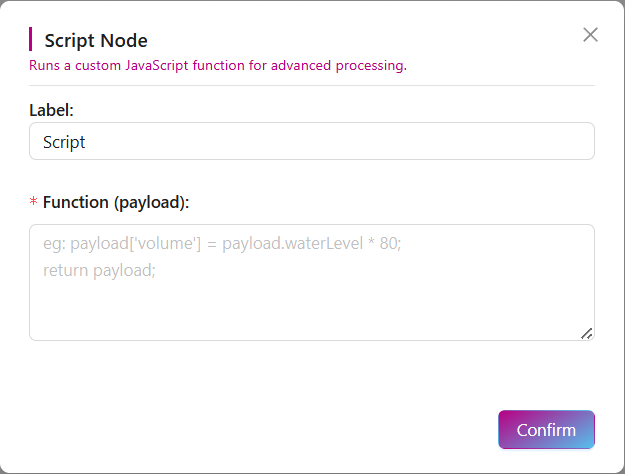
- Description: Run custom JavaScript logic inside flow.
- How it works: Allows calculations, combining fields, or custom formatting.
- Use case: Derive a new value like heatIndex = f(temperature, humidity).
- Setting:
- Label: The name for the script node. By default it is "Script".
- Function (payload) (mandatory): This is where you write the custom JavaScript code that will be executed. The script is designed to process the incoming data, which is represented by the payload variable. You can use JavaScript to perform calculations, add new parameters, or modify existing data. The example provided shows how to calculate a volume value based on waterLevel and then return the updated payload.
Unit Converter
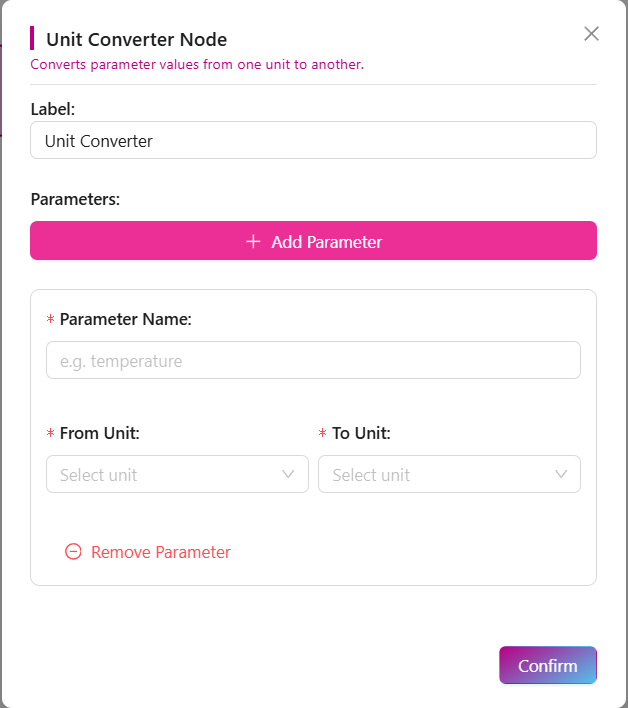
- Description: Converts values between units.
- How it works: Uses built-in conversion formulas.
- Use case: Convert °C → °F, or meters → kilometers.
- Setting:
- Label: The name for the unit converter node. By default it is "Unit Converter".
- Parameter Name (mandatory): The name of the parameter whose value you want to convert. The example provided is temperature.
- From Unit (mandatory): The original unit of the parameter you want to convert from.
- To Unit (mandatory): The new unit you want to convert the parameter to.
- Add Parameter: A button to add more parameters for unit conversion.
- Remove Parameter: A button to remove a parameter entry.
Value Processor
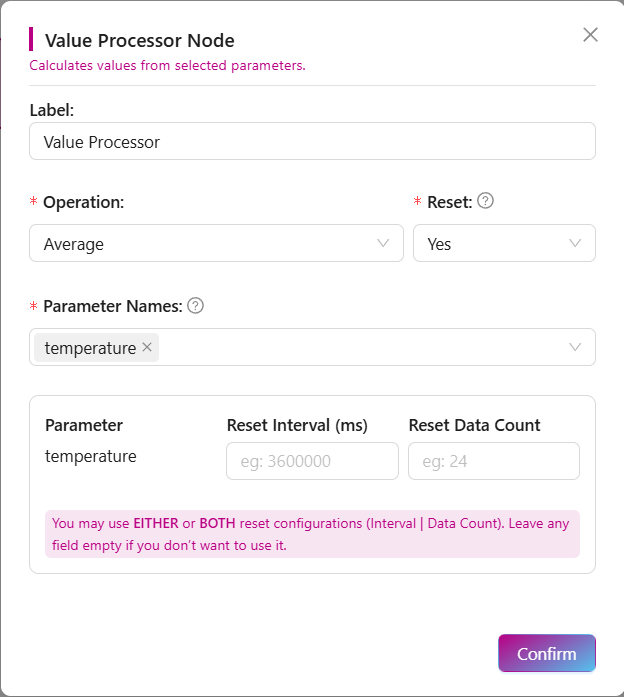
- Description: Performs mathematical or statistical operations.
- How it works: Supports accumulate, difference, average, minimum, maximum.
- Use case: Calculate hourly average temperature before alerting.
- Setting:
- Label: The name for the value processor node. By default it is "Value Processor".
- Operation (mandatory): The mathematical operation to be performed on the selected parameters.
- Reset (mandatory): This setting determines if the data used for the operation should be reset after a calculation.
- Parameter Names (mandatory): The list of parameters whose values will be used in the calculation. The image shows the temperature parameter has been added.
- Reset Interval (ms): The time interval in milliseconds after which the calculation data will be cleared. This field is optional.
- Reset Data Count: The number of data points after which the calculation data will be cleared. This field is also optional.
Alarm
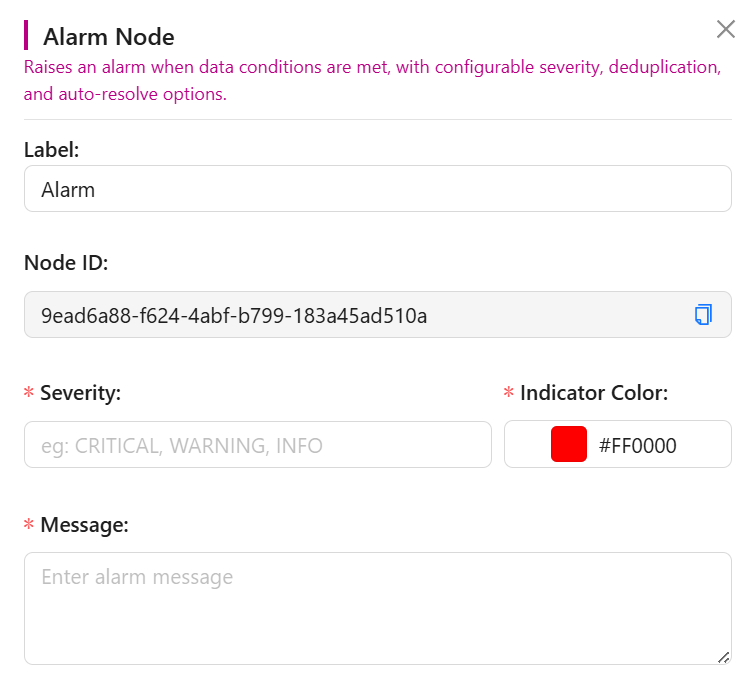
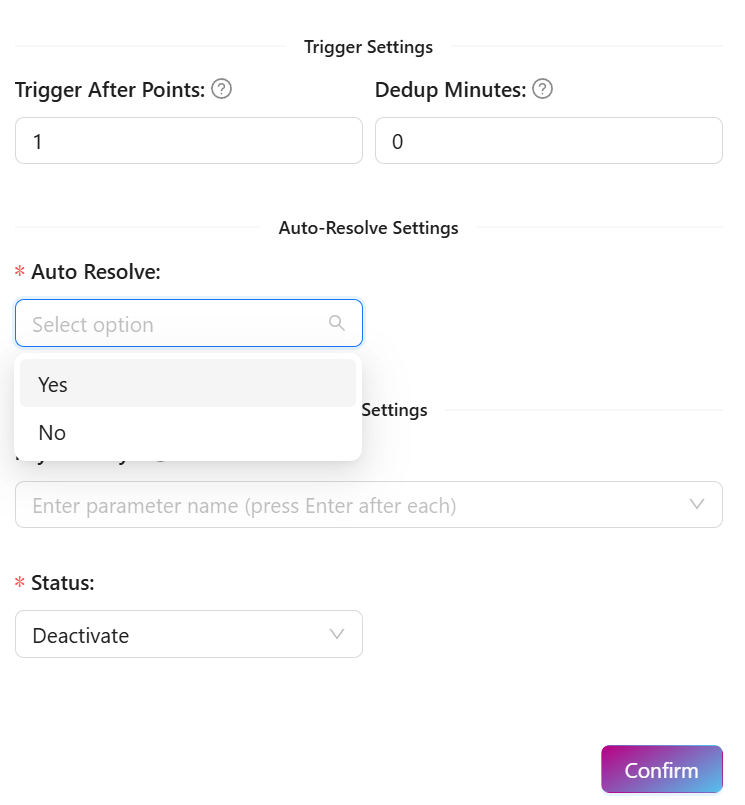
- Description: Triggers an alarm in the dashboard based on consecutive anomaly points.
- How it works: Increments an anomaly counter when triggered (usually on the TRUE branch of a condition). Transitions to ACTIVE and continues the chain to downstream nodes when the point threshold is met. Filters out transient spikes.
- Use case: Trigger a CRITICAL overheat alarm on the dashboard and send email notifications when temperature exceeds 50°C for 3 consecutive readings.
- Setting:
- Label: The name for the alarm node. By default it is "Alarm".
- Severity (mandatory): Custom label for severity level (e.g., INFO, WARNING, CRITICAL).
- Severity Color Indicator (mandatory): Color code used to differentiate severity on the dashboard (e.g., red, yellow, green).
- Trigger After (Consecutive Points): Number of sequential anomaly data points that must arrive before the alarm activates (default: 1).
- De-duplication Window (Minutes): Bundles ongoing failures into a single active alarm row instead of creating a new row for every anomaly packet.
- Auto-Resolve: Whether the alarm clears itself when telemetry returns to normal, or stays active until manually resolved. Manual resolve can also be done on the dashboard alarm widget.
- Resolve After (Consecutive Points): If Auto-Resolve is on, how many consecutive normal readings must arrive before the alarm transitions to "Resolved".
- Update Mode: When enabled, updates the existing active alarm's payload/message instead of creating a new record.
- Message: The content of the alarm message. Supports interpolation of the payload, e.g.,
Temperature exceeded threshold: {{temperature}}
Clear Alarm
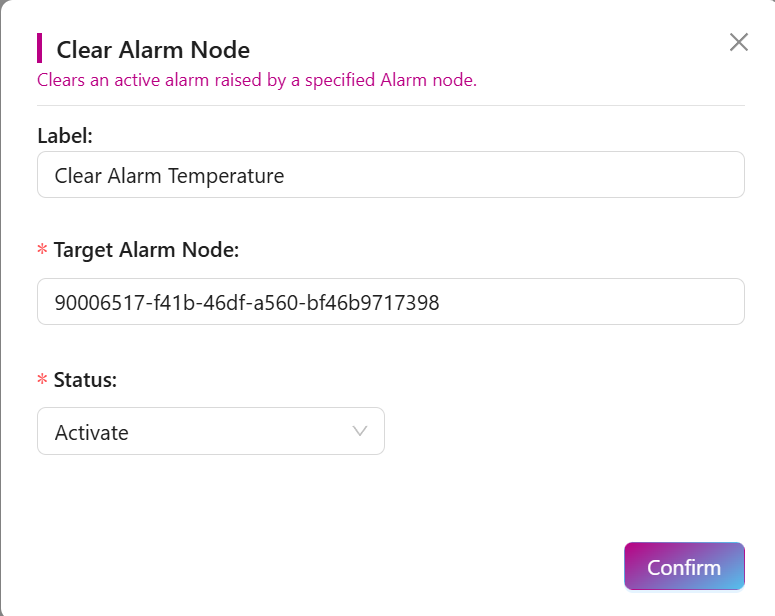
- Description: Resolves an existing active alarm when telemetry returns to normal.
- How it works: Placed on the FALSE branch of a condition node. Increments a normal counter. Clears the target alarm when the resolve threshold is met, then continues the chain to downstream nodes.
- Use case: Automatically clear an overheat alarm and notify a Telegram group when the temperature returns to normal for 2 consecutive readings.
- Setting:
- Label: The name for the clear alarm node. By default it is "Clear Alarm".
- Target Alarm Node (mandatory): The specific alarm node to clear (selected from a list of alarm nodes in the chain).
External Nodes
Nodes that send processed data outside of Favoriot to users, applications, or third-party systems. They make automation actionable by delivering insights, alerts, or control commands.
Store Stream
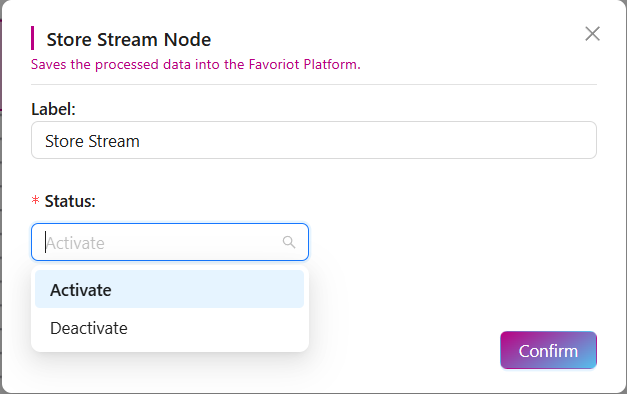
- Description: Saves processed data back into Favoriot.
- How it works: Creates new "cleaned" dataset for dashboards/analytics.
- Use case: Store transformed sensor data in Favoriot Platform.
- Setting:
- Label: The name for the store stream node. By default it is "Store Stream".
- Status (mandatory): This setting controls whether the node is active. When set to Activate, the node will begin saving the processed data into the Faviort Platform. If set to Deactivate, the node will stop saving data.
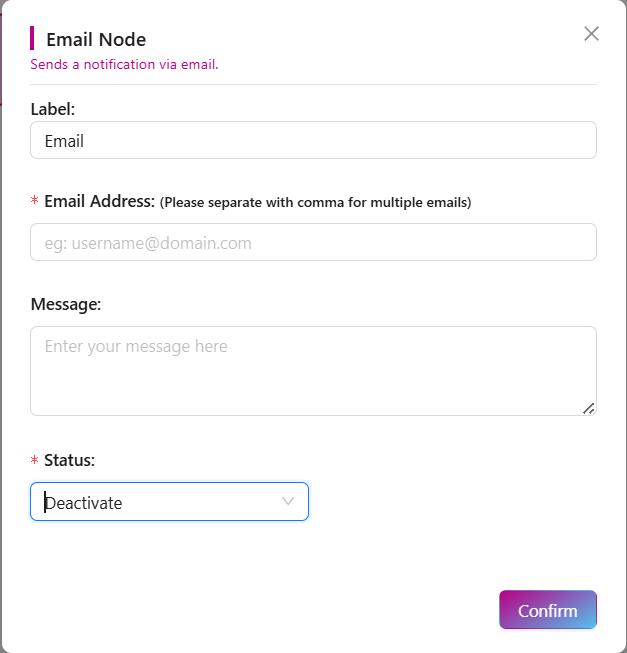
- Description: Sends email notifications.
- Use case: Alert users when temperature exceeds thresholds.
- Setting:
- Label: The name for the email node. By default it is "Email".
- Email Address (mandatory): The recipient's email address. For multiple recipients, you can separate the addresses with a comma.
- Message: The content of the email notification to be sent. Supports interpolation of the payload, e.g.,
Temperature exceeded threshold: {{temperature}} - Status (mandatory): This controls whether the email node is active or not. The options are Activate to enable sending emails or Deactivate to disable it. The default is
Deactivate.
SMS
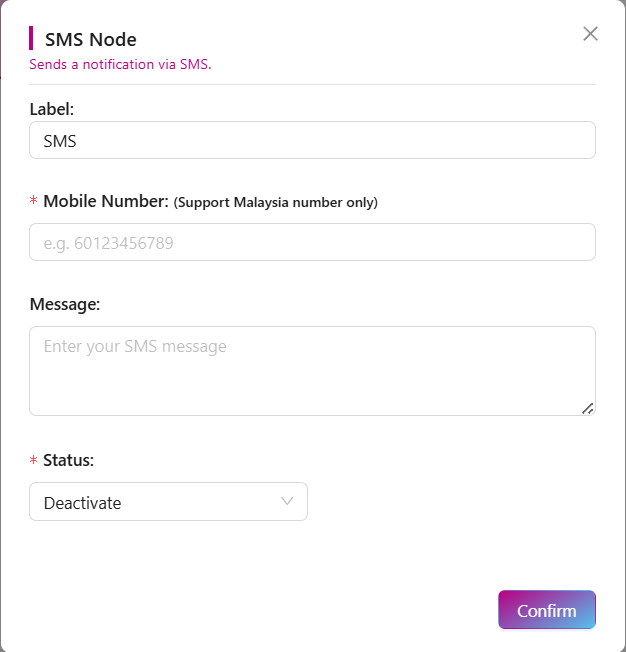
- Description: Sends text messages to mobile numbers.
- Use case: Notify technicians immediately about device failures.
- Setting:
- Label: The name for the sms node. By default it is "SMS".
- Mobile Number (mandatory): The phone number to which the SMS notification will be sent. The note indicates that it only supports Malaysian numbers.
- Message: The content of the SMS message. Supports interpolation of the payload, e.g.,
Temperature exceeded threshold: {{temperature}} - Status (mandatory): This controls whether the SMS node is active or not. The options are Activate or Deactivate, with the default being
Deactivate.
Telegram
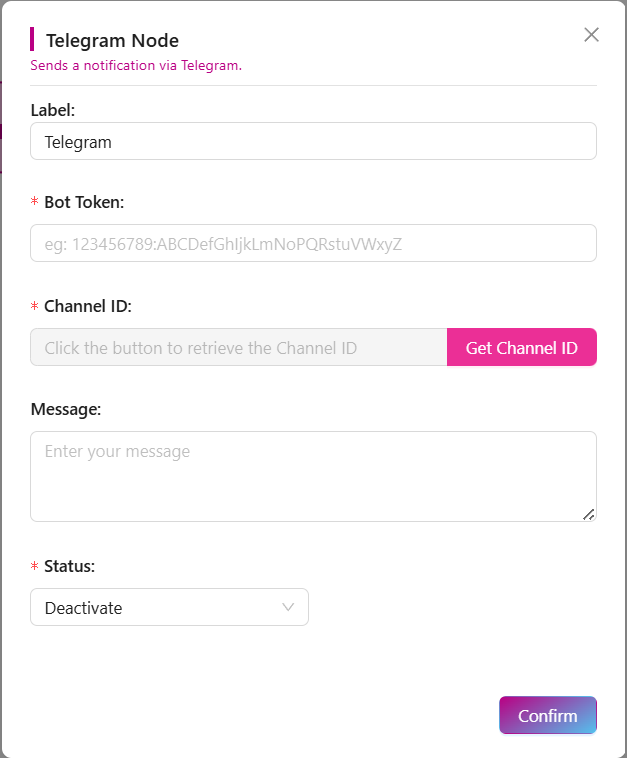
- Description: Sends messages to Telegram bot or group.
- Use case: Push alerts to team chatrooms for fast response.
- Setting:
- Label: The name for the telegram node. By default it is "Telegram".
- Bot Token (mandatory): A unique key provided by Telegram for your bot. This token is required to authenticate and send messages from your bot.
- Channel ID (mandatory): The unique identifier for the Telegram channel or group where the notifications will be sent. The "Get Channel ID" button is likely a tool to help you retrieve this information.
- Message: The content of the message that will be sent to the Telegram channel. Supports interpolation of the payload, e.g.,
Temperature exceeded threshold: {{temperature}} - Status (mandatory): This determines whether the Telegram node is active. The options are Activate or Deactivate, with the default being
Deactivate.
HTTP Post
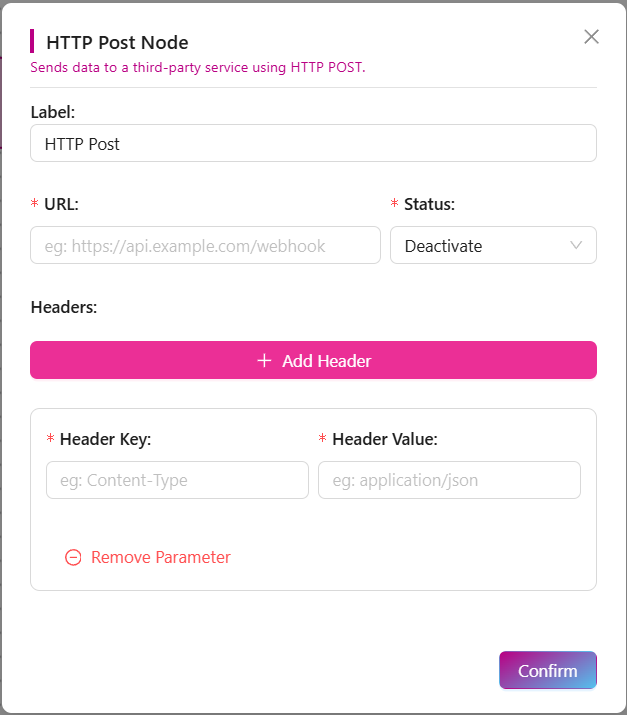
- Description: Sends data to external REST APIs.
- How it works: Pushes JSON payloads to defined endpoints
- Use case: Forward IoT data to ERP, CRM, or cloud platforms.
- Setting:
- Label: The name for the http post node. By default it is "HTTP Post".
- URL (mandatory): The destination URL where the data will be sent via HTTP POST. The example shows a webhook URL.
- Status (mandatory): This controls whether the node is active. The options are Activate or Deactivate, with
Deactivateas the default. - Header Key: The name of a header to be included in the HTTP request (e.g., Content-Type).
- Header Value: The value corresponding to the Header Key (e.g., application/json).
- Add Header: A button to add more header fields to the request.
- Remove Parameter: A button to remove a header field.
MQTT Publish
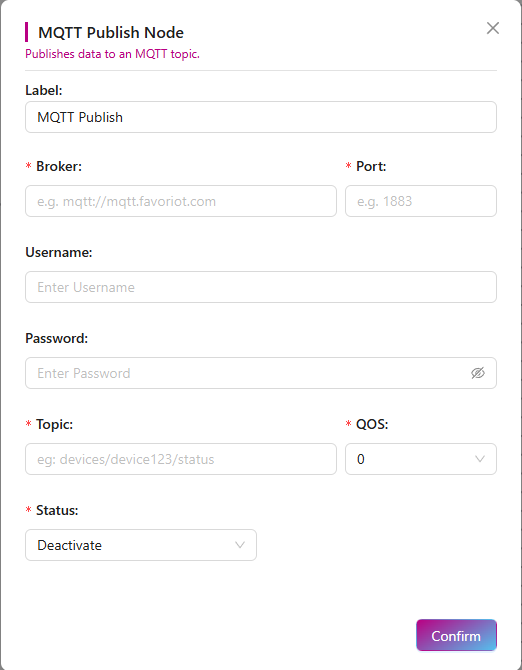
- Description: Publishes messages to an MQTT broker.
- How it works: Standard publish (topic + payload).
- Use case: Share device data with external IoT brokers.
- Setting:
- Label: The name for the mqtt publish node. By default it is "MQTT Publish".
- Broker (mandatory): The URL or IP address of the MQTT broker you want to connect to. The example shows
mqtt://mqtt.favoriot.com. - Port (mandatory): The port number for the MQTT broker connection, typically
1883for standard MQTT. - Username: The username for authenticating with the MQTT broker. This is optional and used for secure connections.
- Password: The password for authenticating with the MQTT broker. This is also optional and used with the username for secure connections.
- Topic (mandatory): The MQTT topic where the data will be published. This is a crucial part of MQTT messaging, as clients subscribe to topics to receive messages. The example is devices/device123/status.
- QOS (mandatory): The Quality of Service level for the MQTT message. This determines the guarantee of delivery. The options are
0, 1, or 2. The default is0. - Status (mandatory): This controls whether the node is active. The options are Activate or Deactivate, with Deactivate as the default.
Control
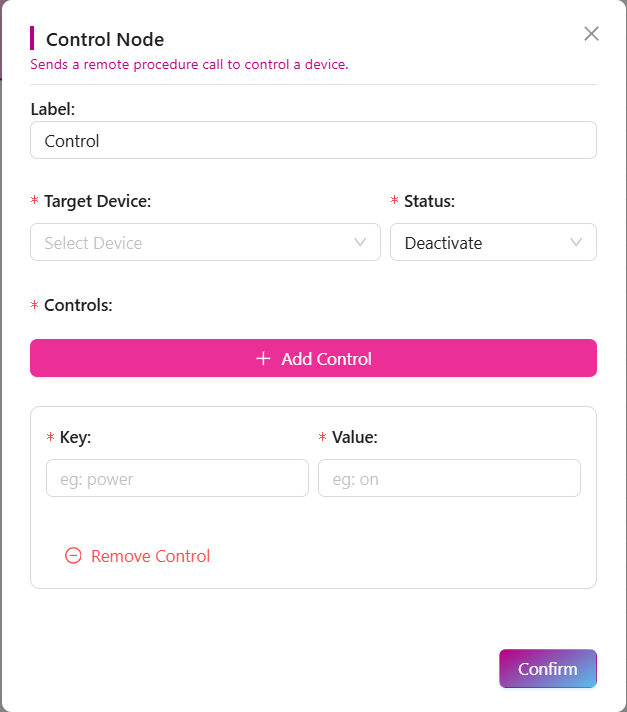
- Description: Sends direct RPC (remote control) to devices.
- How it works: Uses Favoriot RPC API to activate device features.
- Use case: Turn on fan, activate buzzer, or switch LED color automatically.
- Setting:
- Label: The name for the control node. By default it is "Control".
- Target Device (mandatory): This is where you select the specific device you want to control.
- Status (mandatory): This determines whether the control node is active. The options are Activate or Deactivate, with
Deactivateas the default. - Key: The name of the parameter you want to control on the device. The example shown is
power. - Value: The value you want to send to the device for the specified key. The example shown is
on. - Add Control: A button to add more key-value pairs to control multiple parameters.
- Remove Control: A button to remove a key-value pair
Quick Steps to Create a Rule Chain
- Input → Choose how data enters (Stream / Schedule).
- Filter → Apply conditions (threshold, geofence, time, etc.).
- Function → Transform or process the data.
- External → Define actions (store, alert, integrate, control).
- Save & Activate → Test and enable the workflow.
Tip: Just drag and connect nodes visually to design your flow.
Example Rule Chain
Below is an example of a simple rule chain:
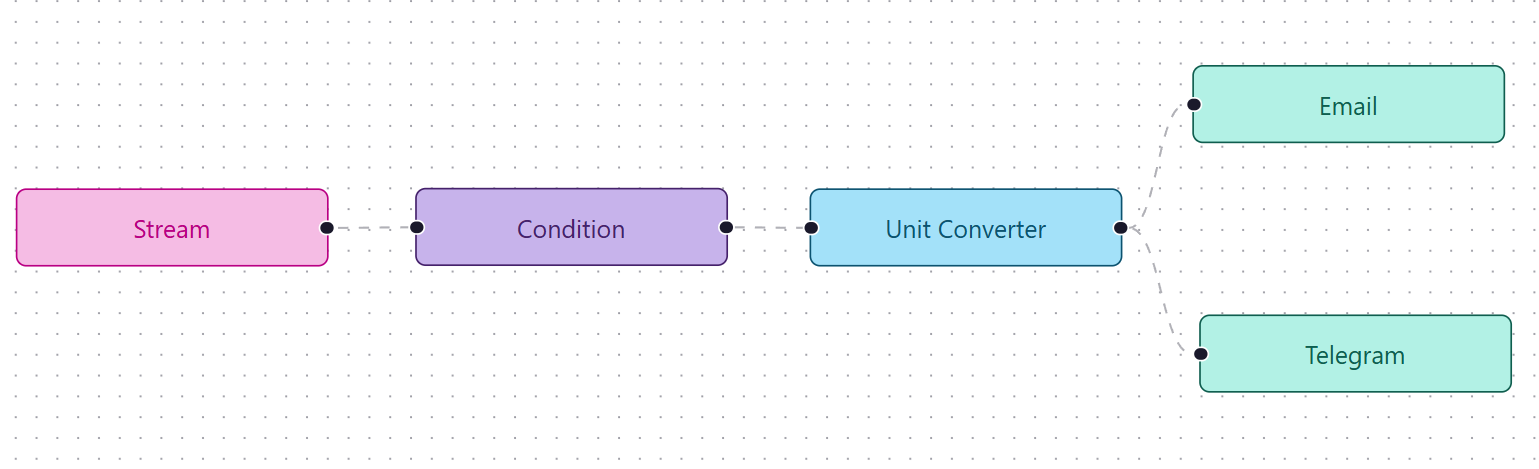
Input:
Stream receives device data →{"temperature": "40"}Filter:
Conditional checks iftemperature > 30.Function:
Unit Converter converts40°C → 104°F.External:
Email + Telegram nodes send alerts to the user.Result:
If the temperature goes above 30°C, the system automatically converts the reading and sends notifications to the user with new converted value.
Multiple Rule Chains
You can create multiple rule flows. Each flow is independent and runs in parallel with others.
- When new data or events arrive, they are evaluated against all active rules at the same time.
- This means one device reading can trigger multiple workflows if the conditions match.
- Rules do not block or wait for each other — they run asynchronously to ensure fast and scalable execution.
- You can have different flows targeting different actions:
- One rule may send alerts via Email/Telegram.
- Another rule may store cleaned data into Favoriot.
- Another may control a device using RPC.
Example: If a temperature reading of 40°C comes in:
- Rule 1 checks temperature > 30 → sends Email alert.
- Rule 2 converts °C → °F → stores into dashboard stream.
- Rule 3 sends an RPC command → turns ON the cooling fan.
All three rules run at the same time in parallel, without waiting for one another.
Debug Rule Nodes using Console
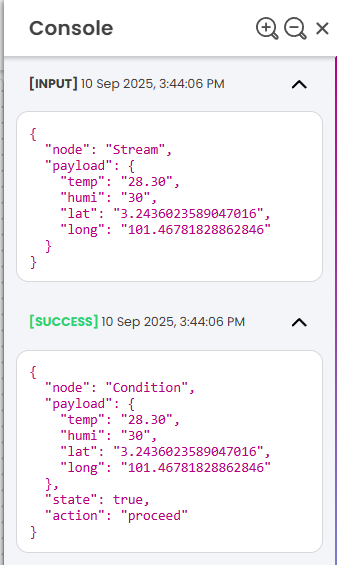
The console acts as a checkpoint within a rule flow. Instead of performing a specific action like saving data or sending an alert, its primary function is to log messages to the console. This allows developers to inspect the message's content at a specific point in the rule flow, helping them:
- Verify data: Ensure the data coming from a device or sensor is in the expected format and contains the correct values.
- Troubleshoot errors: Identify where a message might be getting lost or altered incorrectly.
- Monitor flow: Confirm that messages are reaching a particular point in the rule flow as intended.
Video walkthrough setup rule
Video: [Walkthrough] - How to setup rule
CUSTOMERS
Available to Developer account only
Customers feature - allows authorised external users to access sub-parts of the developer's projects, devices, data and dashboards based on the configured permission by the developer.
Structure
First of all, it is best to understand the structure of the Customers feature.
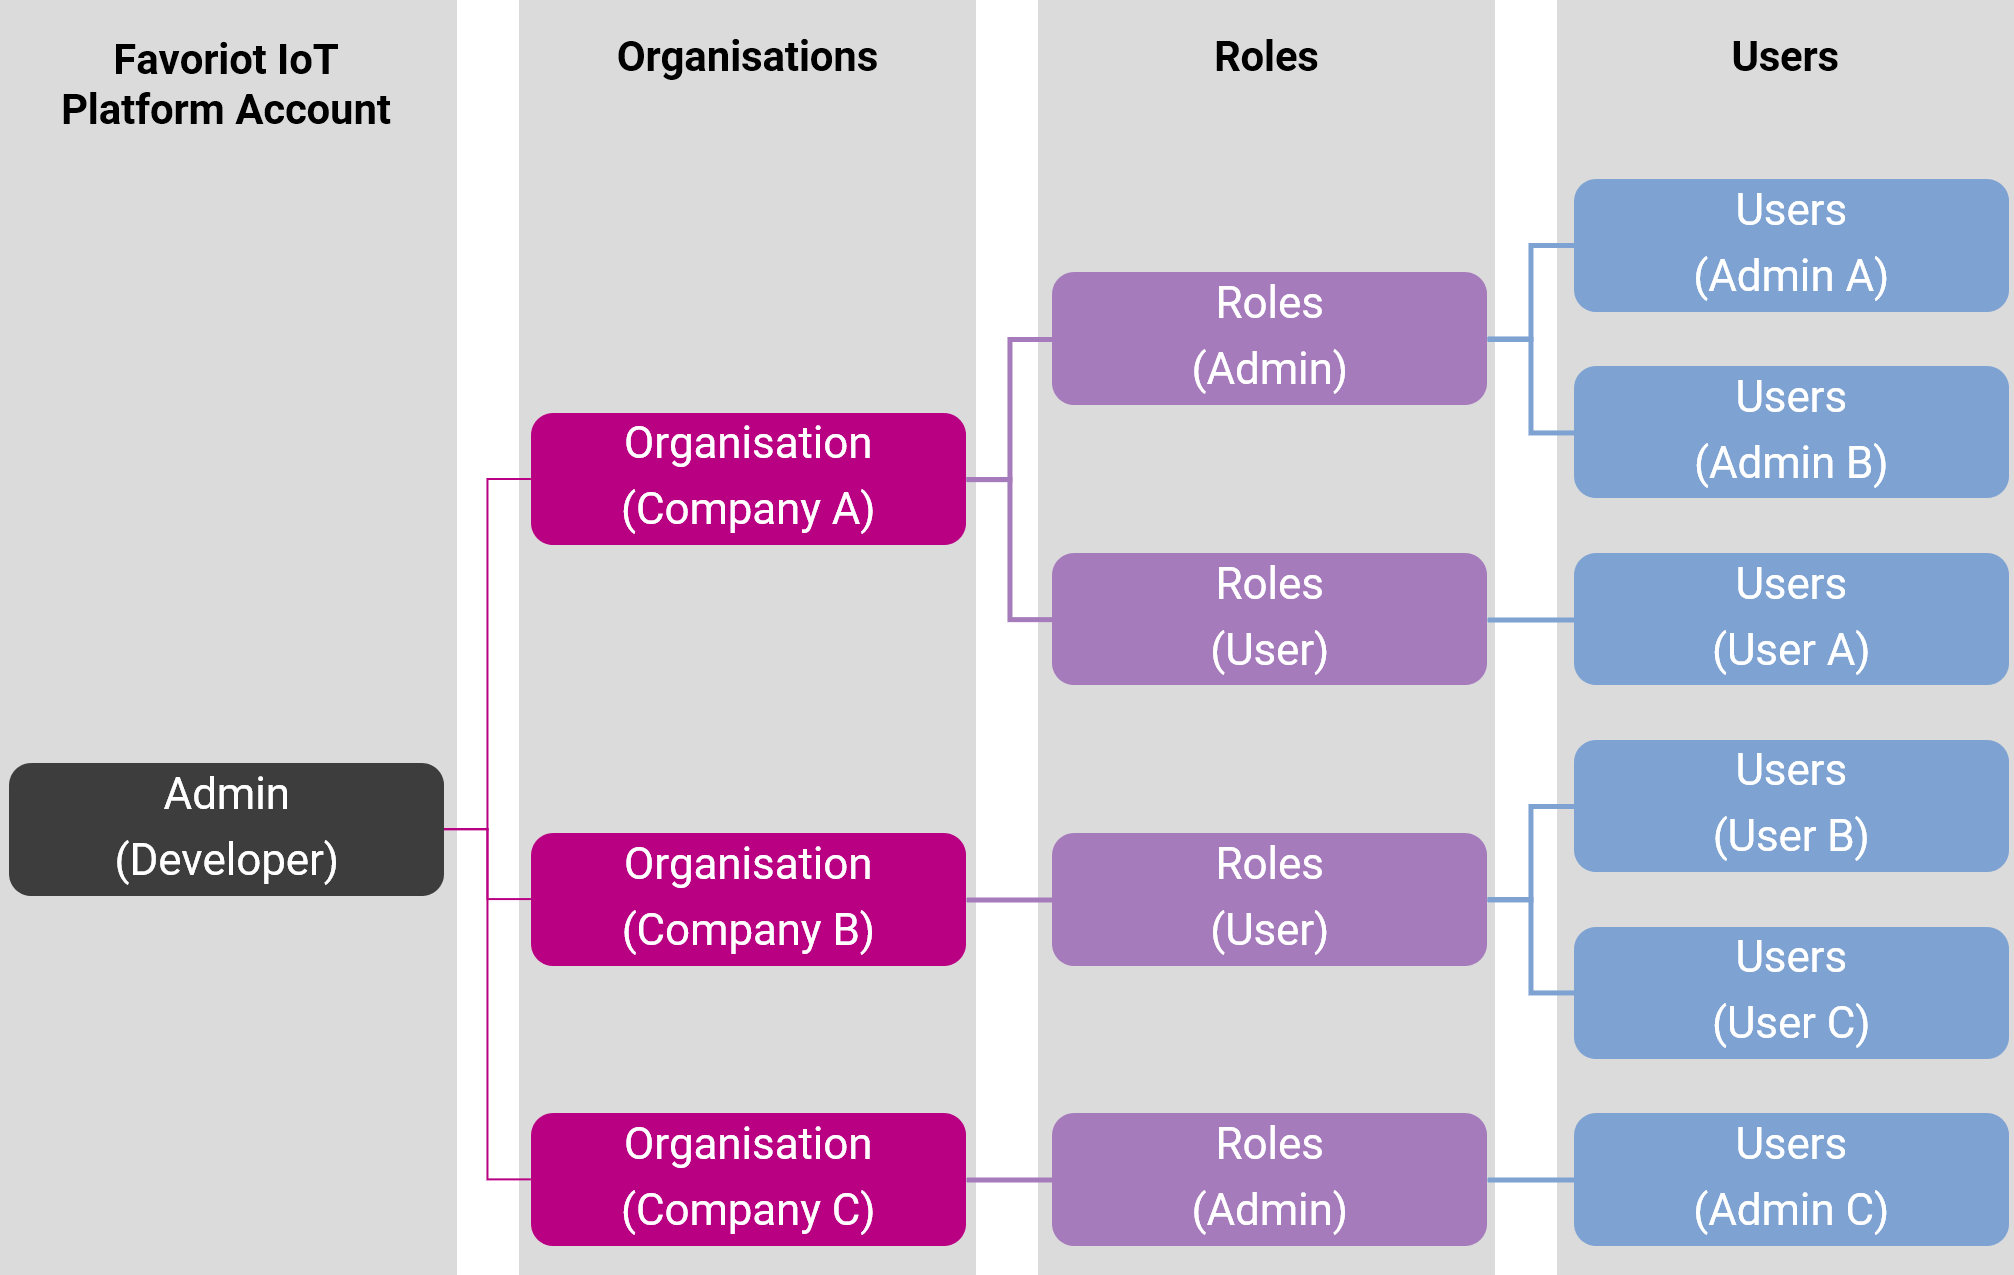
Admin (Developer)
- The person who will create the Customers.
Organisations
- The developer will assign a specific project in the Organisations level.
Roles
- The developer will assign the role's permission in the Roles level.
- Streams:
- Read: Users only able to view the data streams.
- Read/Download: Users able to view and export the data streams.
- Dashboard:
- Read: Users only able to view the selected dashboard(s).
- Read/Write: Users able to view and edit the dashboard.
Users
- The developer will create an account for each user(s) in the Users level.
- The users can access to the project by logging in to the Favoriot IoT Platform.
- Only permitted data will be displayed in their platform.
Customers Creation Process Flow
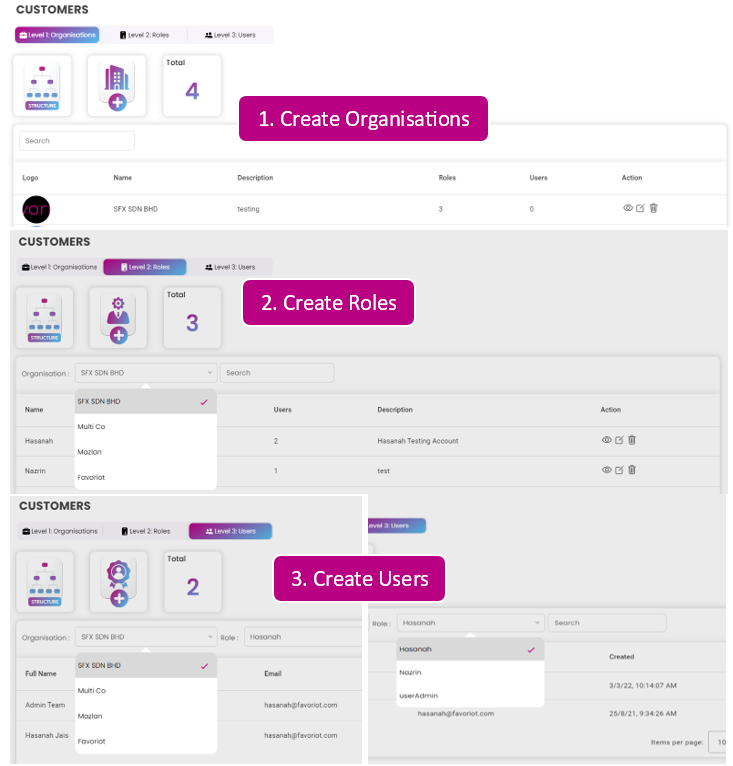
The Favoriot IoT Platform developer (account owner) will have to create the following components:
1. Organisations
- Name (mandatory)
- Select Project (mandatory) - Assign access to which project.
- Description (mandatory)
- Address (mandatory)
- Organisation's Logo (optional) - As a profile photo for their "Users" account.
2. Roles
- Name (mandatory) - (eg: Team Lead)
- Select Role Type (mandatory) - Admin/User.
- Description (mandatory)
- Permission (mandatory) - see Permissions details here
3. Users
- First Name (mandatory)
- Last Name (mandatory)
- User Id (mandatory) - Log in credential.
- Email (mandatory)
- Password (mandatory) - Log in credential.
Permissions
This is where the developers are required to assign which parts of their projects are accessible to the users.
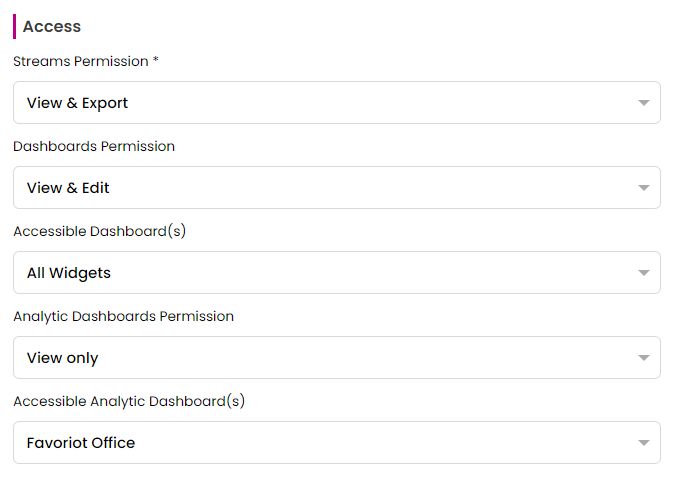
Streams:
- View only: Users only able to view the data streams.
- View & Export: Users able to view and export the data streams.
Dashboards:
- View only: Users only able to view the selected dashboard(s).
- View & Edit: Users able to view and edit the dashboard.
Analytics:
- View only: Users only able to view the selected analytic(s).
- View & Edit: Users able to view and edit the analytic.
Note: - The client will received an email to indicate that the account has been created. the image below depict the similar email content that they will receive which includes their User Id and Password. To login, just head over to https://platform.favoriot.com/login and enter credentials as per normal.

How to setup Customer/User private Dashboard/Analytic
Related Topics
- Projects - Link customers to specific projects
- Dashboards - Share dashboards with customers
- Analytics - Share analytics with customers
- Security - Understand authentication and authorization
FAYBEE AI
Who is Faybee?
Faybee is your intelligent, all-in-one AI assistant designed specifically for the Favoriot platform. Built to make managing your Internet of Things (IoT) environment effortless, Faybee helps you interact with your connected devices, understand your data, and streamline your daily operations without needing any technical expertise. Think of Faybee as your personal data analyst, report writer, and platform guide all rolled into one friendly assistant.
What Can Faybee Do?
Note: Utilizing Faybee's intelligent features consumes AI Credits based on the platform's AI Credit System. Please refer to the AI Credit System section below for detailed information on daily allowances and usage calculations.
Faybee is equipped with powerful tools to help you get the most out of your IoT data:
1. Your Smart Assistant
Faybee is always ready to chat. Whether you need help navigating the platform, finding specific documentation, or answering questions about your connected devices, Faybee provides instant, easy-to-understand answers. It remembers the context of your conversation, making troubleshooting and finding information a seamless experience.
2. Advanced Machine Learning (ML) Analysis
You don't need to be a data scientist to understand complex model outputs. Faybee analyzes your machine learning results and provides clear, proper summarizations. By breaking down technical ML outcomes into actionable insights, Faybee helps you easily grasp key trends and anomalies to make smarter, data-driven decisions instantly.
How to Analyze ML Results:
- Navigate to the Machine Learning module.
- Click on View for your desired model, then proceed to the Analysis tab.
- Click the Analyse Results button to prompt Faybee to begin summarizing the data.
- Once the summarization is complete, the View Analysis button will appear. Click it to read Faybee's generated insights.
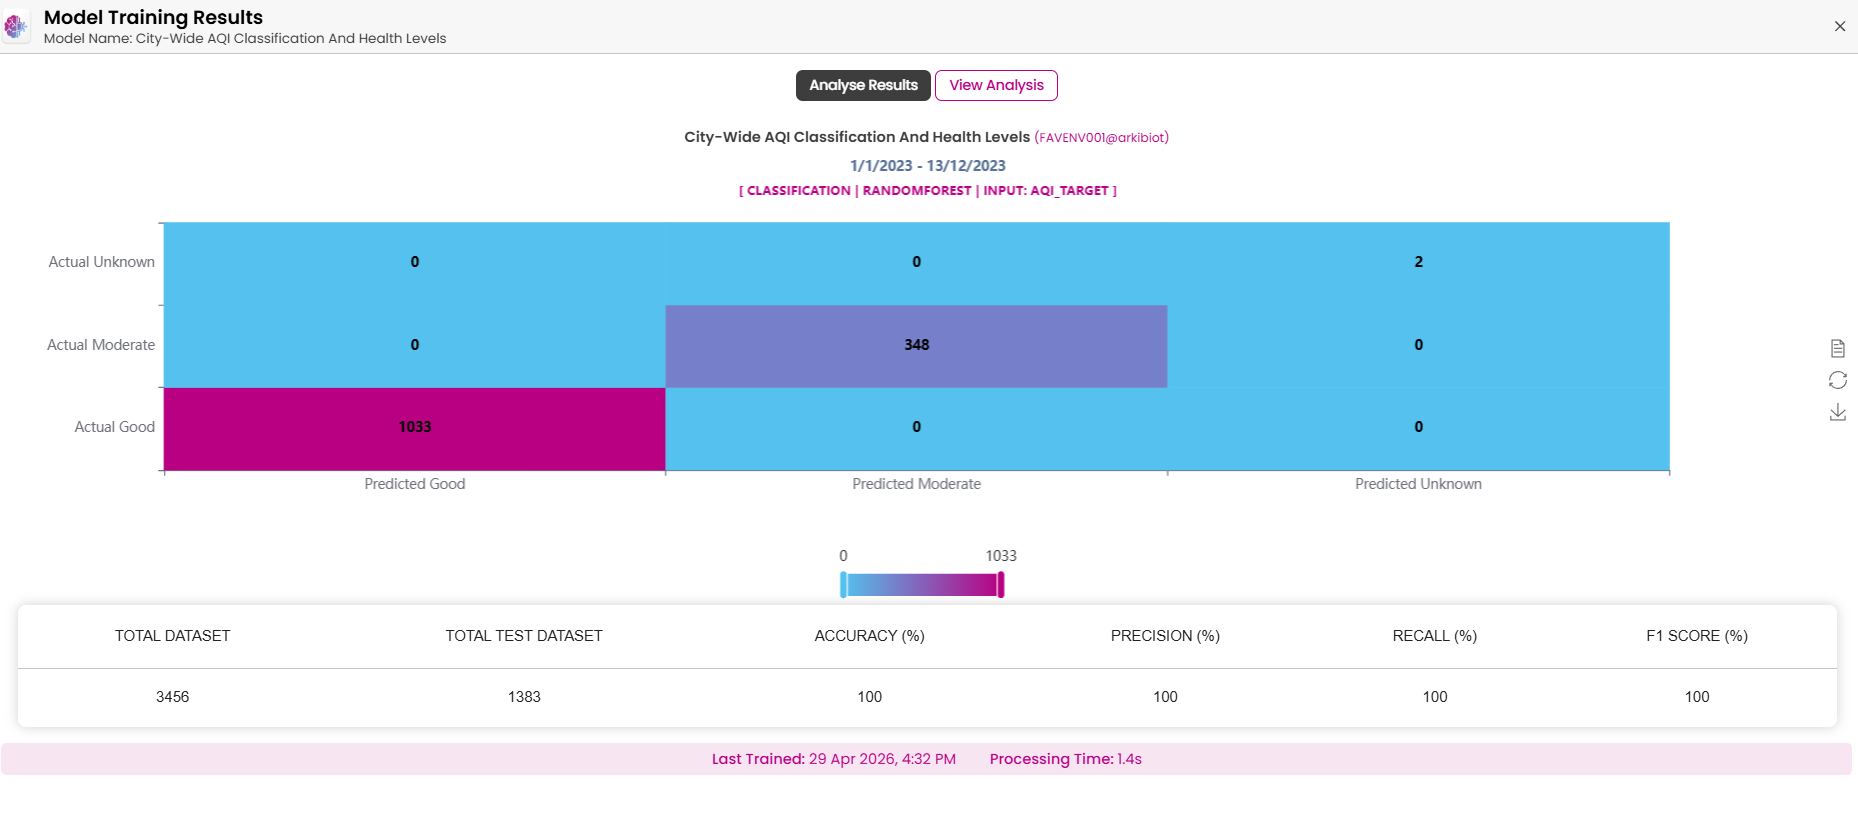
3. Automated Report Generation
Say goodbye to manual data compilation. Faybee can automatically extract data directly from your analytic module dashboard and gather your insights into comprehensive, professional reports. Faybee generates polished reports with easy-to-read summaries that are ready to share with your team or stakeholders in just a few clicks.
How to Generate a Report:
- Initiate Report Generation: Navigate to your desired Analytics dashboard. At the top right corner of the screen, click the GENERATE REPORT button.
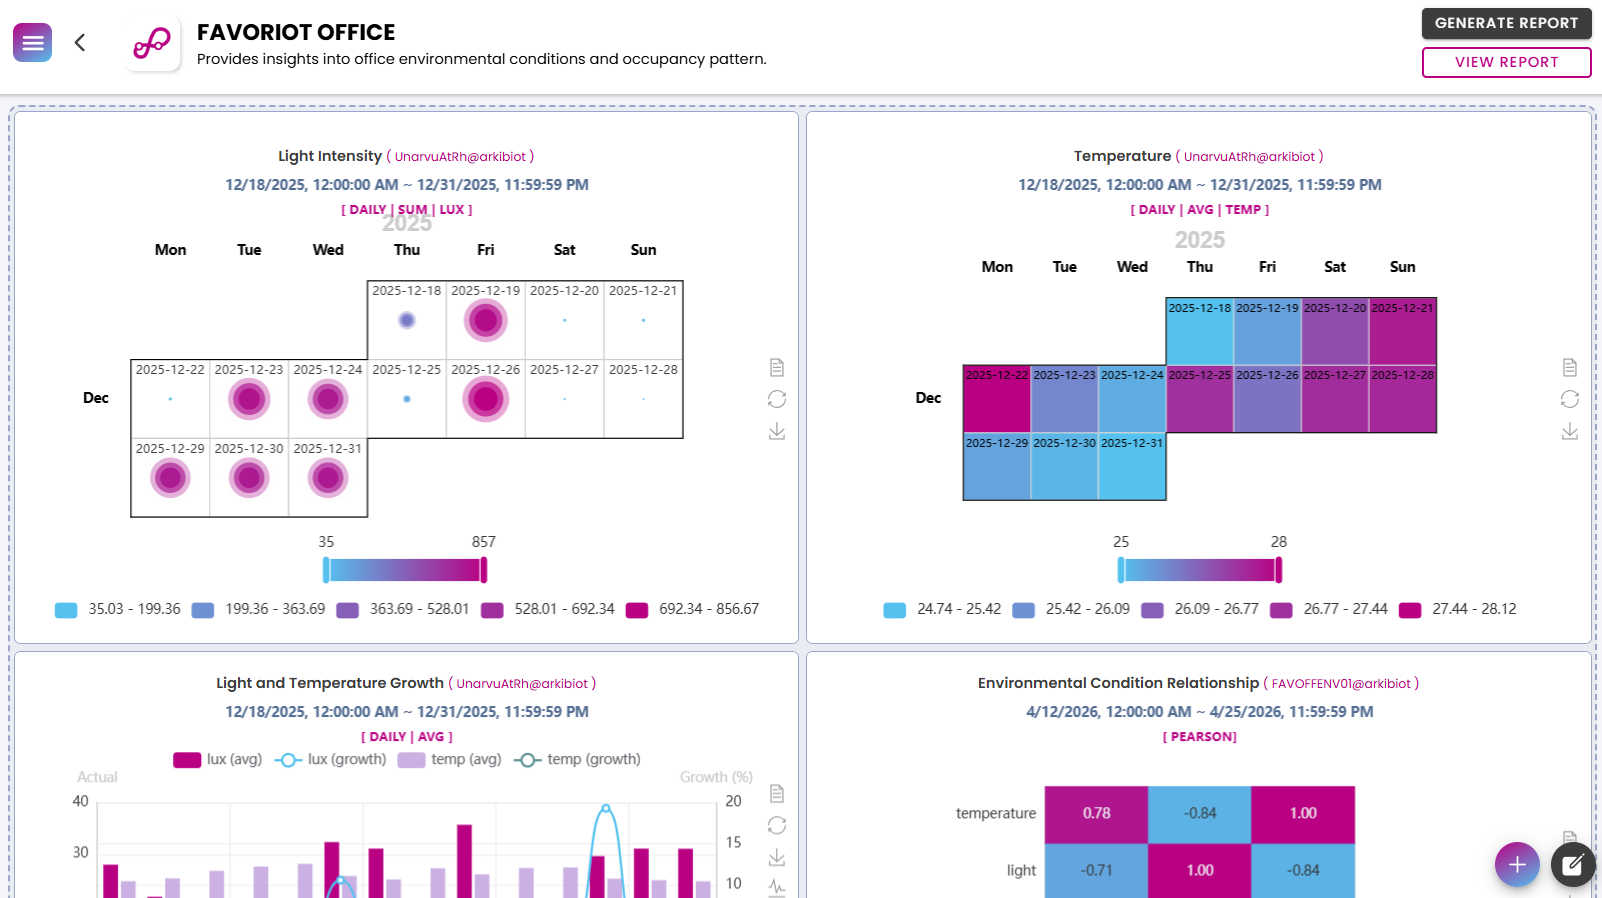
- Setup Prompt and Timezone: A "Generate Report" dialog will appear. Enter your specific instructions or context in the Prompt field (e.g., asking to identify anomalies), select your Timezone, and click Confirm to begin the AI report generation.
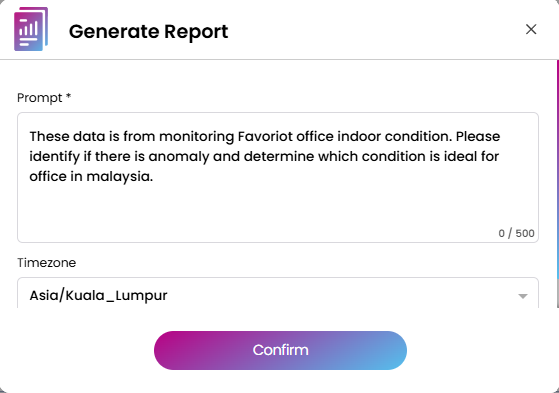
- View the Report: Once the generation process is complete, click the VIEW REPORT button (located just below the Generate Report button on the dashboard) to open and read your comprehensive AI-generated PDF report in new tab. If your browser blocks pop-ups, click Always allow pop-ups and redirects from https://platform.favoriot.com to ensure reports open correctly.

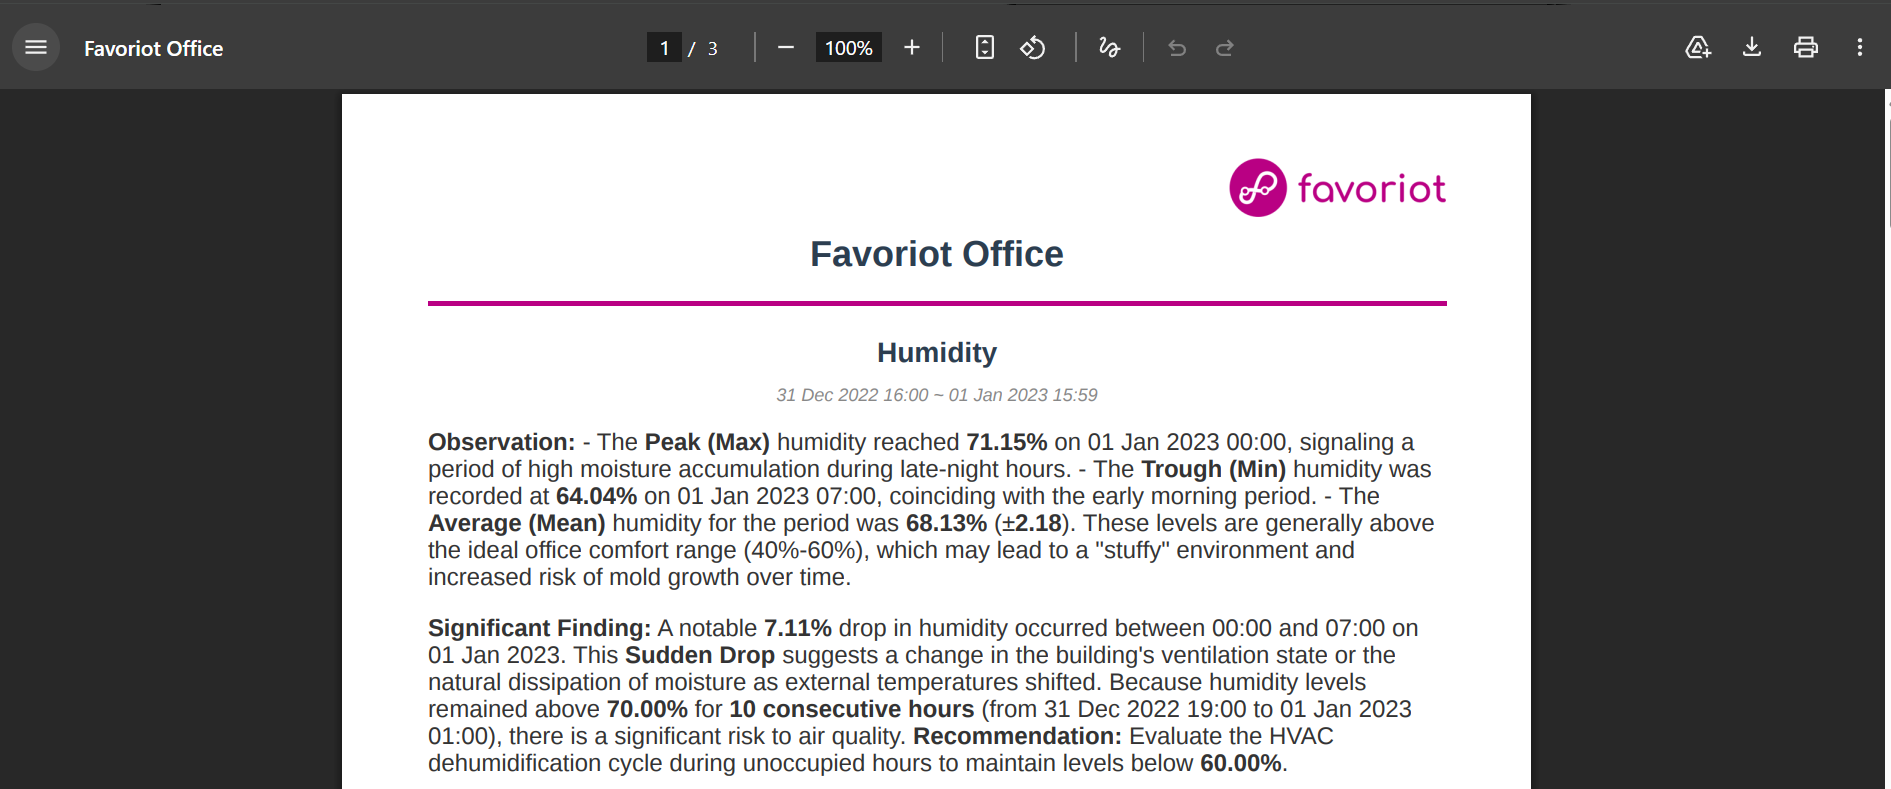
AI Credit System
The AI Credit System manages the consumption of Generative AI services within the Favoriot Platform.
Here is a breakdown of how the AI credit system works:
1. Daily Free Credits
Users are granted a specific number of free credits every day depending on their subscription tier. These reset at gmt 0.
- Free: 10 credits/day
- Lite: 25 credits/day
- Beginner: 50 credits/day
- Developer: 100 credits/day
2. Deduction & Token Conversion Rules
The platform uses a pre-deduction and token-based adjustment mechanism to calculate credit costs:
- Pre-deduction: When an AI request starts, 1 credit is immediately pre-deducted as an estimate.
- Token Conversion: Actual credit usage is calculated based on the total number of tokens utilized. The total tokens are calculated by combining the user prompt, data stream/context, system prompt, and the AI's generated output.
- Cost Formula: 1 credit = 6,000 tokens. The system calculates the final cost by rounding up (
ceil(total_tokens / 6000)). - Minimum Cost: Every AI request costs at least 1 credit.
- Refunds/Adjustments: If a request fails, the pre-deducted credit is refunded (Refund - Failed Operation). If the operation uses more than 6,000 tokens, the system applies an Additional Token Charge.
4. Viewing Your AI Credit Balance
You can easily check your remaining AI Credits from your dashboard. Navigate to the Overview page and look under the Others section at the bottom right. You will see your current AI Credit Balance displayed alongside your total daily quota.
5. Tracking AI Credit Utilization
You can monitor exactly how your AI Credits are being consumed by checking the Activity Logs.
- Navigate to the Activity Logs module.
- Look for entries where the Action corresponds to AI tasks (e.g.,
Ml Analyze,Report Generation,Assistant). - Click the View icon (eye symbol) under the Details column to see a breakdown of the specific request. The dialog will display the exact
credits_charged,input_tokens,output_tokens, andtotalTokensused for that operation.
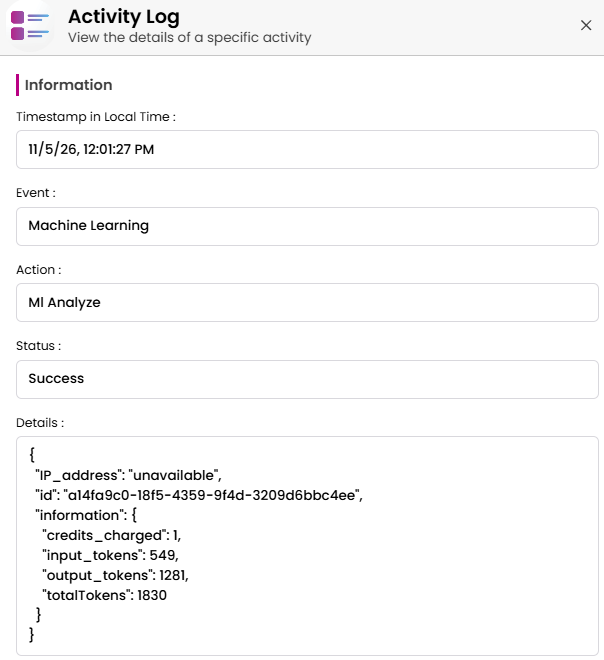
FEATURES
Export & Import
This document provides a brief explanation of the export and import features for the Device, Gateway, Dashboard, Analytic, and Rule modules.
The export and import capabilities allow users to back up, duplicate, and migrate configurations, architectures, and UI layouts via JSON files. This facilitates seamless restoration and rapid deployment of identical setups across different instances, groups, or platform accounts—all while avoiding ID conflicts and automatically excluding sensitive data such as access tokens.
Note: These features enable seamless configuration transfers across different Favoriot platform accounts.
UI/UX Representation
You can find the corresponding actions using these icons consistently across all modules:
- Import: Look for the IMPORT button, which features a document icon containing a cloud with an upward-pointing arrow (upload symbol).
- Export: Look for the download arrow icon (a downward-pointing arrow into a tray). You will typically find it grouped with other action icons such as view, edit, copy, and delete.
ACTIVITY LOGS
A page dedicated for the developers to view activities made in Favoriot Platform. Activities such as log into Favoriot Platform, login time, create hierarchy, creating dashboard/analytic etc. are logged for viewing purposes.
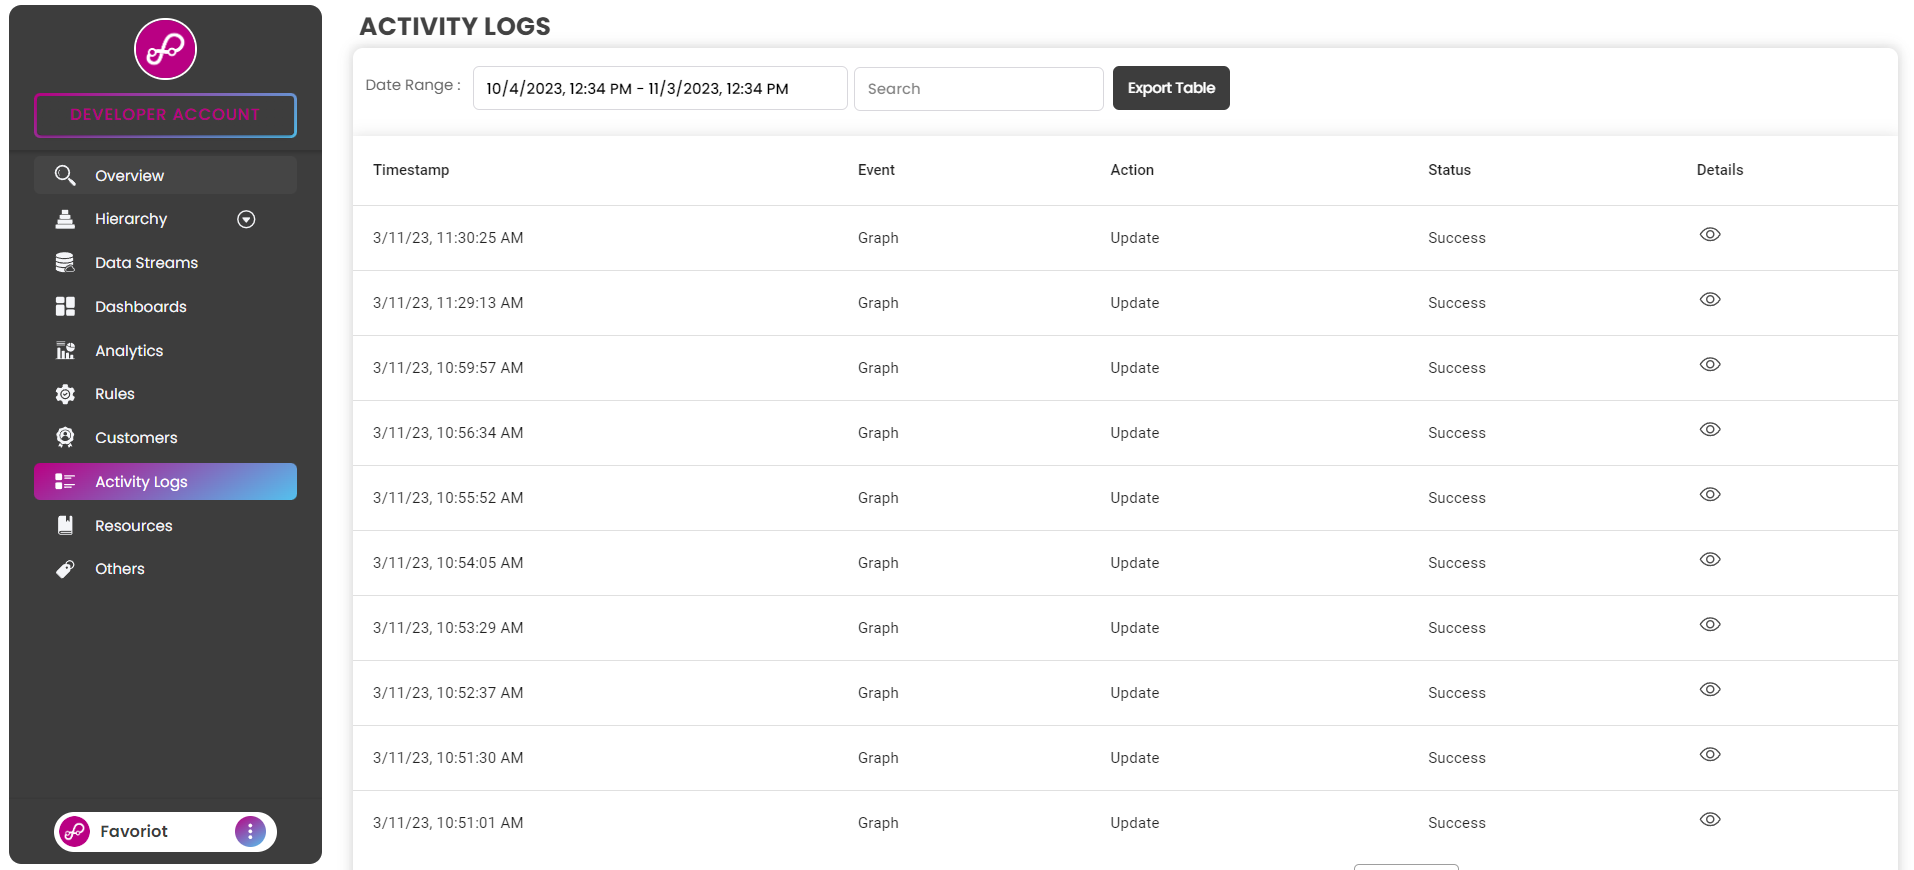
Interactions
Date Range Selection
View logs that occured on a particular date timeframe. Once date range selection has been made, simply click the 'Get Logs' button to get the logged activities of that date range. The newly acquired logs will be displayed on the table respectively.
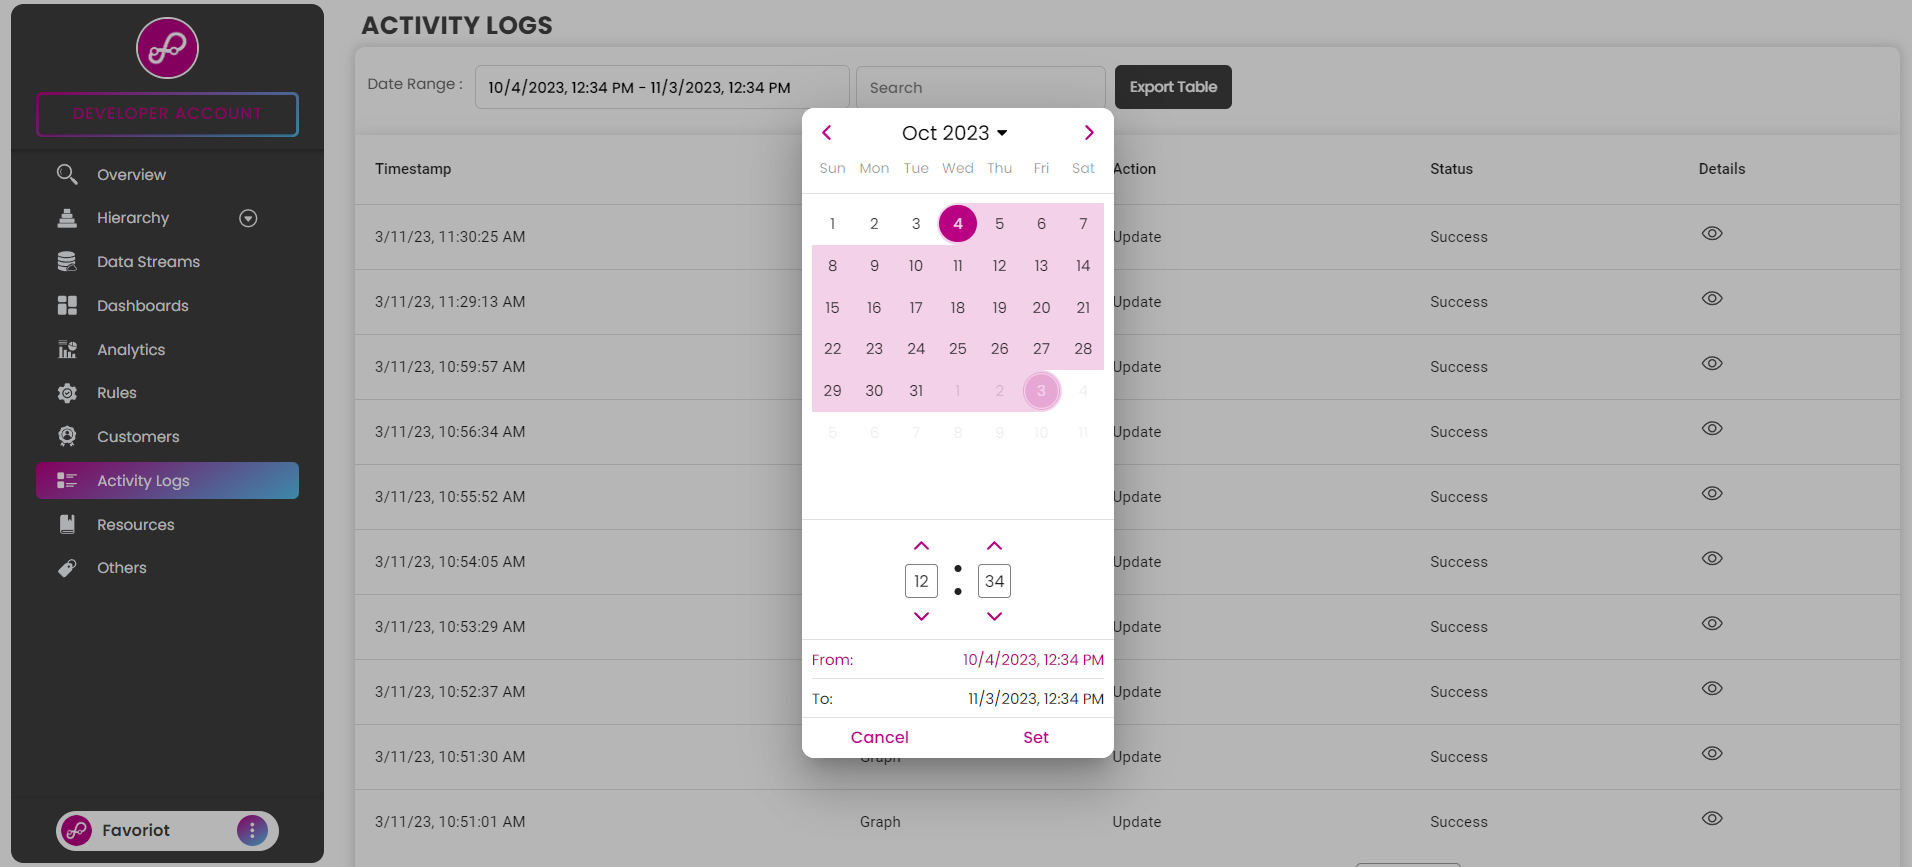
Misc Log Data
To view more info regarding the a particular log, click on the eye icon.
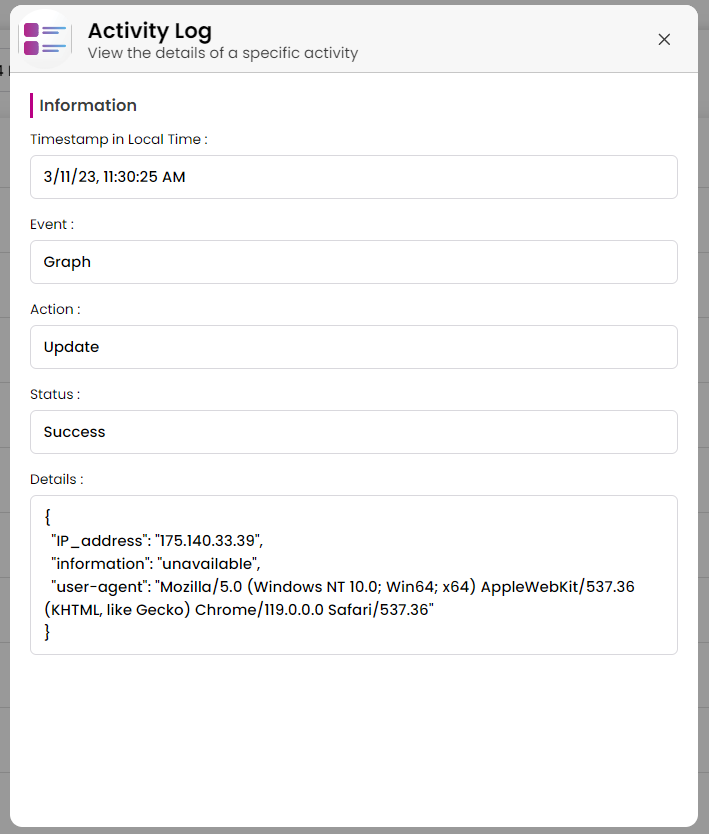
TUTORIALS
This section provides video tutorials and sample code on how to use the Favoriot Platform and connect various devices from different platforms.
Video Tutorials & Source Code
1. IoT Environment Monitoring System
A complete IoT environment monitoring solution that tracks temperature, humidity, and other environmental parameters.
Source Code: https://github.com/Favoriot/IoT-Environment-Monitoring-System
2. Real-Time Face & Smile Detection
An AI-powered project that performs real-time face and smile detection using the Favoriot Platform.
Source Code: https://github.com/Favoriot/Real-Time-Face-and-Smile-Detection
3. Robo Pico with Favoriot Platform
Integration guide for connecting Robo Pico devices to the Favoriot Platform.
Source Code: https://github.com/Favoriot/ROBOPICO-with-FAVORIOT-by-Syakila
4. Favoriot Edge Gateway
Learn how to set up and configure the Favoriot Edge Gateway for your IoT deployments.
Source Code: https://github.com/Favoriot/Favoriot-Edge-Gateway
5. Hibiscus Sense (ESP32) Bluetooth Gateway to Favoriot Platform
Connect Hibiscus Sense ESP32 devices via Bluetooth to the Favoriot Platform.
Source Code: https://github.com/Favoriot/Hibiscus-Sense-Esp32-Bluetooth-BLE
6. RPC via REST API using Hibiscus Sense
Video tutorial demonstrating how to implement Remote Procedure Calls (RPC) using REST API with Hibiscus Sense devices.
Watch Tutorial: https://youtu.be/jhKAFyjxNEw?si=D5ZaOeCzuNAV1Qcb
7. Telegram Group Notification using Favoriot Platform Rule
Learn how to set up automated Telegram notifications using Favoriot Platform rules.
Watch Tutorial: https://youtu.be/XYwQZuwaUpg?si=KN2V2y3zPHxjB8tD
8. Favoriot REST API to Grafana
Integrate Favoriot REST API data with Grafana for advanced visualization and monitoring.
Watch Tutorial: https://youtu.be/bufC3OvrA8U?si=DcDXKj7VnpqU8V2n
9. Favoriot REST API to InfluxDB
Connect Favoriot REST API to InfluxDB for time-series data storage and analysis.
Watch Tutorial: https://youtu.be/BSPz-uy_hwA?si=bKna6ry0etZr5sQf
10. Favoriot Platform Rules - Forward Data to Firebase
Learn how to configure Favoriot Platform rules to forward data to Firebase.
Watch Tutorial: https://youtu.be/rZCtjOnUAoA?si=SIEFrhvve1f1pdeX
11. Sensor Data from Favoriot Data Streams to Postman
Tutorial on retrieving sensor data from Favoriot Data Streams using HTTP GET requests in Postman.
Watch Tutorial: https://youtu.be/yuFtmTIHfQA?si=6wpkAs7e53bk0FWv
Getting Started Tutorials
For Beginners
If you're new to the Favoriot Platform, we recommend starting with these tutorials:
- Create Your First Project - Learn how to set up a project container
- Add Devices - Register your first IoT devices
- Send Data - Start streaming data from your devices
- Create a Dashboard - Visualize your data with widgets
For Advanced Users
Explore advanced features:
- Rule Engine Setup - Create automation workflows
- Edge Gateway Configuration - Set up edge computing
- Firmware OTA Updates - Implement over-the-air updates
- API Integration - Integrate with third-party services
Community Contributions
Have a tutorial or project you'd like to share? Contact us at support@favoriot.com to get your project showcased on our website.
REDEEM VOUCHER
Received a voucher or referral code from Favoriot or other iot developers? If so, do redeem them, to gain beneficial discounts for initial purchases made via Favoriot IOT Platform.
How to Redeem
- Head over to the 'Subscription' page through the 'Subcribe Now' button, select plan related to the voucher.
![[Redeem Voucher] upgrade page](images/redeem/upgrade-page.png)
Confirm order by clicking the the plan button.
Key in the voucher code and click the 'apply' button.
If voucher code is valid, the pricing of selected item will be altered based on the discount received from the voucher code.
![[Redeem Voucher] Discount Applied](images/redeem/redeem.png)
- Proceed by clicking on the 'Make Payment' button to receive many discount benefits.
CONTACT US
If you are having trouble with connecting your device to our platform or you find a bug please contact us at support@favoriot.com.
If you want your project to showcased on our website please contact us at support@favoriot.com.